The Hillsborough NJ Memorial Day parade was held on Saturday, May 27, 2023. As has become tradition, the NJ Region of the AACA was invited to have its members drive their collector cars in the parade. About 17 special interest vehicles, all at least 25 years old, participated. The weather was close to perfect, with sunny skies and comfortably warm temperatures. I enjoy this event because it’s local to me. I’ve driven it in 2017, 2018, 2019, and 2022. In 2018 it was in the Miata, and all other times in the Alfa.
The view from the driver’s seat
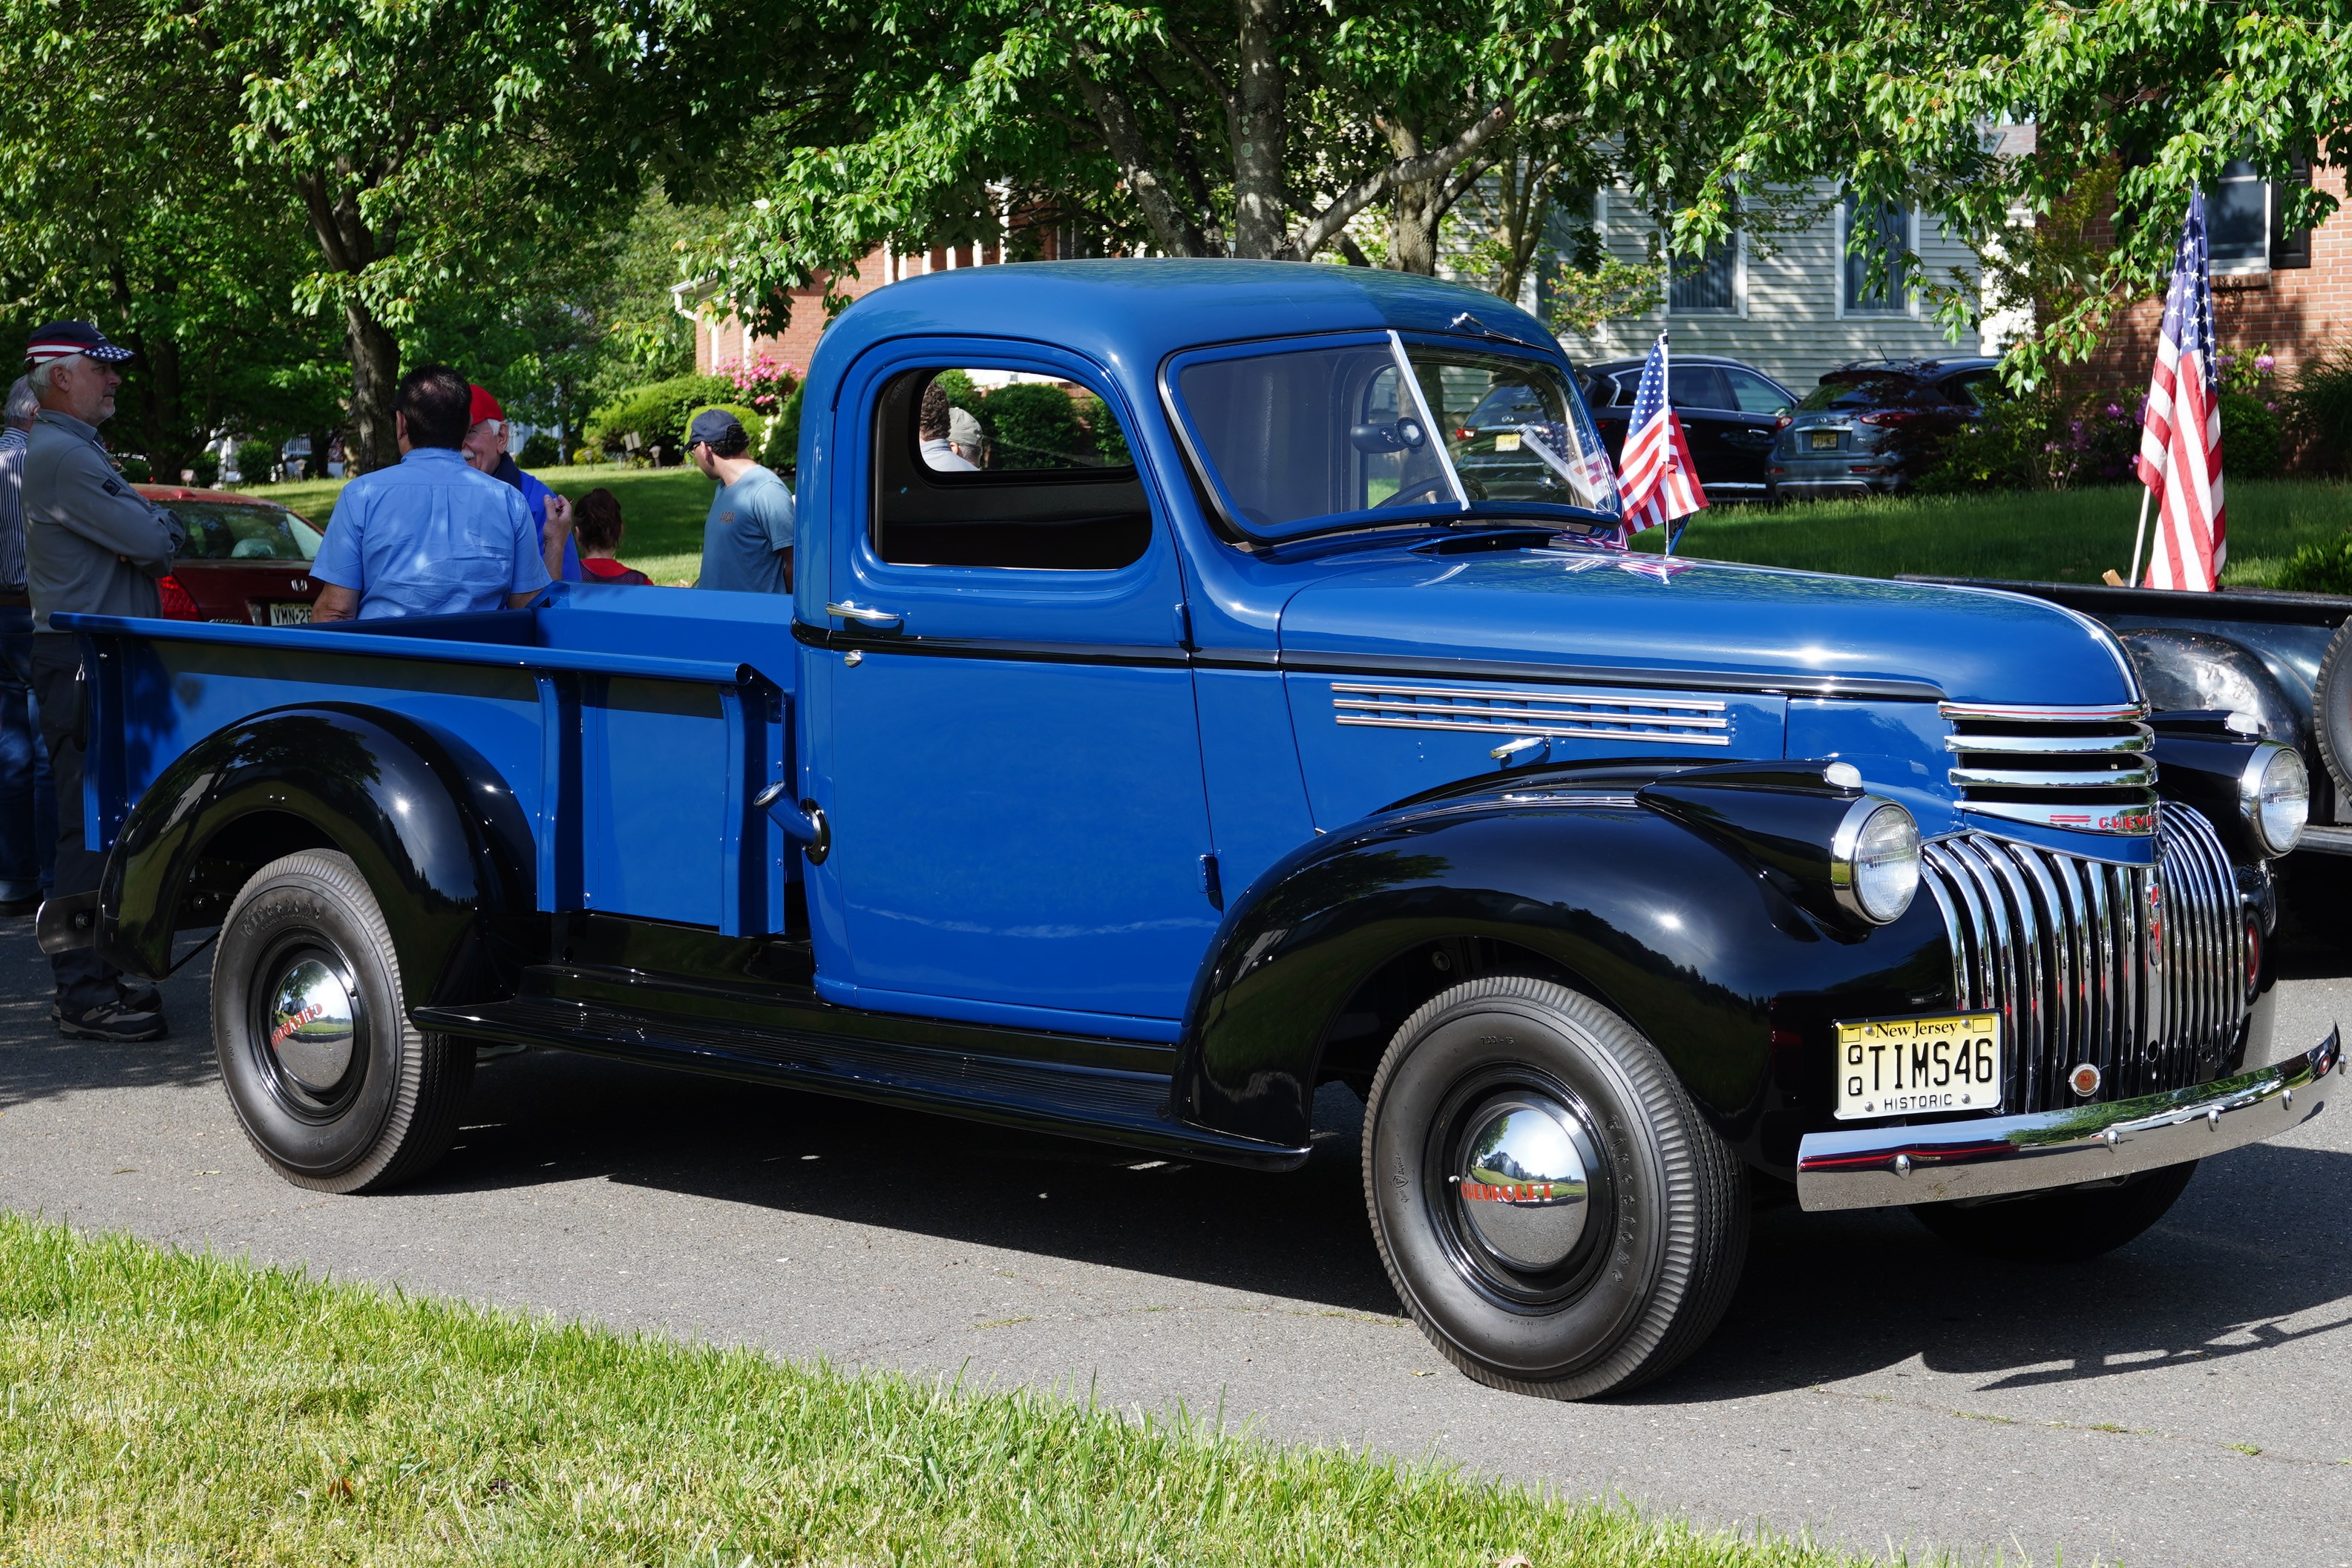
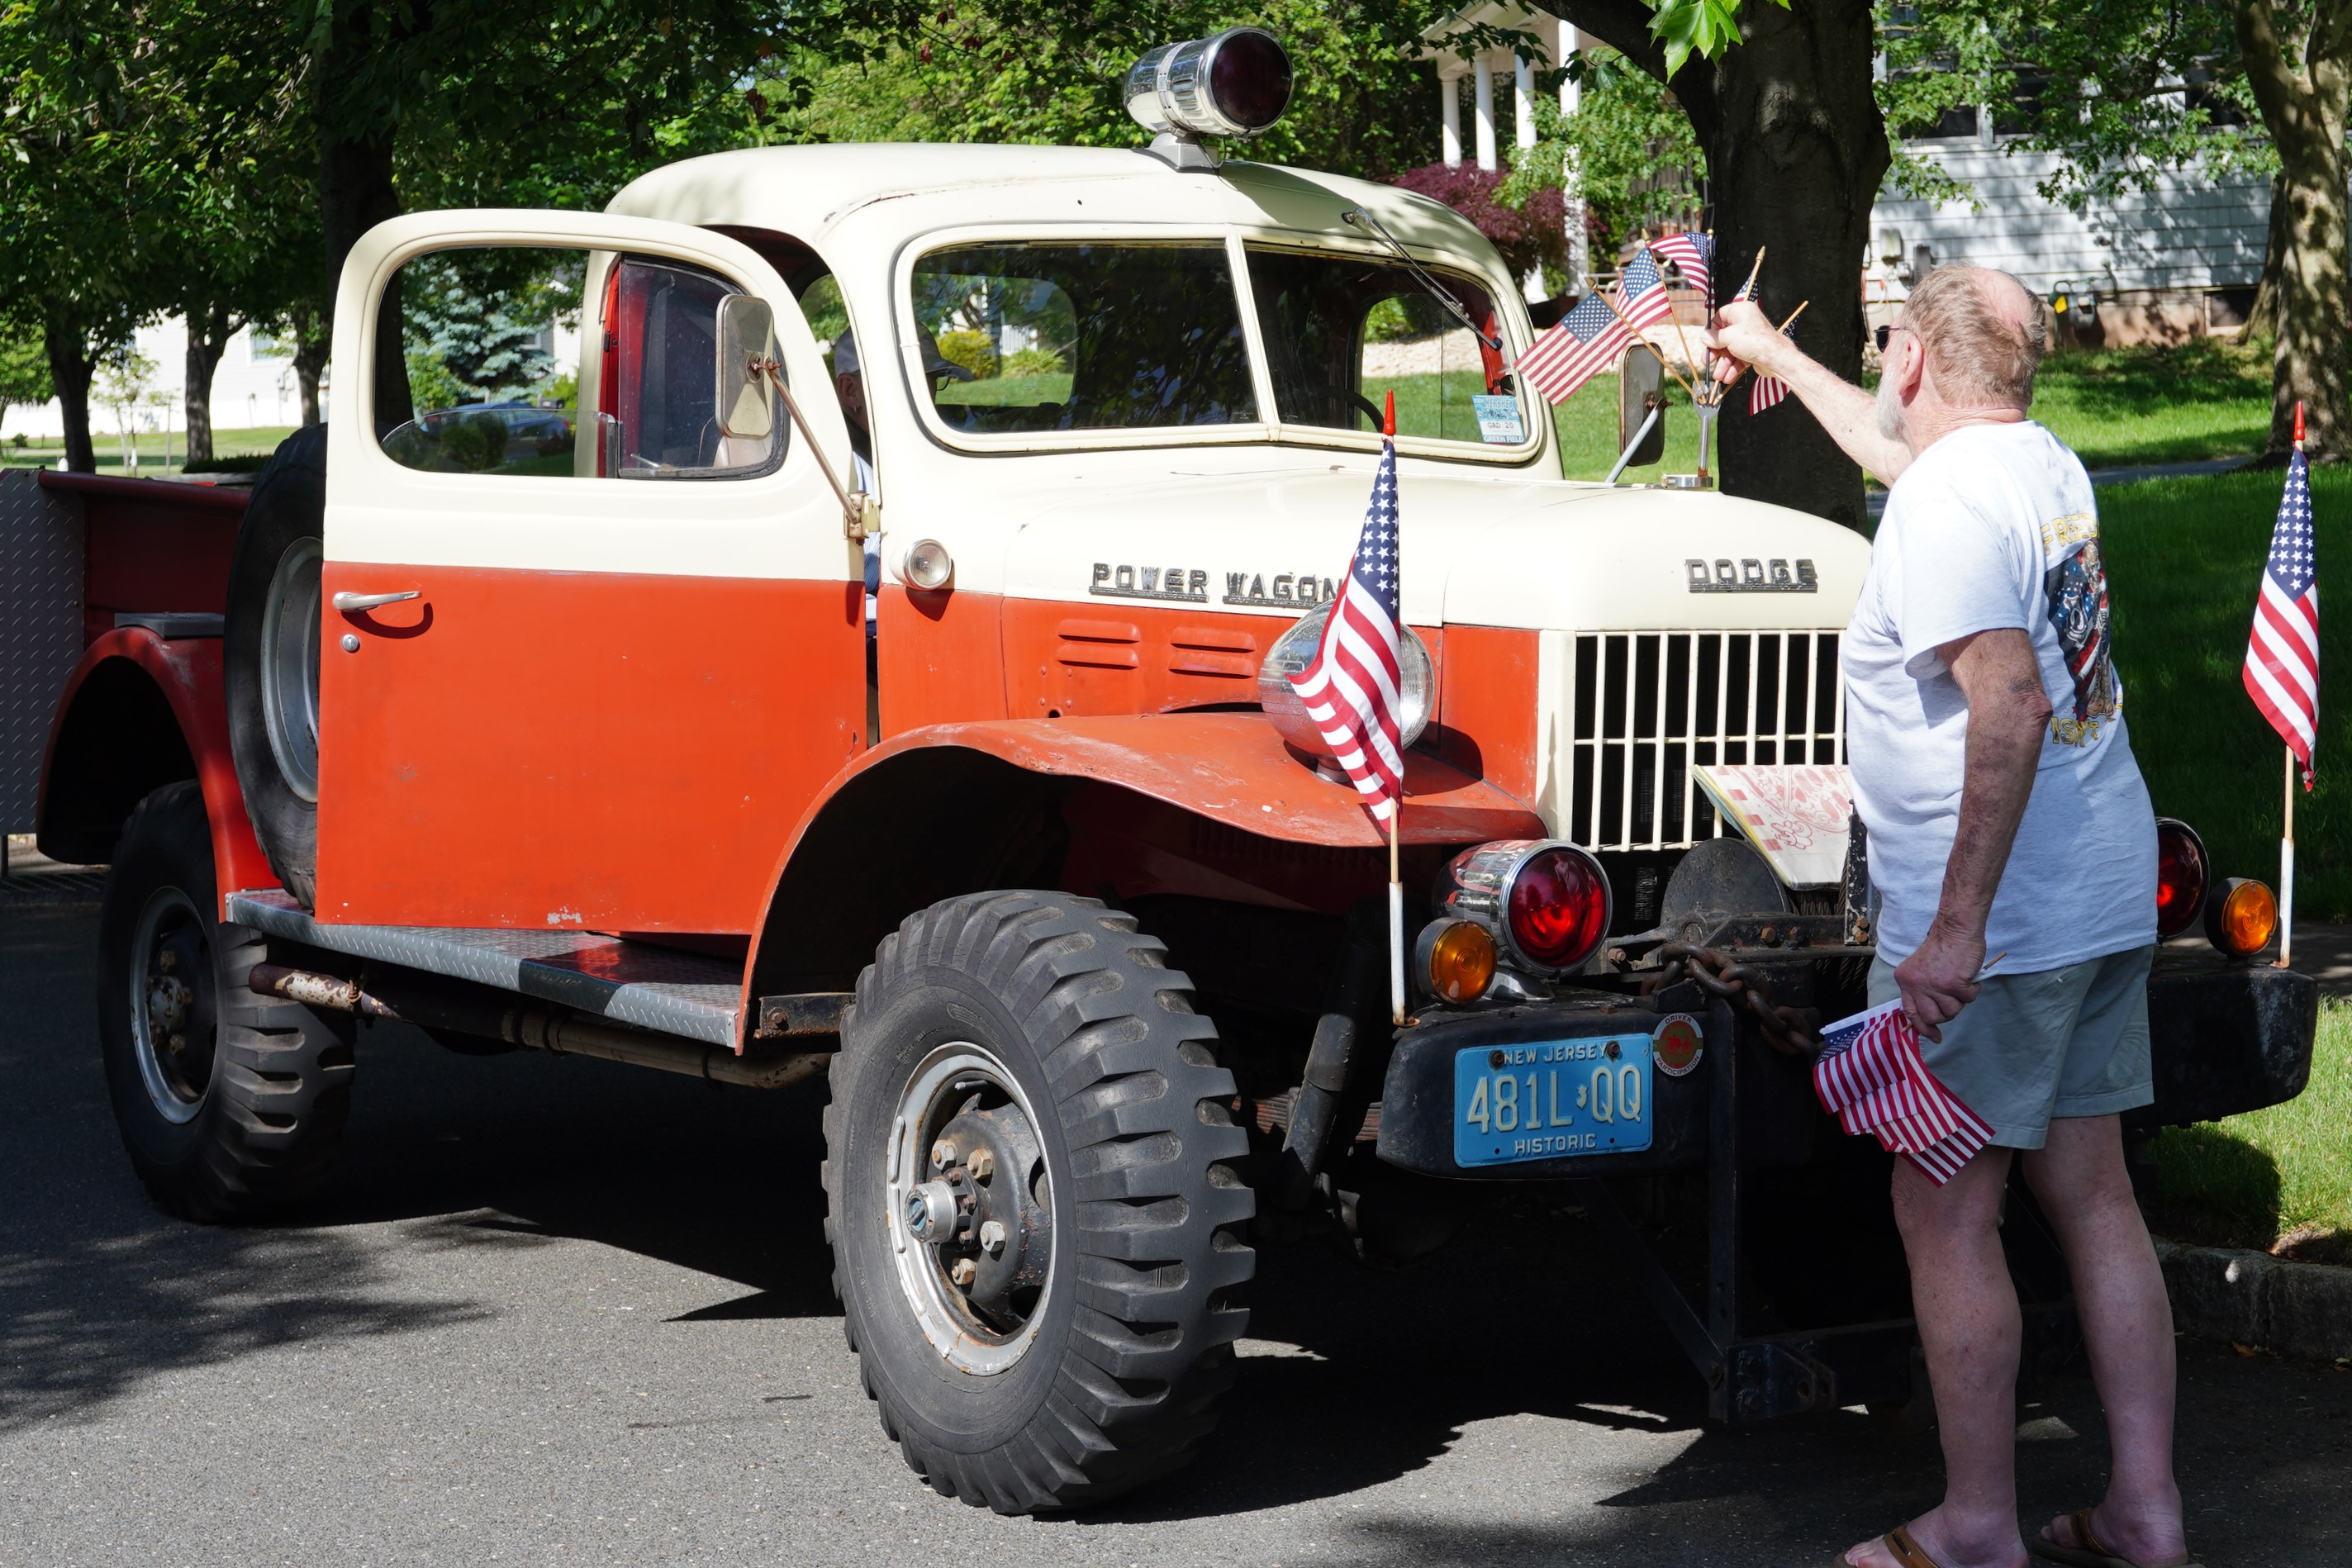
The oldest vehicles in the parade were from the ‘40s, and coincidentally, all were trucks. The 1950s were well-represented, with 7 cars, all from the Big 3. The 1960s cars included a late C1 Corvette, a Ford, two Mercurys, and the lone import in the parade, your scribe’s Alfa Romeo. A single vehicle from each of the decades of the ‘80s and ‘90s rounded it out.
All parades move slowly. This year, the puttering along seemed even slower, and then we came to a complete stop for several minutes. I learned later that one of the lead vehicles (not an AACA car) was tossing candy out the windows, and children were running into the street to retrieve it, which led to a dangerous situation. The parade was temporarily stopped so that this vehicle could be instructed to quit tossing the sweets. I almost brought the parade to a stop myself when a spectator yelled out to me “I like your Audi!”. I hit my brakes and yelled back “it’s an Alfa!”.
For me, as it has been in previous years, it’s all about the spectators. I love seeing people of all ages, races, and ethnic backgrounds who are now here in the USA and are partaking in this event. I’m glad that the NJ Region has continued its own tradition by participating each year.
1946 Chevy pickup1946 Dodge pickup1949 Dodge Power Wagon1953 Chevy
1953 Cadillac
A pair of
57 Bel Airs
1957 Chrysler1959 Ford1962 Corvette1965 Ford
1967 Alfa Romeo1967 Mercury Comet
1967 Mercury Cougar1988 Mercury Cougar
1993 Pontiac Firebird
THE TRUE COLORS OF OUR COUNTRY AS REPRESENTED BY THESE SPECTATORS:
Rich’s Repair Ramblings #9: Ten Steps to a Better Oil Change
Changing the engine oil and oil filter is one of the easiest and most straightforward maintenance jobs you can perform on your collector car. What’s easier than “pull the drain plug, swap out the filter, and add new oil”? Would it surprise you if I said that I might be able to offer up to 10 suggestions to improve the process? The following 10 Best Practices are from my own experiences. Read through the list and see if there isn’t at least one step which you can incorporate to make the next oil change a better one for your buggy.
#1. SAFETY FIRST!
It bears constant repetition: Never work under a car that isn’t properly supported. Do not use the vehicle jack (or worse, some cinder blocks) to support a car off the ground. Use quality jack stands or drive-up ramps with sufficient weight ratings when doing any work that involves sliding under something that weighs upwards of several tons. Make sure that the transmission is either in “Park” or for stick shift cars, in a forward gear. Always set the parking brake. Chocks on the rear wheels are a good idea too.
Ramps are great for oil changes, as there is no need to remove front tires
#2. DRAIN THE OIL WHEN THE ENGINE IS WARM.
Yes, “cold” (room temperature) oil will flow out the oil pan. But warm oil flows more quickly, and more importantly, takes more contaminants out with it. The engine doesn’t need to be hot – you increase the risk of burning yourself from scalding oil or a hot exhaust pipe. But if the car is cold, let it idle at least until the temperature gauge starts to move. If you don’t have a gauge, 5 minutes on a warm day should do it. If you’ve just driven the car and everything is too hot to touch, wait 20 to 30 minutes so that the oil is warm but not burning hot.
Let the temp gauge move off “C” before draining oil
#3. REMOVE THE FILLER CAP BEFORE YOU REMOVE THE DRAIN PLUG.
You’ll get faster flow (and again, remove more of the bad stuff) if you take off the oil filler cap and allow air into the engine during the drain. The cap needs to come off anyway! This is the same as punching a 2nd hole in a can when you’re trying to pour out liquid.
#4. REPLACE THE DRAIN PLUG WASHER.
The drain plug has a gasket or washer, typically made of copper or aluminum, which serves as a seal. The softer metal is designed to be crushed when you tighten the plug. But the washer can stand being crushed only so many times before it’s no longer effective at stopping leaks. The trick in replacing the drain plug washer is having a spare one on hand. (I buy them by the dozen.) And a tip to avoid a problem that even trips up the pros: make sure that the OLD washer is removed, and is not stuck to the drain plug or oil pan. If you put a new washer on the drain plug with the old one there, you’ll almost certainly have a leak.
Old washer on left shows crush marks; new washer on right
#5. ALWAYS REPLACE THE OIL FILTER.
I continue to be amazed at the number of times that someone has told me that they completed an oil change and left the old filter in place. What is the issue? Is the filter difficult to access? Is it too expensive? Do you think that the old filter has some service life left in it? If it’s hard to get to, watch some YouTube videos and figure it out. Others have. How much does a new filter cost? Stop being so cheap. Leaving the old filter in place recirculates about a quart of dirty oil directly into your fresh clean oil. It also runs the risk of the filter becoming so full of contaminants that it can no longer do its job. Always be sure to have a new filter on hand before you start the job.
#6. PRE-FILL THE OIL FILTER BEFORE INSTALLING IT.
This is one ‘best practice’ that isn’t always practical to do. I do this for one car, but not the other, simply because of the filter’s location. If the filter attaches from the bottom, I can add oil to it and keep it right-side-up, avoiding any spills when reinstalling it. However, if the filter attaches horizontally, it’s trickier. Sometimes I can add a little oil and get it on there without any spills. We’ll need to qualify this best practice with the caveat “it depends”. See Tip #9 below.
#7. TIGHTEN THE OIL FILTER CORRECTLY.
A while back, my neighbor had to return her car immediately after an oil change, and she was told that the tech had left the filter loose. (The person performing the job also needs to make sure that the rubber gasket from the old filter is not stuck to the engine block, for if it is, the new filter will never seal properly.) It’s just as bad, however, to overtighten the filter. I have personally witnessed technicians resort to hammering a long screwdriver through an old filter to act as a pry bar to remove an overtighened one. For most cars, oil filters should be tightened by hand, without the use of any tool. Tighten until the gasket contacts the engine, then turn the filter another 1/8 to ¼ of a turn. That’s it!
Rubber seal on old filter on left came loose; new filter on right. Box holds extra drain plug washers
#8. USE THE CORRECT VISCOSITY OIL.
Your owner’s manual will identify the specified viscosity. For most cars built in the last 50 years, vehicle manufacturers have recommended a multi-weight oil good for year-round use, with numbers like “10W-30”. The lower the number, the thinner the oil, necessary in cold weather. The higher the number, the thicker the oil, needed in hot climates. The “W” stands for winter. Using the incorrect viscosity oil can damage the engine in your old car. My Alfa Romeo calls for 20W-40 oil, but that was printed in 1967. It runs very happily (and uses no oil between changes) on 20W-50. At the other extreme, my modern iron specifies 0W-20. It would be a disaster if I were to switch these viscosities between the old and new cars! As a special note for much older AACA cars, the called-for viscosity may no longer be readily available. If your engine has been rebuilt, you may need to adjust the viscosity you use compared to what was recommended 70 or 80 years ago. Speak to other owners with similar cars to see what they use or recommend.
#9. CRANK, BUT DON’T START, THE ENGINE TO BUILD UP OIL PRESSURE.
Starting an engine immediately after an oil change runs the risk of starving critical components like bearings of needed oil. A best practice is to disable the ignition (easy on old cars by simply pulling the secondary coil wire) and cranking the engine until oil pressure builds, usually in about 5 to 8 seconds. Taking this small step helps ensure the longevity of internally lubricated engine parts.
#10. RECHECK THE OIL LEVEL 5 MINUTES LATER.
The manual states “five quarts with filter”, and that’s what you put in. But I don’t rely solely on the number of quart bottles I’ve poured. After running the engine for a few minutes, I shut it down, wait 5, then pull the dipstick (with the car on level ground). If it needs a smidgen more, now’s the time to do it. I want the peace of mind of knowing that, after an oil change, the level is exactly at the ‘full’ mark on the stick.
Rich’s Repair Ramblings #8, Repairing a ground wire
In our most recent previous Ramblings, we stated that “the number one cause of automotive electrical problems is loose, dirty, or corroded connections”. In this installment we’ll show you how to fix a loose or broken terminal connection. On our AACA cars, many electrical terminals are universal, or a standardized size; they have self-described names like ring, spade, blade, and bullet. Making a repair typically involves replacing a short piece of wire, or attaching a new connector to a wire, or both.
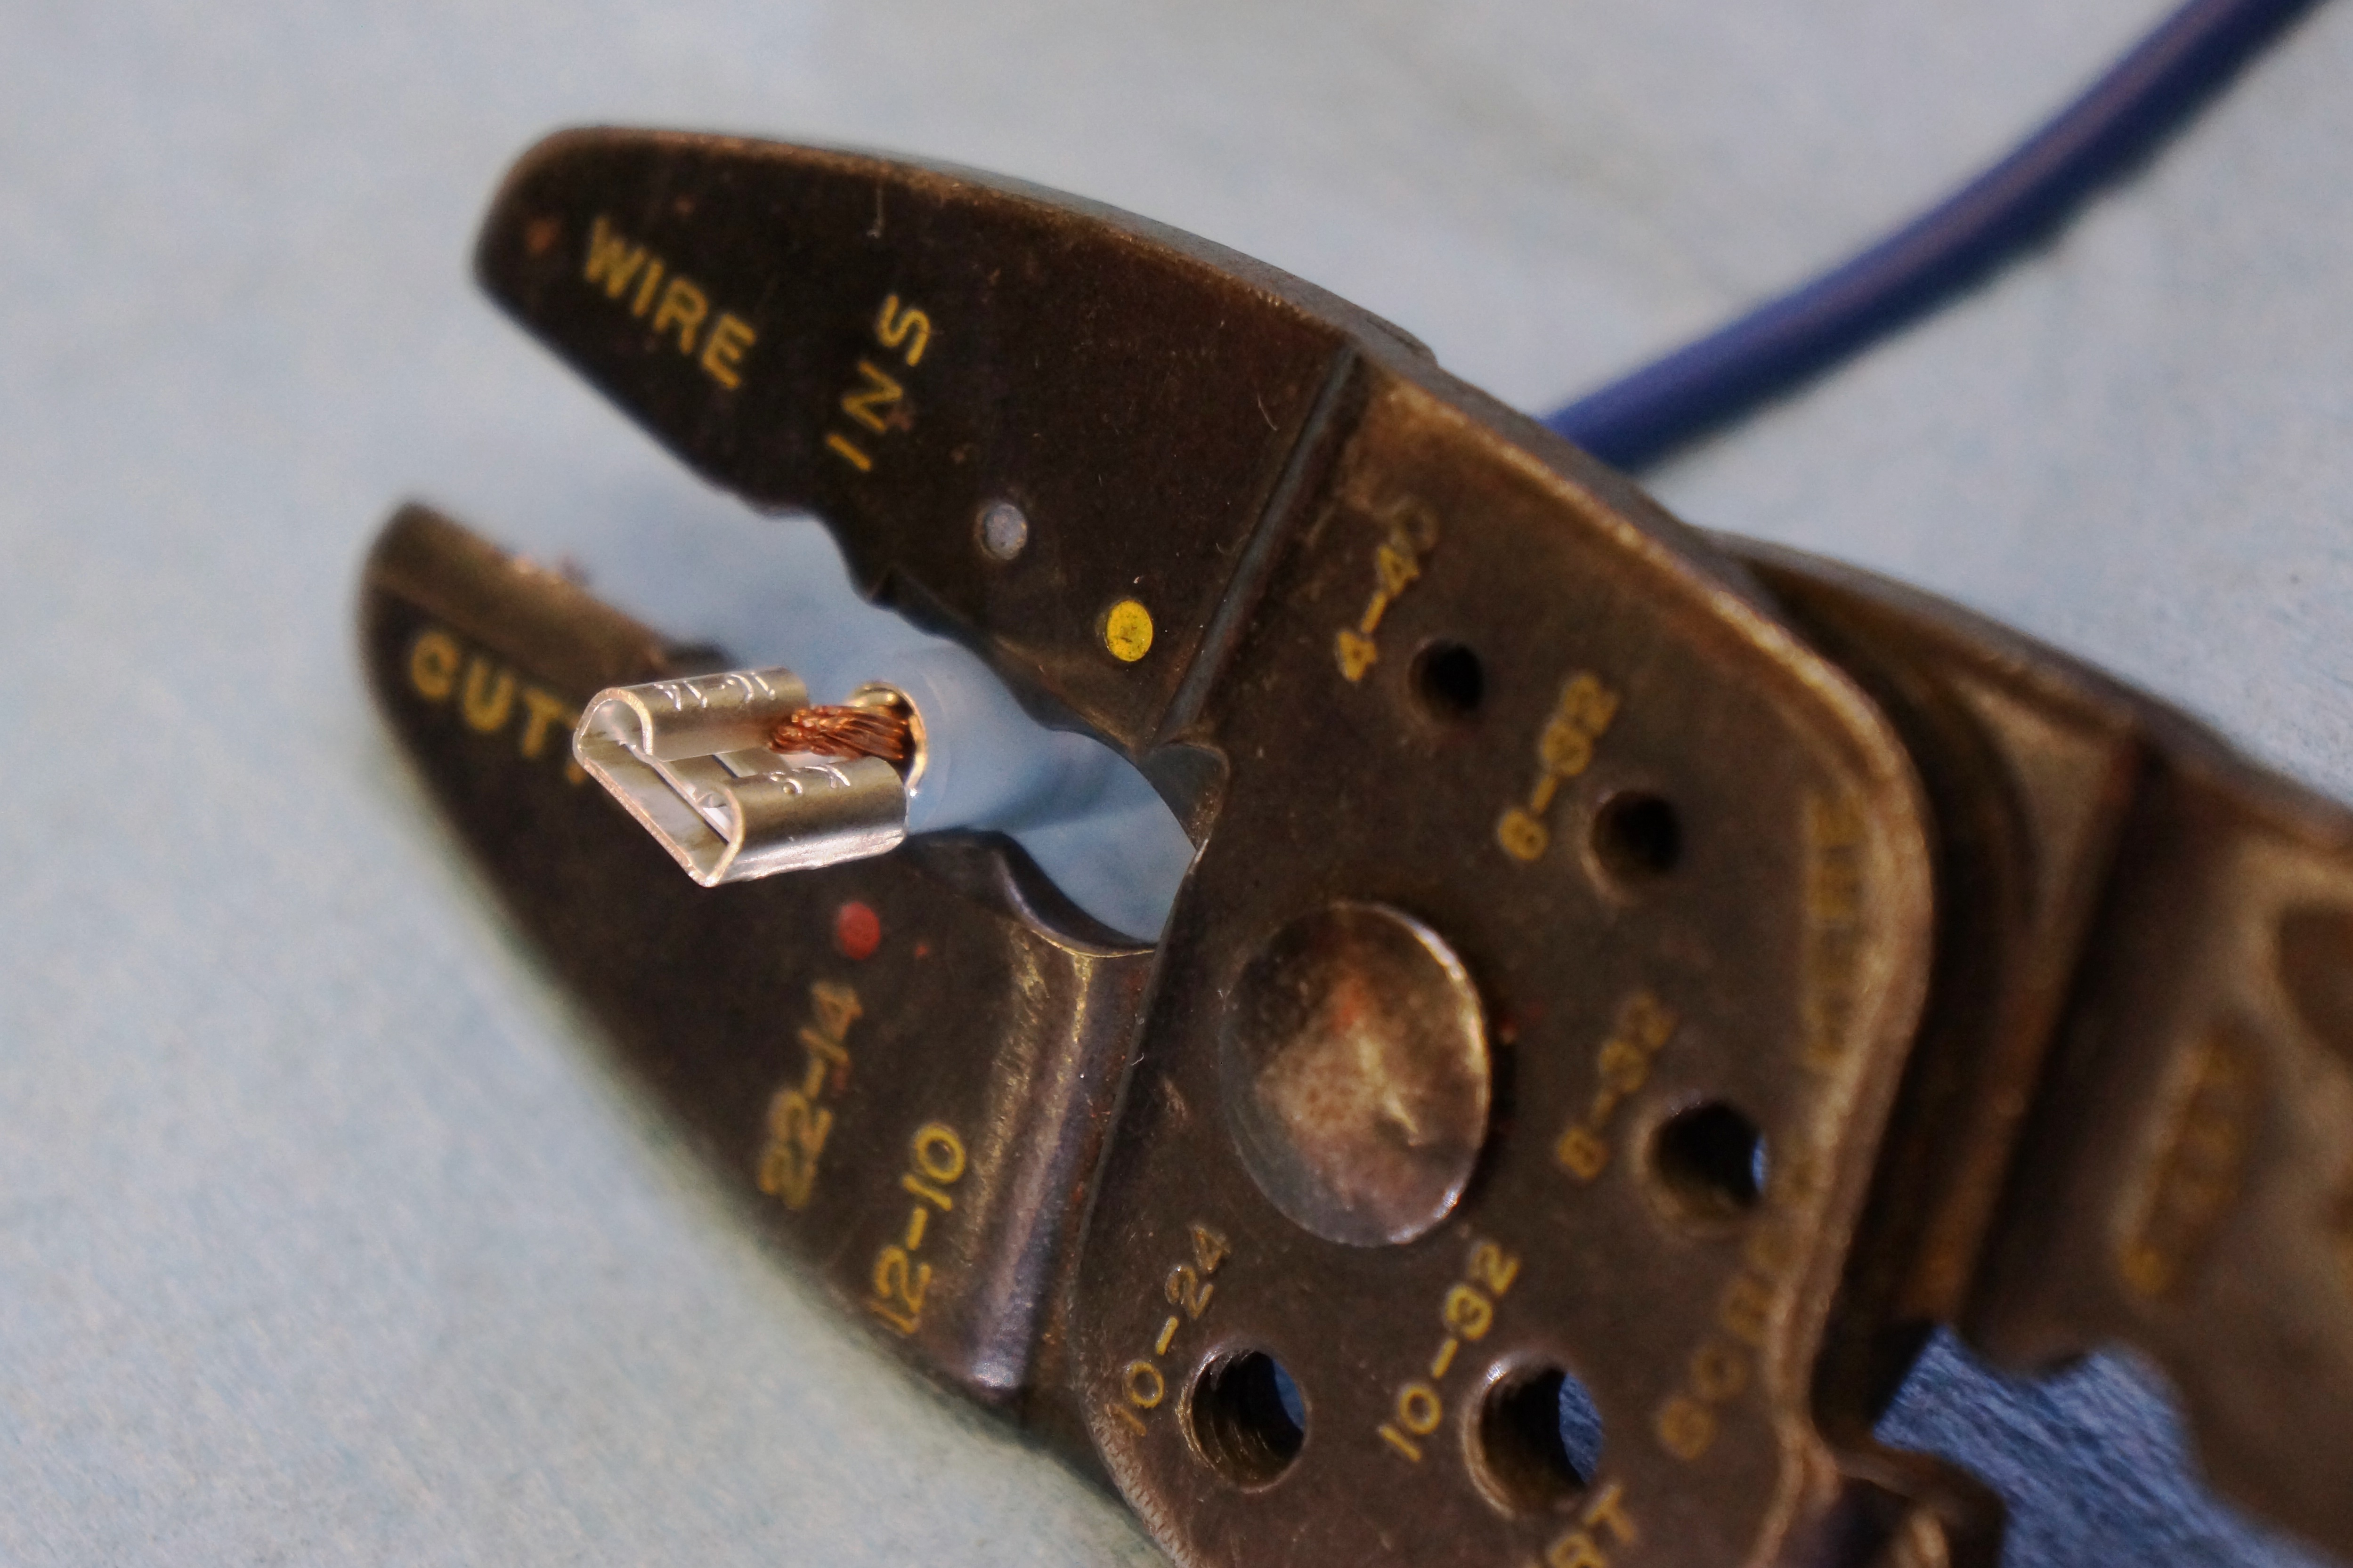
The best way to make such a repair is by soldering. However, soldering requires dedicated tools and equipment, and some practice. An alternate method is using solderless terminals, aka crimp terminals, which are quicker and easier than soldering. I’ve been successfully using them for years. They get a bad rap as unreliable, but like most repairs, there’s a correct way, and an incorrect way, to complete the job. Let’s dive in.
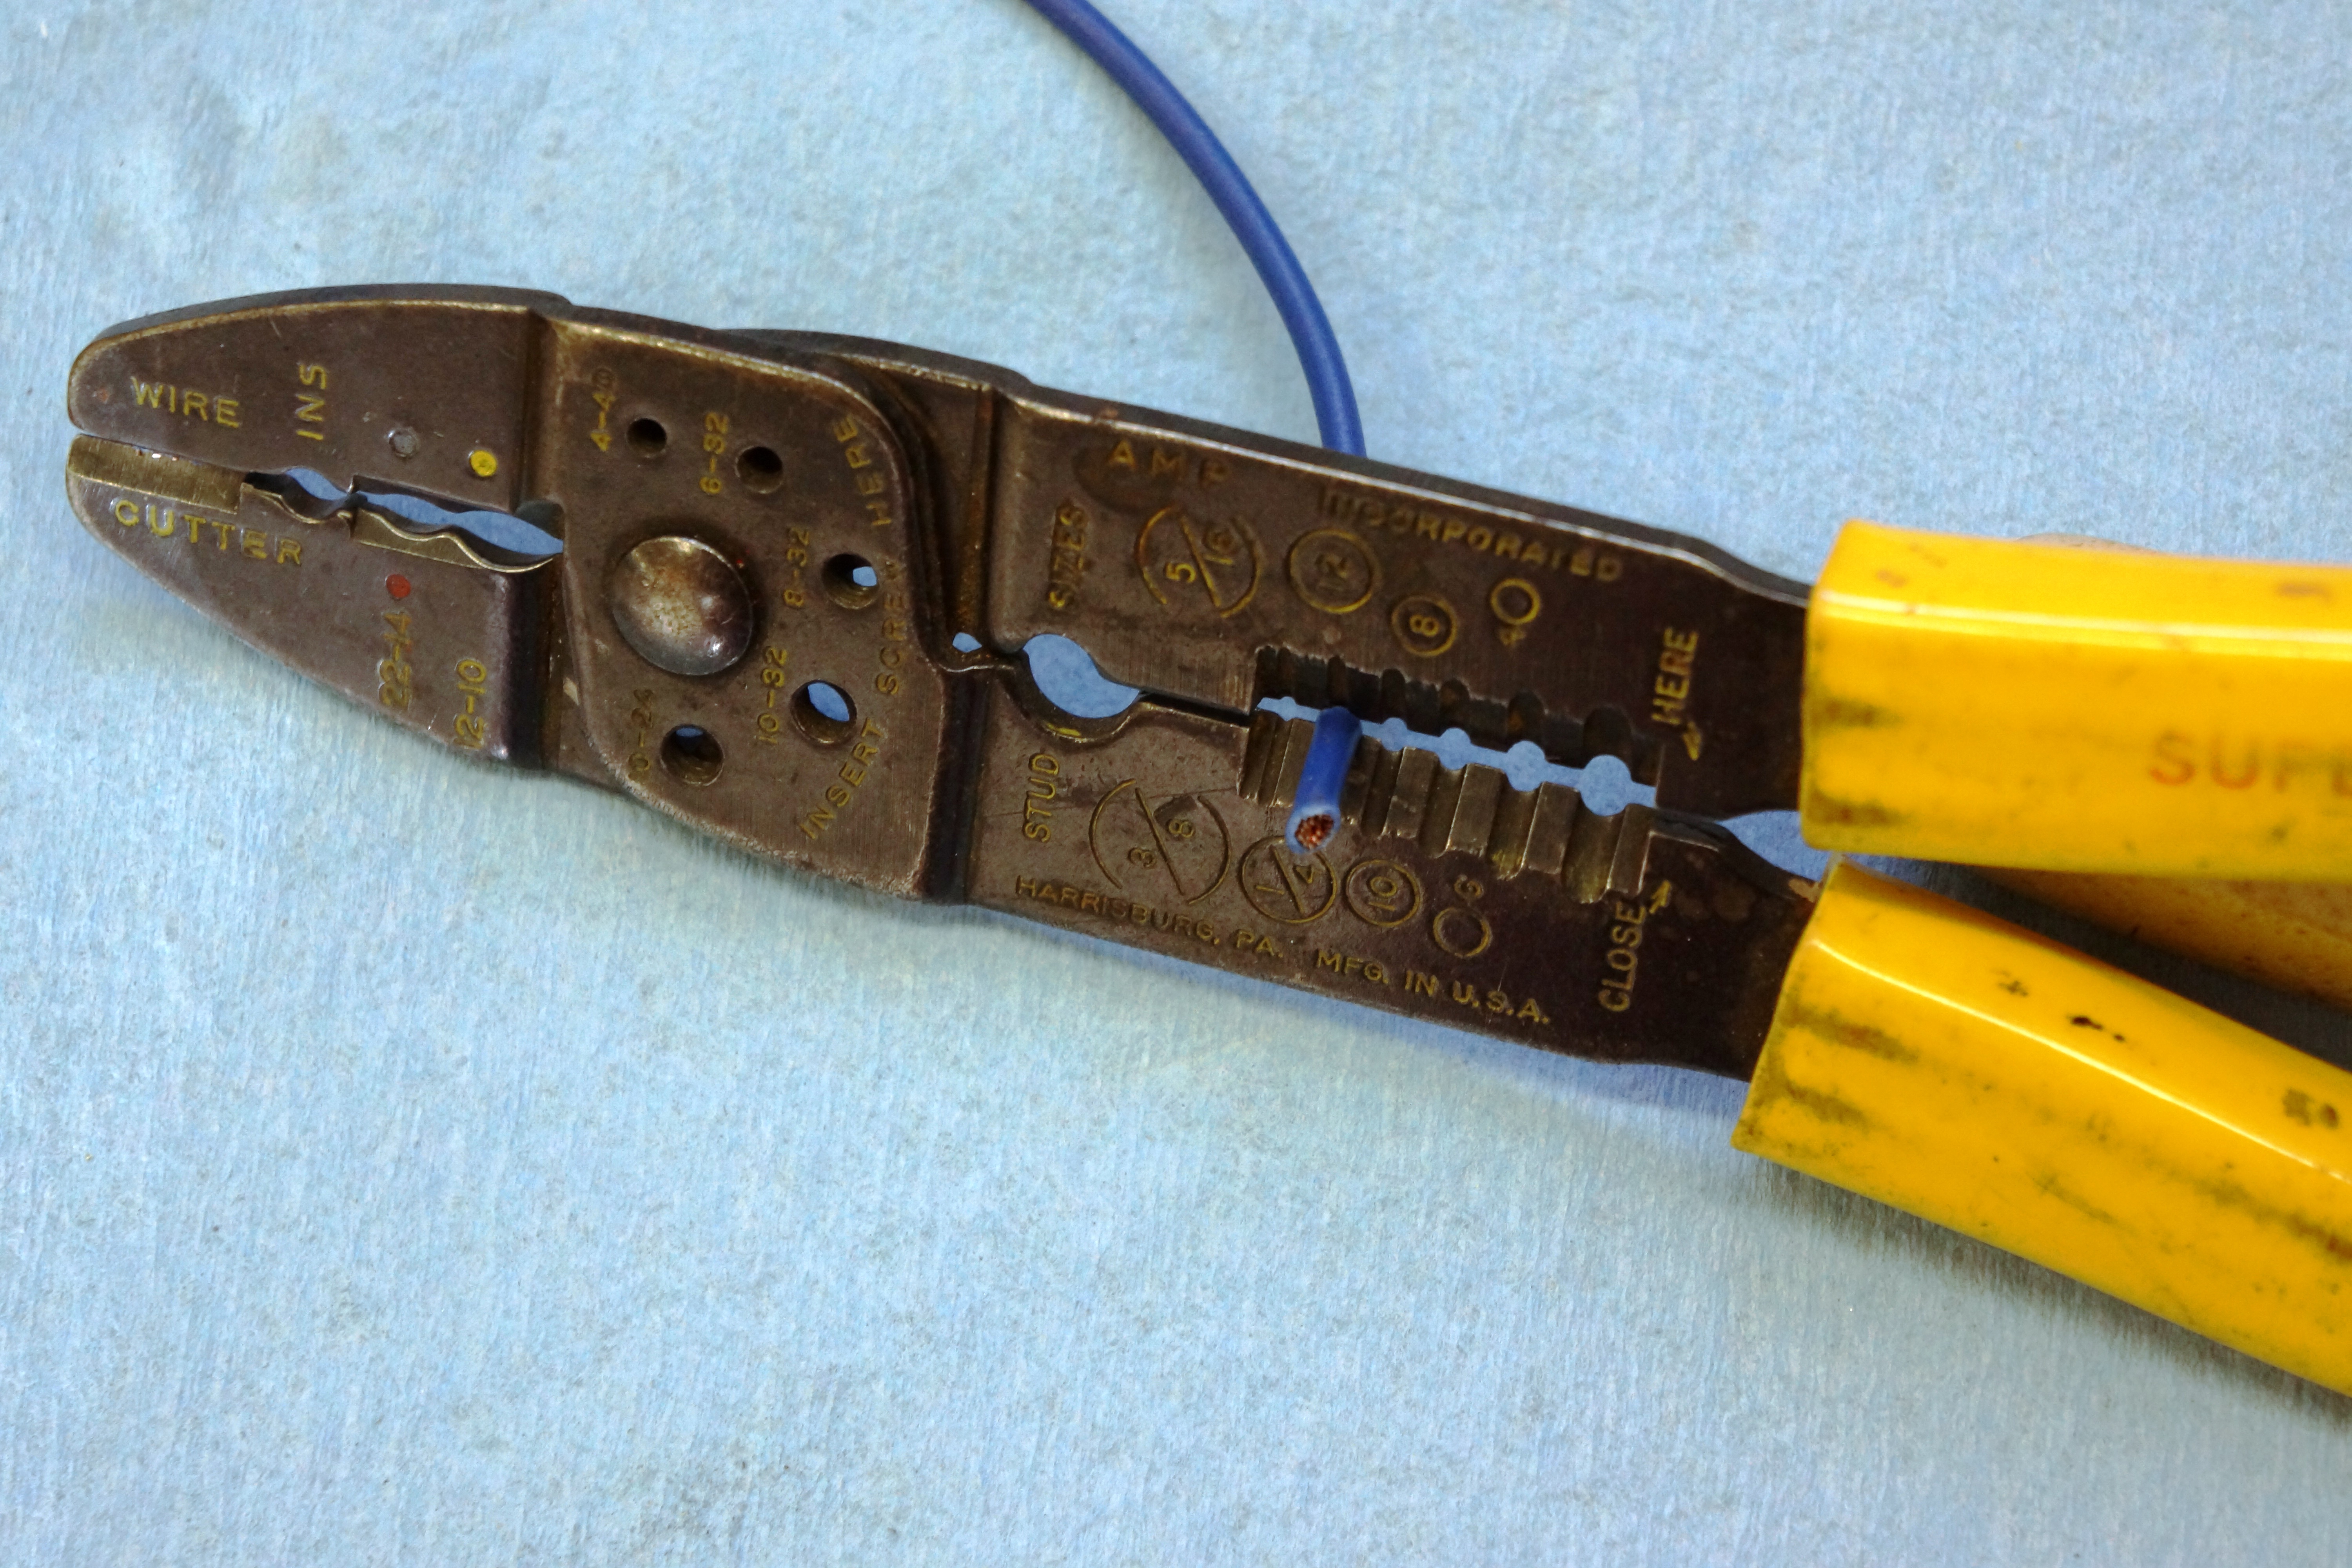
First, you’ll need these tools and supplies: wire stripper, terminal crimper, wire, appropriate terminal, and electric tape or shrink wrap. There are some very fancy stripping and crimping tools on the market, but I’ve had the same pair of yellow-handled combo cutters/strippers/crimpers forever, and they still get the job done. For wire, you’ll want the same gauge as the existing wire (gauge number DECREASES as wire thickness INCREASES- if in doubt, bring a sample to the store). For most of my car repairs, 16- or 14-gauge suffices.
L to R: stripping/crimping tool, terminal assortment, homemade test wire
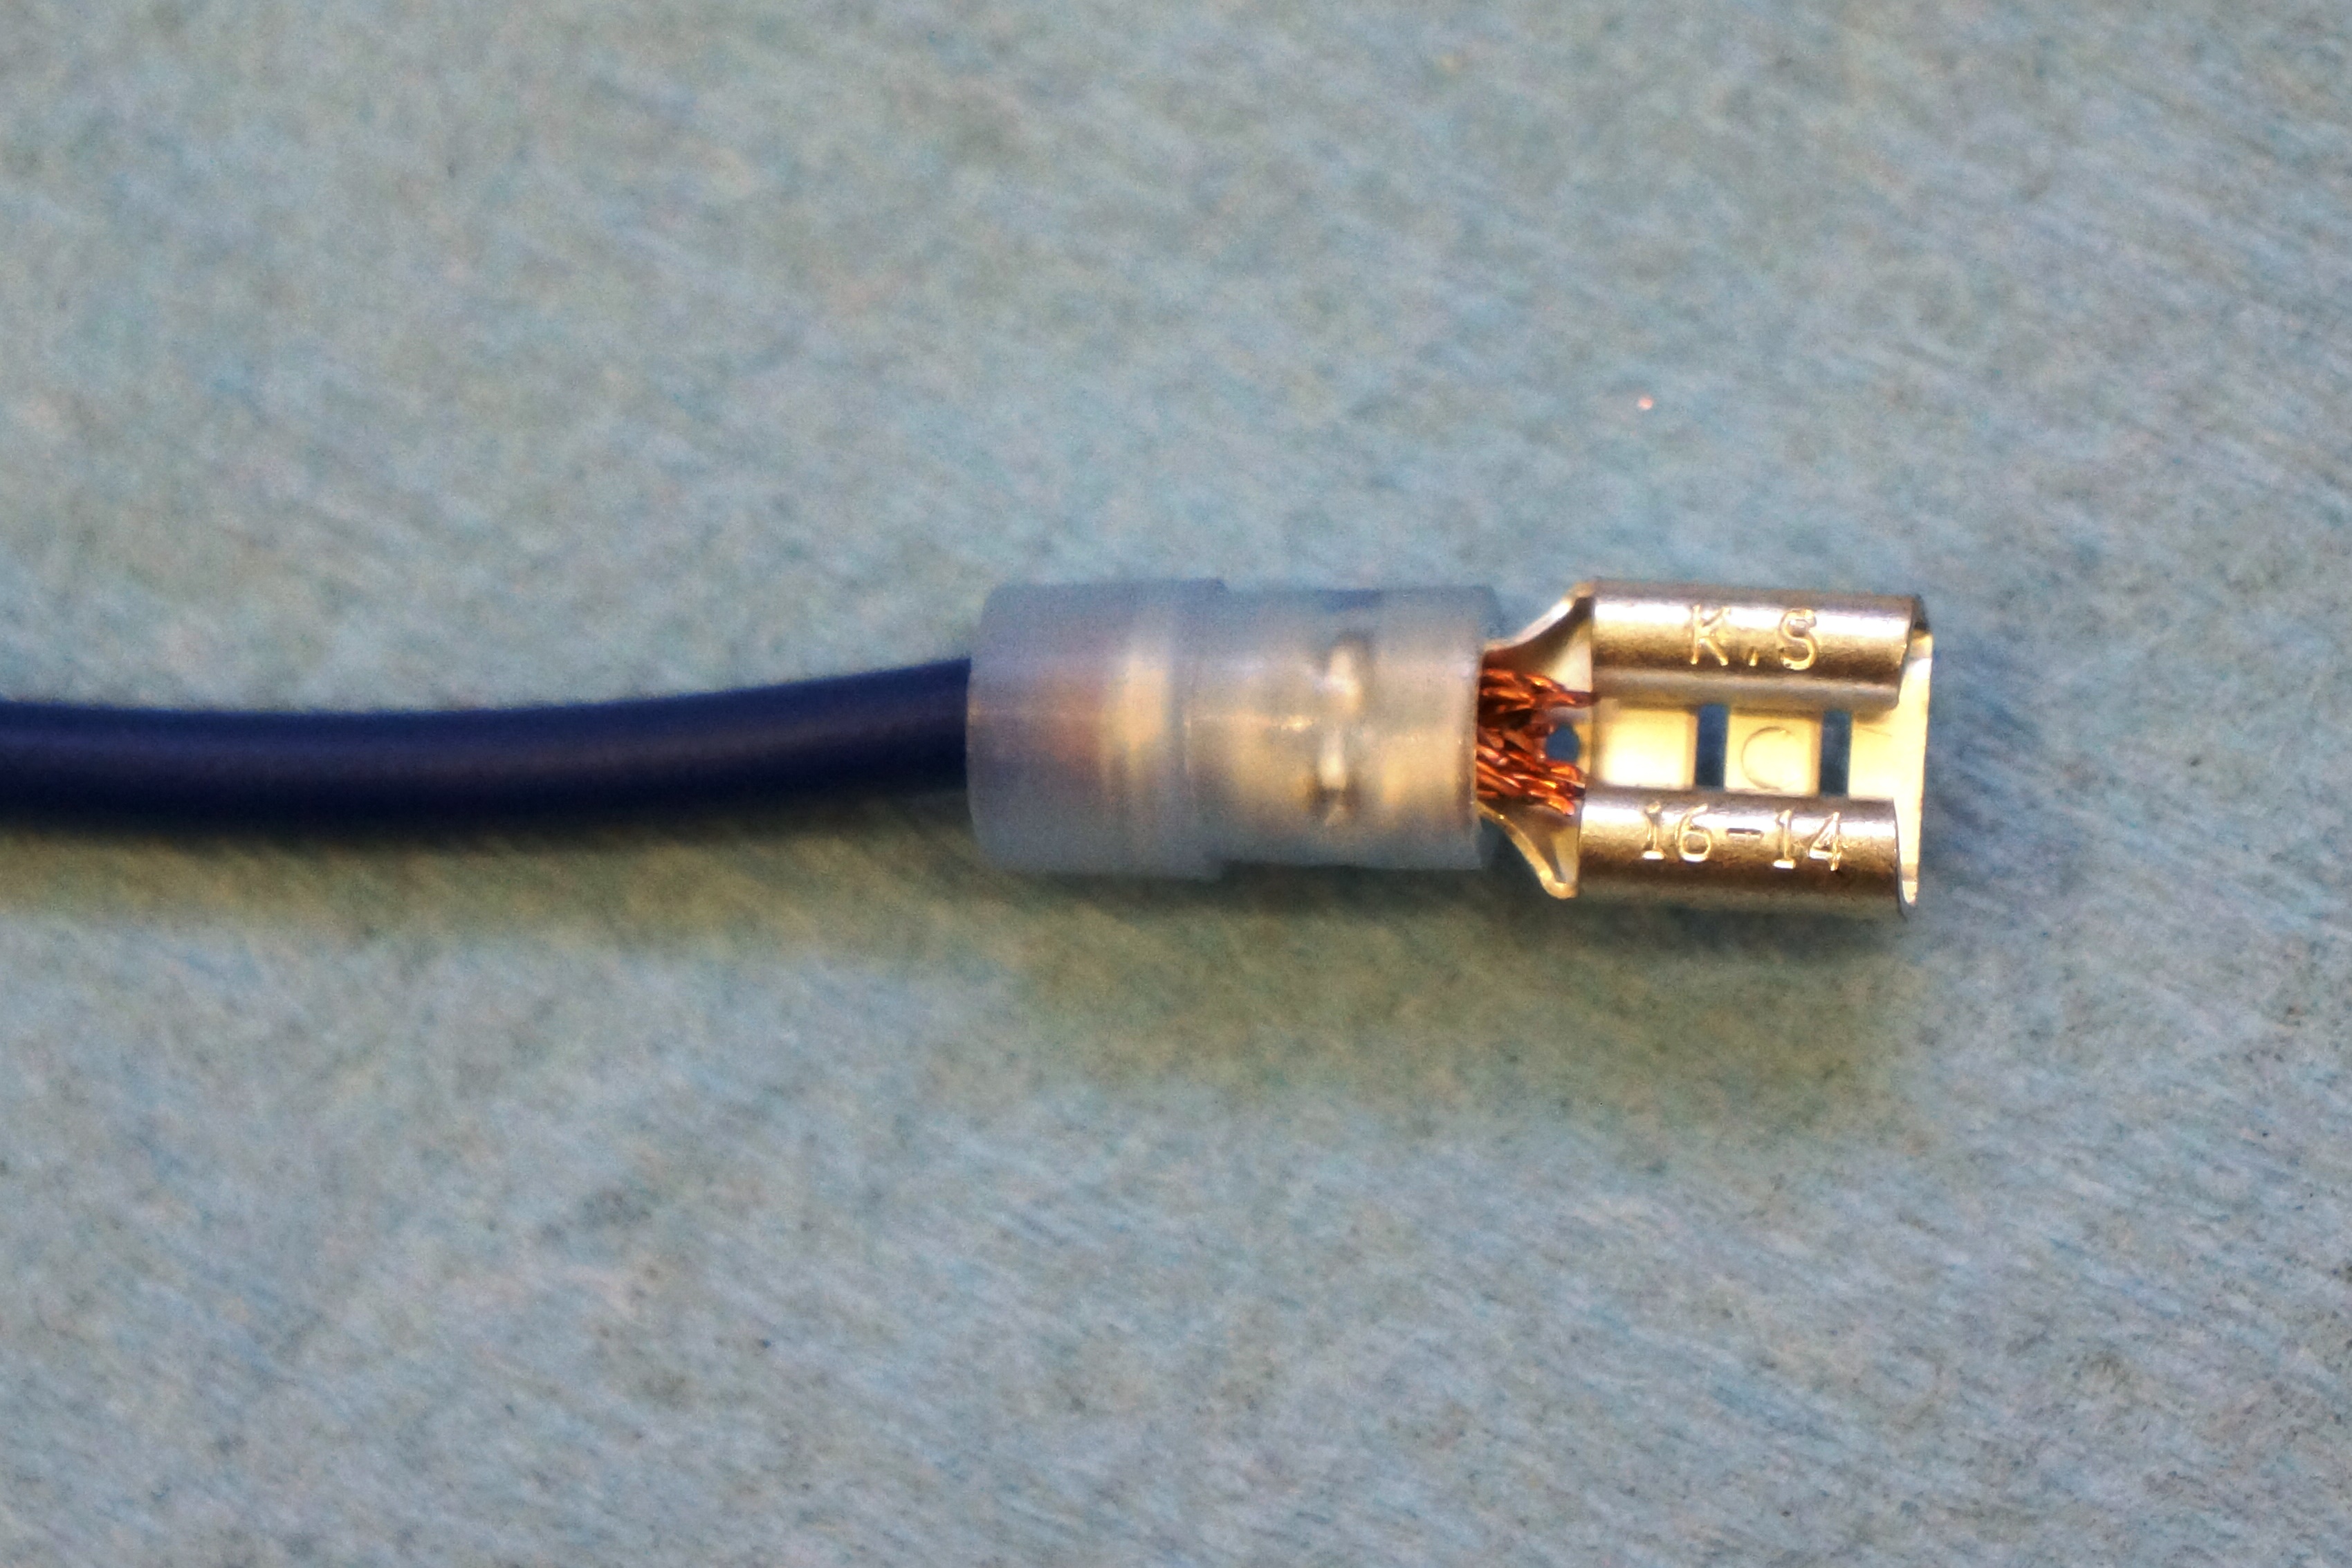
Crimp terminals are color-coded for size: the smallest are red (18-22 gauge wire), then blue (14-16 gauge), and the largest, yellow (10-12 gauge). Again, for cars, blue connectors cover almost all my needs. When buying electrical tape, stick to name brands; I like 3M, which costs a bit more, but makes better repairs. In the example below, I use shrink wrap, which comes in different diameters. You want a diameter which will fit OVER the end of the terminal.
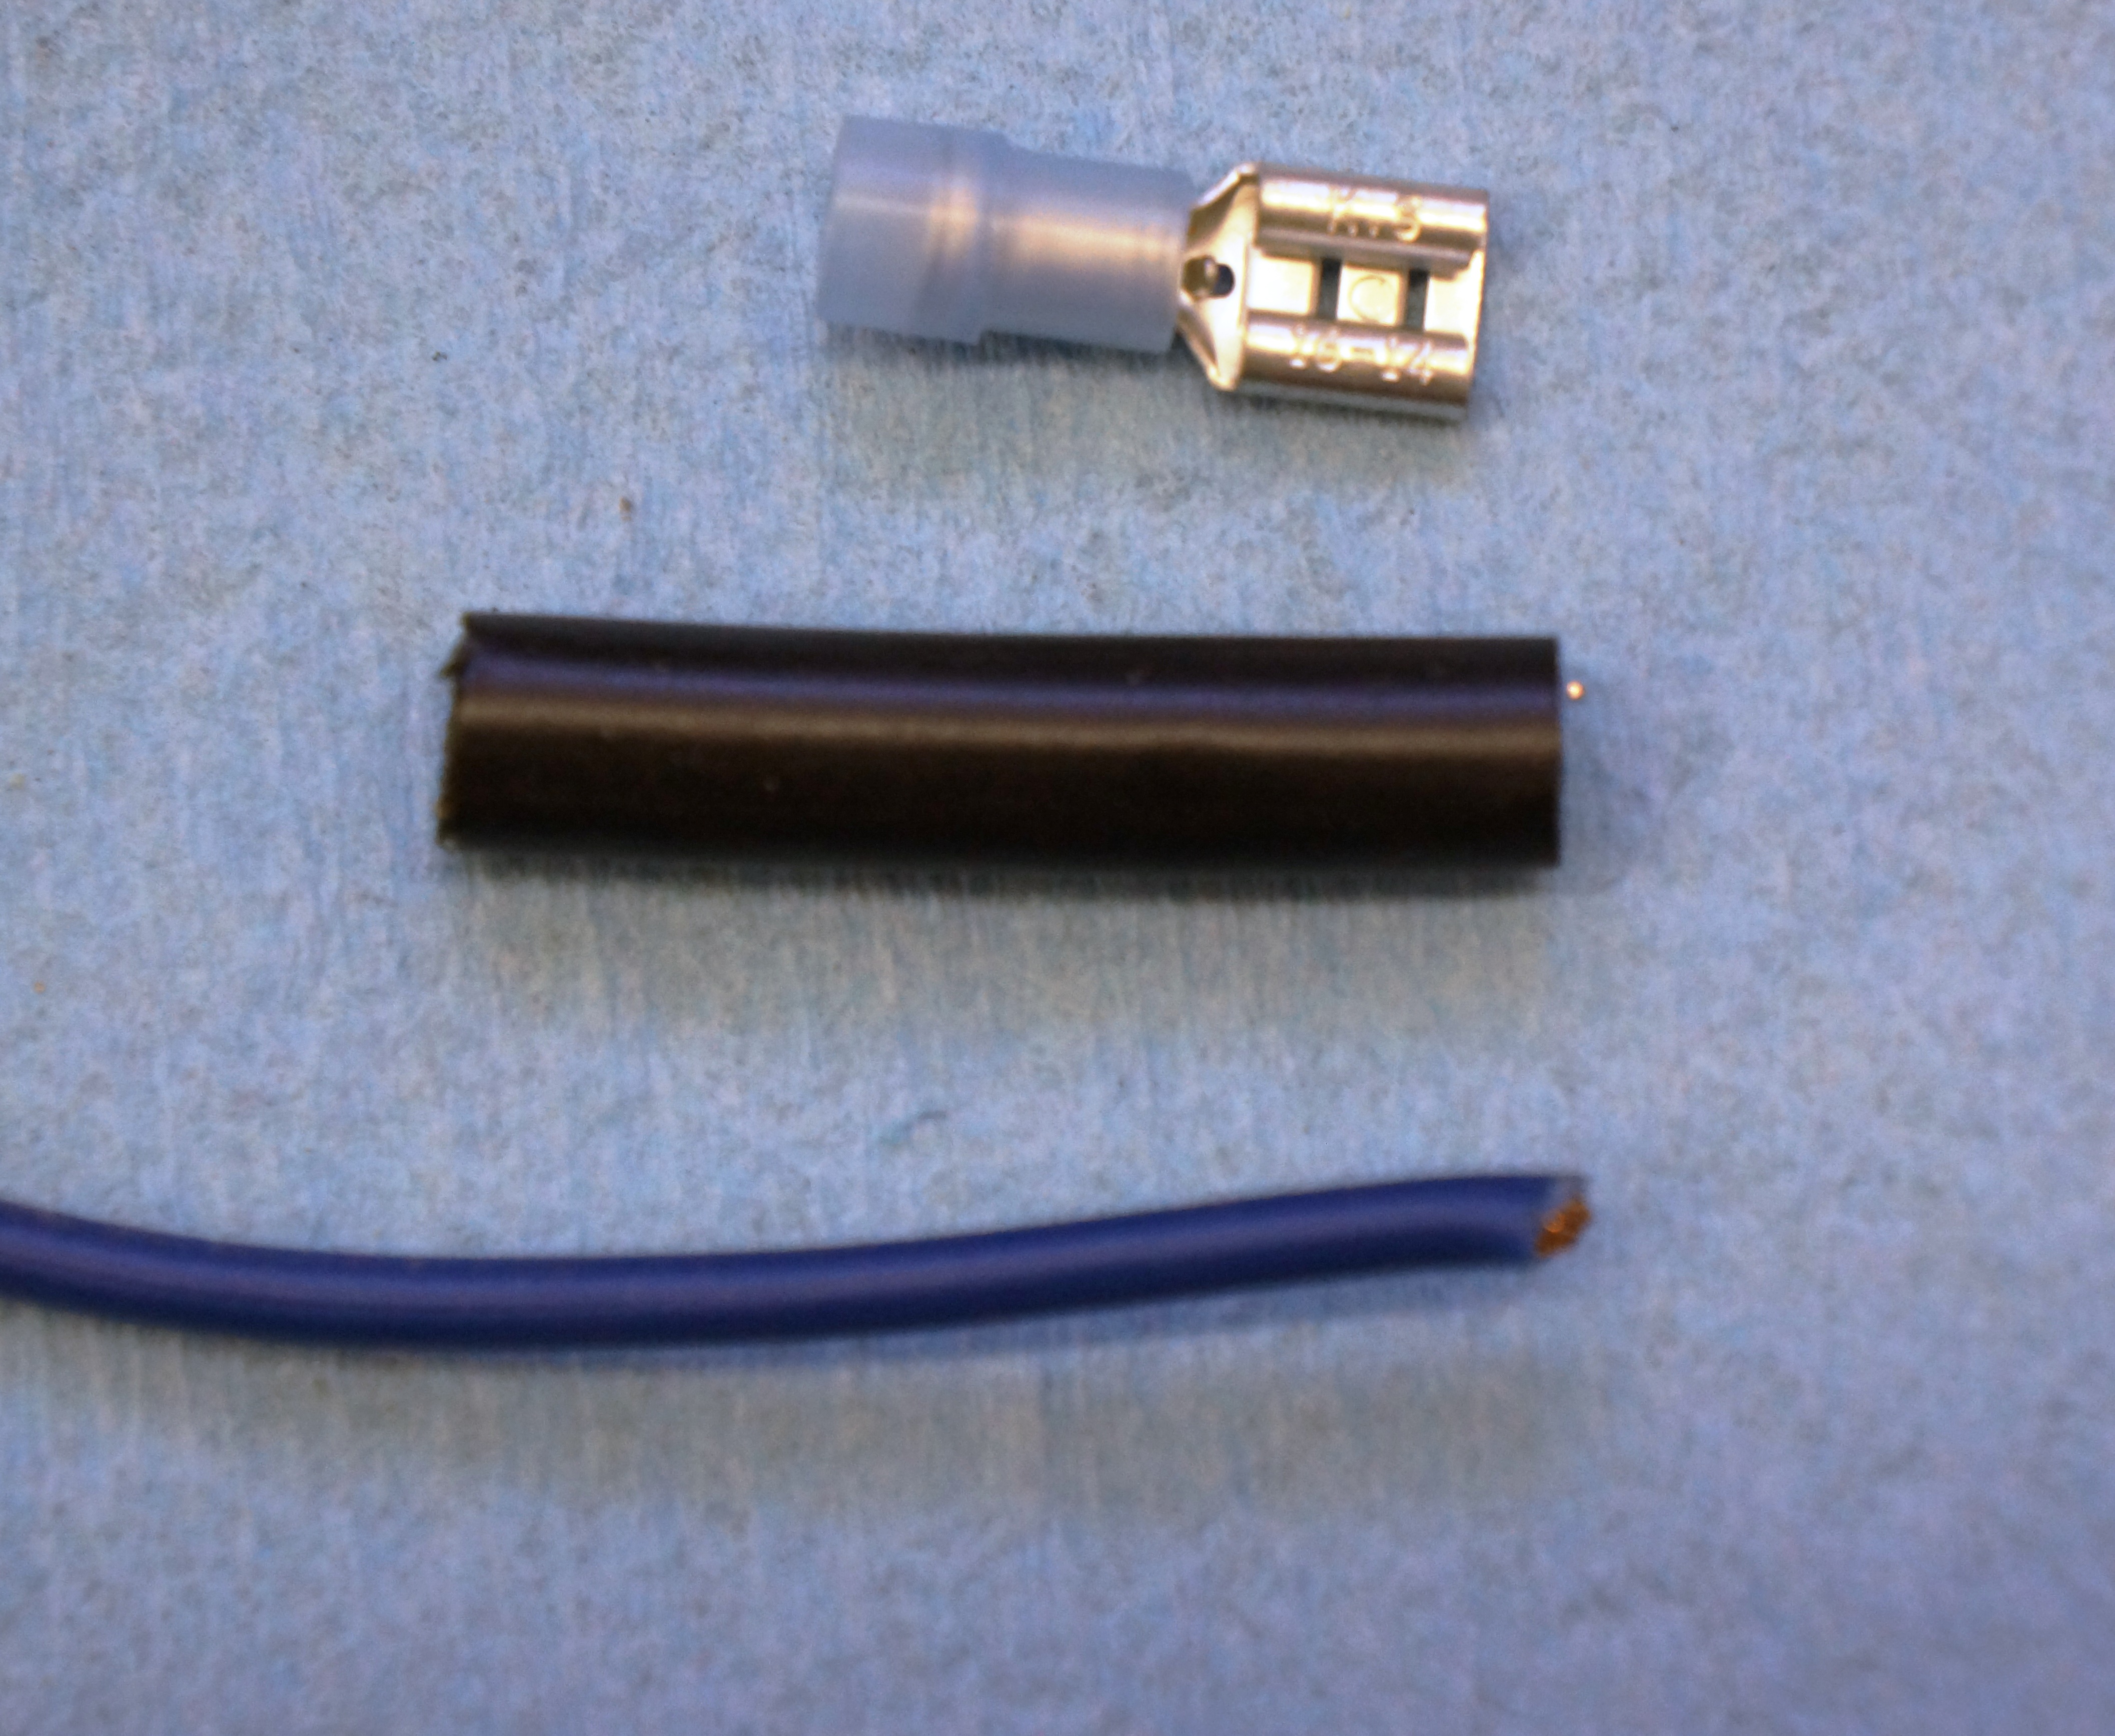
Top to bottom: female spade connector, shrink wrap, 14-gauge wire
For my sample repair, I need a 2-ft length of 14-gauge wire, and need to crimp a (blue) female spade terminal to one end of the wire. Note that I’ve correctly matched the 14-gauge wire to a blue-coded terminal. THE FIRST MOST COMMON MISTAKE IS INCORRECTLY MATCHING THE WIRE AND TERMINAL SIZES. I’ve verified that the shrink wrap fits over the barrel end of my terminal. I will strip about 3/8” of insulation from the wire – enough so that when the stripped end is inserted into the terminal, a tiny bit peeks out, and bare copper is under the barrel where I will be crimping. THE SECOND MOST COMMON MISTAKE IS STRIPPING TOO LITTLE INSULATION SO THAT BARE COPPER IS NOT UNDER THE TERMINAL BARREL.
Stripping the wire
When using the stripping tool, select the opening which is just slightly smaller than the wire diameter. Your goal is to cut the insulation so that you can pull it off without also removing any copper strands. I took the photo using the 2nd-smallest size, but then ended up moving the wire to the next larger size. This takes some practice – try it out on several different wire gauge sizes.
Before crimping the terminal, slide the shrink wrap onto the wire; if you’re repairing an existing wire on the car, this may be your only chance to get it into position! With the terminal placed over the bare copper strands, verify that copper is under the barrel, Use the crimping part of the tool to firmly crush the barrel onto the wire. THE THIRD MOST COMMON MISTAKE IS CRIMPING THE TERMINAL NEAR ONE OF ITS ENDS SO THAT THE CRIMP DOESN’T FIRMLY GRASP THE WIRE. A COROLLARY MISTAKE IS USING A HAMMER & CHISEL, OR PLIERS TO MAKE THE CRIMP. USE A CRIMPING TOOL, PLEASE. In the photo, note that the barrel is crushed almost directly in the middle. Using moderate force, pull on the terminal; it should feel securely attached and should not slide off. If it does, the crimp is inadequate, and you’ll need to repeat the process.
Crimping the terminal
Slide the shrink wrap over the terminal, and heat it with a heat gun. (A match or propane torch also works, but don’t let the flame touch the material!) Within seconds, the shrink wrap reduces to less than half its original diameter, and the final repair looks very professional. You can use electric tape here also. The point of the shrink wrap or tape is to insulate your repair. THE FOURTH MOST COMMON MISTAKE IS USING TAPE TO CONNECT THE TERMINAL TO THE WIRE. IT’S THE MECHANICAL CRUSH OF THE BARREL ON THE WIRE WHICH MAKES THE CONNECTION.
Note that crush is in center of barrel
Heat gun on shrink wrap
I’m not kidding about these common mistakes. I’ve seen everything from copper wire twisted around a crimp terminal to Scotch tape used as an attempt to hold the wire and terminal together. Installing crimp terminals takes some practice; buy some wire and a terminal assortment, and practice before you need to make a repair to your car. I’ve also used solderless terminals to make up my own test wires, whether it’s to run temporary grounds, or run 12V from the battery to the rear of the car. These test wires may have alligator clips or spade terminals or some other combination; I have several, and they come in handy!
The New Jersey Region of the Antique Automobile Club of America (AACA) held its 70th annual Spring Meet on Sunday, May 7, 2023. The show, traditionally hosted on the first Sunday of May, was in a new location this year: Nielsen Dodge/Chrysler/Jeep/Ram on Route 10 in East Hanover NJ.
The last few years for our Spring Meet have been rocky, to put it mildly. After literally 60 years at the same location, the club was forced to move, and we spent a few years holding our show at the Mennen Arena in Morristown NJ. (These links will take you to those shows in 2016, 2017, 2018, and 2019.) But between unbelievably bad luck with the weather, combined with Covid shutdowns, we never had a good show there. Last year, we were at a school (link here), which had its positive points, but many didn’t care for the parking layout. This dealer offered us a spacious lot emptied out for us, and we finally had the weather on our side, with a sunny, warm, and slightly breezy day. There was a great turnout of show cars (my extremely unofficial count putting it at around 150), and a large number of spectators helped by our location along a busy 4-lane Jersey thoroughfare.
Music, like last year, provided by Gup
For reasons having nothing to do with the car, I was unable to bring the Alfa to the show, even though I had registered it. I did drive up in modern iron, though, because I had volunteered to be a judge. This task needs to be completed because many owners still are in love with the concept of placing 1st, 2nd, or 3rd, and bringing home a trophy (what I’ve come to call a dust collector). All cars are placed in classes based on decade of manufacture, vehicle type, or make/model, done at the discretion of the club. There are 4 areas of the car which are examined: exterior, interior, engine compartment, and undercarriage. Each of those areas is scored on a scale of 1 to 10, 10 being the best. Maximum score is 40. Ideally, the judging team consists of 4 judges, with each judge taking on the same area for all cars in the class. In reality, we only had enough judges to form teams of 2. I was teamed with a club member who said that he is an experienced Hershey judge, although he also said he knew pre-war cars better than post-war. I thought we made a good team as we balanced each other out. He took exterior and interior, and I took engine compartment and undercarriage.
Not as many pre-war cars this year; this is a ’29 PackardBob Smith’s Dodge roadster
First class we judged: 2-seat sports cars. We had quite a few Corvettes (C1 through C4), a few 2-seat T-Birds, a Triumph TR-6 and a Porsche 912. We are judging to AACA standards: the car should appear as it would have when delivered as a new car by a dealership. The 912 had a number of mods to it, which knocked it down. All the Corvettes were nice, but the ’54 C1 was close to perfect and took first place.
Porsche 912’54 Corvette which took 1st in its class
Next class was a tough one: “pony cars”, which in this case was 5 Mustangs and a ’70 Cougar. Mustang owners tend to be meticulous in their attention to detail, especially if they have ever been judged by the Mustang Club, where the judging is much stricter than it is at AACA. My personal fave was a ’67 Shelby GT-500 fastback with inboard lights. As stunning as that car was, it only took 3rd! Two other Mustangs were that much nicer.
My co-judge and I tallied our scores and handed our sheets back to the Chief Judge. I sat down for a quick lunch, thinking we were done. We were not. Somehow, “Class 6” got missed and some of the owners were peeved. We were asked if we could tackle it and we said yes. This too was a tough class, as it was American cars of the 1960s. First place went to a ’67 Cadillac convertible, and 2nd place to a supercharged Studebaker Avanti. But my personal favorite which came in 3rd was a ’63 T-Bird convertible with the roadster package, in triple black. With gleaming wire wheels and white walls, it was gorgeous. But again, the competition can really be challenging.
’67 Caddy which took 1st in class’63 T-Bird’66 Olds 442
To give you some further insight, most cars that we judged scored somewhere between a total of 25 and 38. It would be very rare indeed to score any one area below a “5”, and even if we did, another area might still score an 8 or a 9. No car that we judged scored a “40”, although 2 or 3 did score “39”. Provided there are at least 3 cars in the class (and for us, there always was), we need to deliver a 1st, 2nd, and 3rd place score back to the Chief Judge. What if there was a tie? That happened twice. In those cases, my co-judge and I looked at our judging sheets, and one of us adjusted one score either up a point or down a point. We did it as fairly as possible, although we also thought about the overall impact that the vehicle made on us.
ABOVE: Baby Bird parade: a ’56 and two ’57s
Again, I thought I was done. The Chief Judge, Ed, whom I’ve known for 20 years, asked me to accompany him as we still needed to judge cars for “Membership Trophies”. Let me explain: these awards, open only to NJ Region members, are for special categories, including the 3 best unrestored cars in 3 different year ranges. During registration, owners must request that their cars be considered. There are only 2 or 3 candidates in each category, and truthfully we were just giving them a quick eyeball. The problem was that these cars were in their respective classes, and therefore, scattered from one end of the show field to the other, so we had a lot of walking to do to locate them. But we eventually did, and finally, judging was done. Looking back at my photos, I see that I was not able to take as many shots as I would have liked! Including my brief lunch break, I was walking the field and judging cars (four different classes in total) for about 4 hours! I’m sorry that I missed photographing some of the stunning cars that I judged.
This mostly-unrestored Imperial took a Membership trophy
ABOVE: Two of the many Cadillacs at the show: a ’58 and a ’73
The awards ceremony started a bit late, probably around 3pm, but most owners stuck around, and I must admit that I did enjoy seeing their grins of satisfaction as they collected their trophies. It takes many, many volunteers from our club to make this show happen, and I was happy to be part of the team which pulled it together. I overheard that the Region hopes to use the same location next year, so my fingers are already crossed that the weather will cooperate in 2024.
My friend Sean with his ’75 Pontiac’70 Fiat 500’56 Dodge’66 Chrysler’53 Hudson’71 CamaroHillman MinxLotus Elan’64 Chevy II’56 Ford