During the restoration of the Isetta, a frequent question presented to me was “what motivates you to keep going?” Of course, I wanted to see the project reach a successful conclusion, but setbacks, and there were a few, can be demotivating. There were times I questioned my own sanity, as in, “why am I spending so much time, money and effort to restore a 13-horsepower bubble car from the 1950s that most people have never heard of?” With everyday life (job, family, house) swirling around me, I was occasionally tempted to quit the whole deal.
One of my mantras during this 5+ year stretch was “celebrate your successes”. Reaching certain milestones not only feels great, but the achievement can be shared with others, which then inspires you to keep moving forward.
In August of 1995, I was ready for such a celebration: the Isetta body shell, freshly painted and just back from “The Shop”, was about to be reunited with the mechanically-restored chassis. In a traditional automobile assembly plant, the moment of “marrying” the up-until-then separate body and chassis is called the marriage point. So, in honor of that event’s facsimile, we decided to host a wedding. Before, um, consummating this union, since the shiny and clean chassis was about to be covered up again, a final set of photographs was taken to document its return to as-new glory.
The wedding was scheduled for Sunday, August 20, 1995, and since a wedding must have guests, a small ensemble was invited. (Memory doesn’t recall whether any of the invitees were tipped off that there was work to be done before food and beverages would be served.) The chassis was staged in the driveway just beyond the garage doors, with the body patiently hanging out in the garage on four jack stands.
Five intrepid groomspeople (Chris Beyer, John Maggio, Dennis & Ann Marie Nash, and Don Dahringer) vaulted the body back into the daylight. Spotters were assigned to eyeball the body’s descent so that nothing was injured. It took a few moments to clear all the obstacles, but the (re)union was a success.
A video camera (thanks, John) was rolling to capture the event. You can view a 12-minute excerpt at this YouTube clip here:
Whew! My nervous excitement is palatable to me as I watch myself nervously pace back and forth and around the car. In all seriousness, having a group of friends around me helped alleviate my worries. Once I knew the body shell was resting on the chassis rails, we popped the champagne, ate some BBQ, and of course, shared dessert in the form of a wedding cake:
The end of the push to make “The Isetta Drive in ‘95” was close, really, truly close. The steering, pedals, wiring harness, ignition, and seat all needed to be installed and connected. The motivation was the knowledge that I was perhaps a few short weeks away from driving my Isetta for the first time since buying it as a disassembled heap in 1978.
It almost looks ready to drive. Almost.
(Special thanks to my Creative Team pals Cody, Eslam, and Greg for their video-editing assistance. You guys are the DUDES.)
Jody Fitzpatrick, proprietor of “The Shop” in Maplewood NJ, had my Isetta in his possession for one day shy of five weeks. His work was completed, done, finished. I breathed a huge sigh of relief if only for his ability to accurately predict his work timeline, originally estimated at “3 to 4 weeks”. This was close enough. There wouldn’t be any restoration shop horror stories in my future.
Chris Beyer, work colleague, neighbor, and friend, had accompanied me when I dropped off the Isetta body. When I told him that it was ready for pick-up, he was ready and willing to join me again.
The date was Friday July 28, 1995. Nothing in my notes or my memory explains how Chris and I both happened to be off from work that day; but we were. It was a sweltering humid day, hotter than the previous days had been during what was already an oppressive summer. Cranking the A/C in my Volvo 850 wagon did little help; nothing was going to cool me enough to dissipate my nervous excitement over seeing the painted shell.
Jody’s 2nd and final statement
At our arrival, Jody strolled out to greet us, looking and acting nonchalant. “How come HE’S so cool?” I asked no one. Perhaps because he does this every day, and, it’s not his car, and, he just wants to get paid, replied the voice in my head. The body shell, of course, looked perfect, almost too much so. I was afraid to touch it, but with Jody and Chris’s help, we got the same 2x4s bolted back to its underside, and then to the trailer floor.
The red 850, ready to tow home the red Isetta (note dolly and plywood in lower right of photo)
From ugly duckling to gorgeous swan (obviously, beauty is in the eye of the beholder)
Chris and I pose in parking lot of The Shop
Jody got his check, I got my receipt and my obligatory photos, and we were on our way. I must have glanced in the rear view mirror about every 12 seconds to make sure the body was still there. At a red light on the way home, several male teens yelled out “hey, it’s the Urkel-mobile!” Oh My God, I thought, am I going to be hearing this for the duration of my ownership of this thing? (The short answer to that question is “yes”.)
Back home after a 5-week vacation
Soon to be reunited
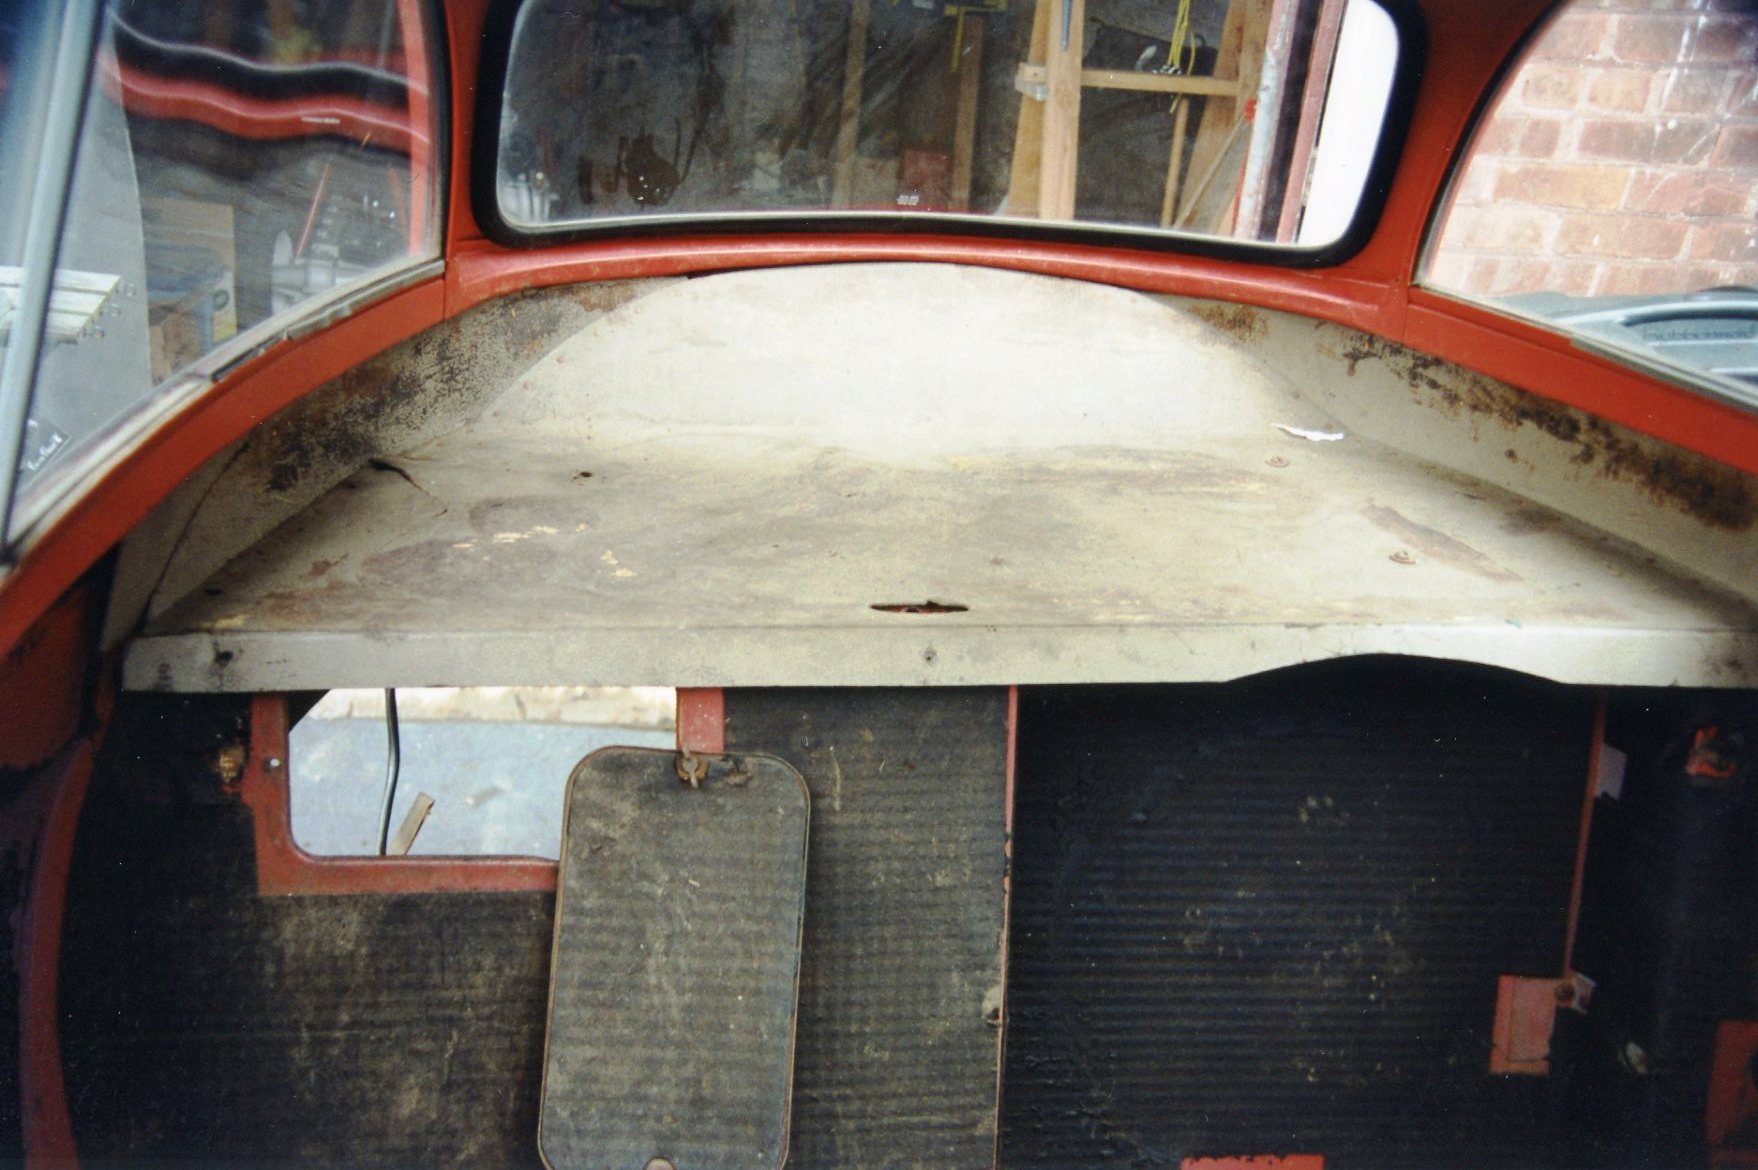
Leaving the 2x4s in place for now, we carried the body into the garage, and back onto my makeshift dolly. I posed it next to the completed chassis, fully aware that in a few days, five years of mechanical work would be covered forever (or at least until the car is re-restored in 2095).
Light buckets and other externals at the ready
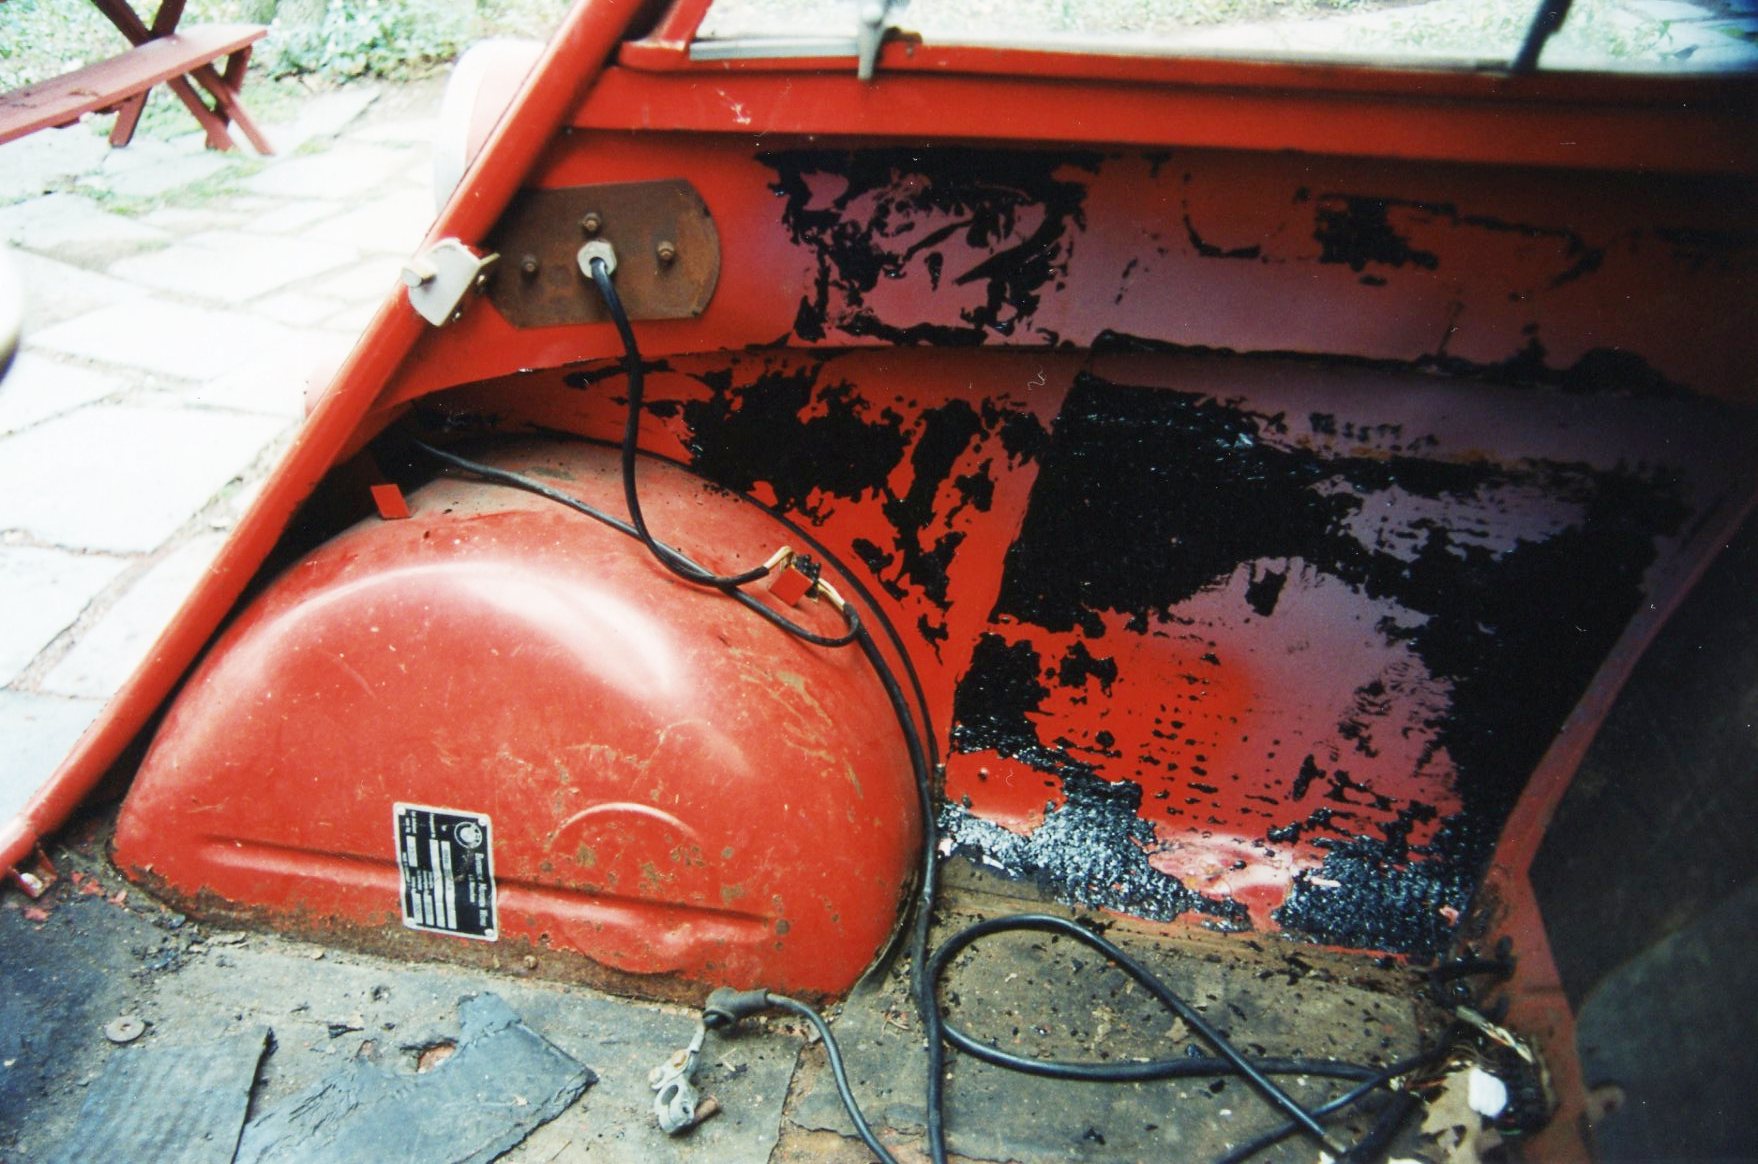
What work was remaining before reuniting the body and chassis? The body’s hand-painted underside now had primer overspray on it, so that got yet another coat of gloss red. The headlight and tail light buckets were bolted on. The fuel tank, which had earlier been restored by coating it with Bill Hirsch’s GasTank Sealer, was secured in place. The 2x4s were finally removed, and the body was placed onto 4 jack stands.
Gas tank bolted into place (note fuel tap in upper left)
In an auto assembly plant, the moment when the car’s body, on one conveyor, is lowered onto a complete chassis, arriving on another conveyor, is called “the marriage point”. The Isetta’s 17-year courtship was coming to an end. It was time to host a wedding party and consummate this marriage.
Jody Fitzpatrick, proprietor of “The Shop” in Maplewood NJ, was my choice to oversee the body restoration of the Isetta for many reasons: he was personally recommended, the business was nearby my residence, his pricing was fair, we had a mutual understanding of what “done” looked like, and his estimated timeframe was reasonable. Another reason is that Jody assured me that I could visit and observe the progress whenever I desired (sort of like conjugal visits for the incarcerated).
Having read more than one “restoration shop horror story” (the car gets pushed to the back, 6 months pass with no progress, the shop demands more upfront money, they lose your car keys, or worst, they close the business and lock the doors with your car inside), having visitation rights was refreshing.
So visit I did.
Three times during that hot July of 1995, I stopped in to have a peek and to snap a few snaps. Jody was always very accommodating and genuinely happy to see me, and gave me free rein to walk around my car and chat up the crew doing the actual labor.
During the first visit, employees were using homemade scrapers to remove the paint. They had decided against chemical dipping or media blasting, fearful of inflicting further damage. They also hammered out any dents and other rough spots, in preparation for some minor welding and an eventual skim coat of putty in spots. (From my own research, I had come to learn that any talk of body repair that doesn’t involve some small use of plastic filler is fantasy.)
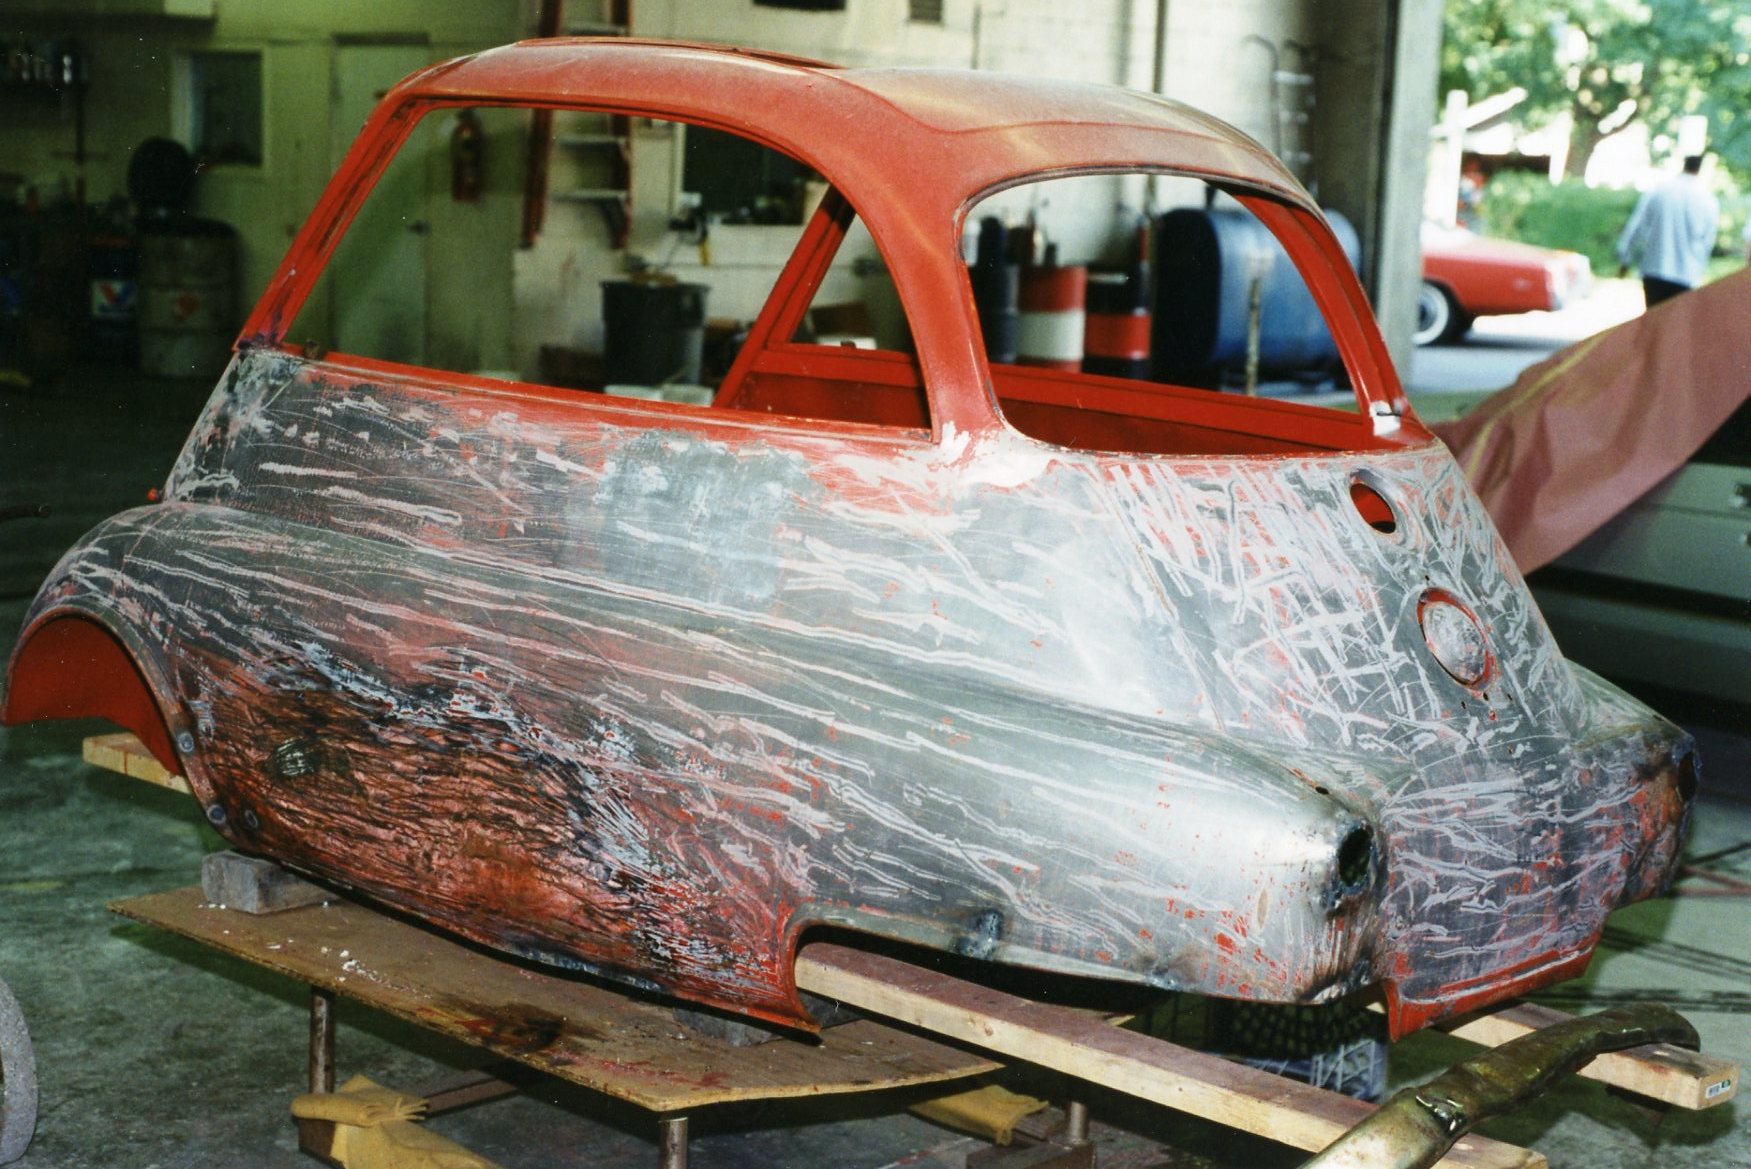
THE SHELL IN THE PROCESS OF PAINT BEING REMOVED:
During this visit, Jody and I also finalized the choice of paint color. There was no known “official 1957 BMW Isetta paint code chart” we could refer to, so we did the next best thing. Sampling the unfaded paint we found under the BMW roundel on the door, we matched that to the closest shade among the modern paint code charts in Jody’s possession. We both agreed that the 1995 Ford Mustang shade of “Performance Red” was it. Jody stressed another advantage: should the car need touch-up or repair in the future, the correct paint would be readily available.
Just a week later, I saw the body with all the original paint gone, and the metal work beginning. I had given Jody a recommendation from John Jensen’s Isetta Restoration book for a method to reinforce the rearmost body panel at the tail lights and rear bumper. This section of the shell was not directly attached to the chassis, and was a known weak spot. Jody stated he would use the printed suggestion to add some additional metal in places.
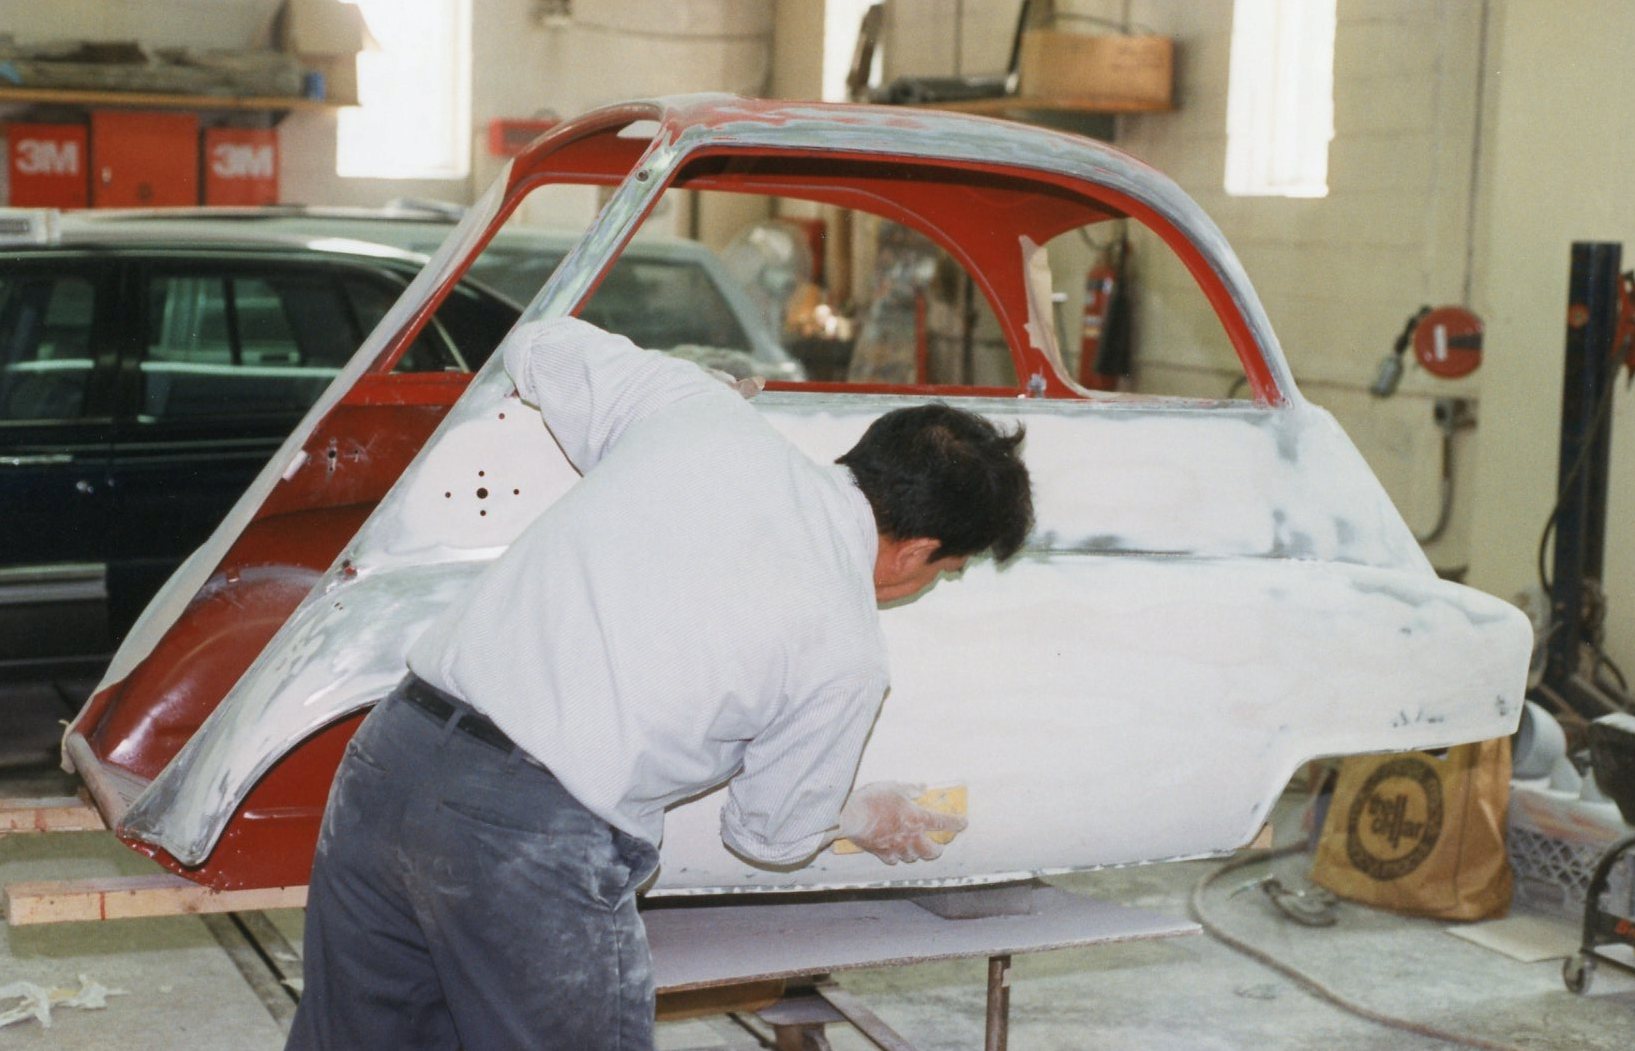
HAND-SANDING THE FILLER AND THE GUIDE COAT:
During this 2nd visit, I pointed out a number of drilled holes which needed to be filled. These included where the dealer-installed mud flaps and luggage rack had been, neither of which were to be reinstalled. (I would later discover one which I missed, requiring the purchase of a somewhat pricey accessory in order to cover it!) Jody’s suggestion of grinding down the visible factory welds at the body panel joints was rejected by me, as I had every desire to keep to an original look.
Like a proud papa, I posed alongside the work-in-progress:
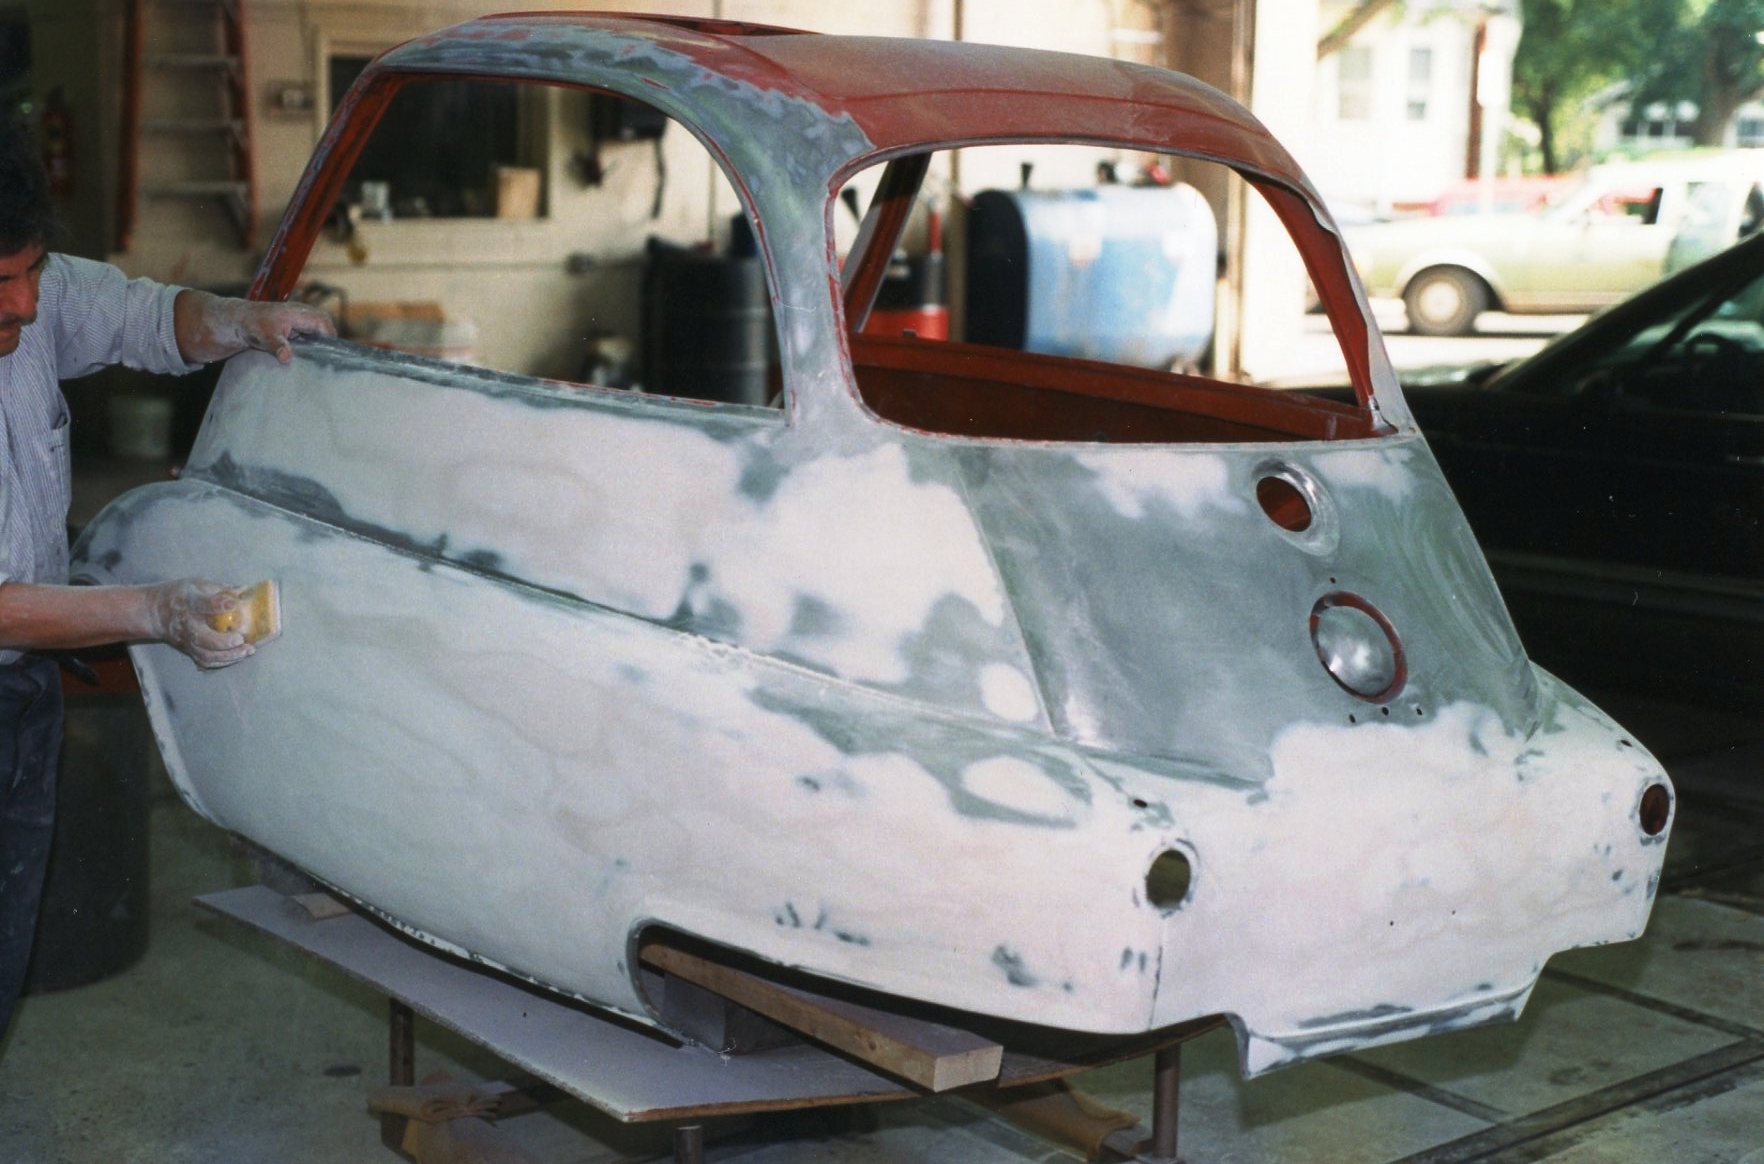
The third visit found the body in full primer. With the metal work done and its flanks as smooth as new, it was not difficult to visualize a freshly painted body shell. Jody had the door and all the other exterior pieces at The Shop, but he also generously offered to hang and align the door for me, something that was not part of our initial negotiation. I brought the freshly-plated door hinges with me so that he could do just that.
THE BODY IN FULL PRIMER, JUST PRIOR TO COLOR COAT:
Perhaps the most exciting aspect was that the work was closely adhering to the originally estimated timeframe. Jody said that it might take a week longer than he hoped, but everything looked to be on track for a final pick-up by the end of July. And there were no “pricing surprises” either. Jody had gotten a $2,000 down payment upon drop-off, and he said that all I owed him at completion was the $2,000 balance plus NJ state sales tax.
A few days later I got the call. “It’s ready whenever you are.” That Saturday, I hooked up the trailer to the car and grabbed my checkbook. We were on our way.
Happy New Year! The most recent posting of the Isetta Saga was Chapter 13, way back in May 2018 (it was a busy summer and fall). It’s time to resume the Saga, with intentions to post subsequent chapters more consistently through the winter months.
Chapter 13 ended on a high note: I had found a somewhat local body repair place in Maplewood NJ, “The Shop”, run by Jody Fitzpatrick, who agreed to take on the job. Jody and I had a verbal agreement that for $4,000 in materials and labor, he would perform all needed metal repair work, plus prime and paint the exterior and interior using a single stage paint. (He offered to clear coat it, but I declined, wanting to keep to the factory appearance.)
Notably, for that price he would NOT paint the underside, and his interior work would be limited to paint only. He would perform no metal prep to the interior (and it really didn’t need it), nor would he cut and buff the interior paint.
He suggested that my prep of the shell should include removing all glass, sunroof, and trim; removing the existing “tar paper” soundproofing; priming the interior panels; and painting the underside with whatever top coat color I chose.
Jody estimated that this body and paint work would take about three to four weeks. If I got the shell to him in June, I’d have it back sometime in July, giving me all of August and September to complete the reassembly of the car. In the grand scheme of things, I envisioned an “Isetta Party” for some time in the autumn. There was a lot to do, but it seemed within reach.
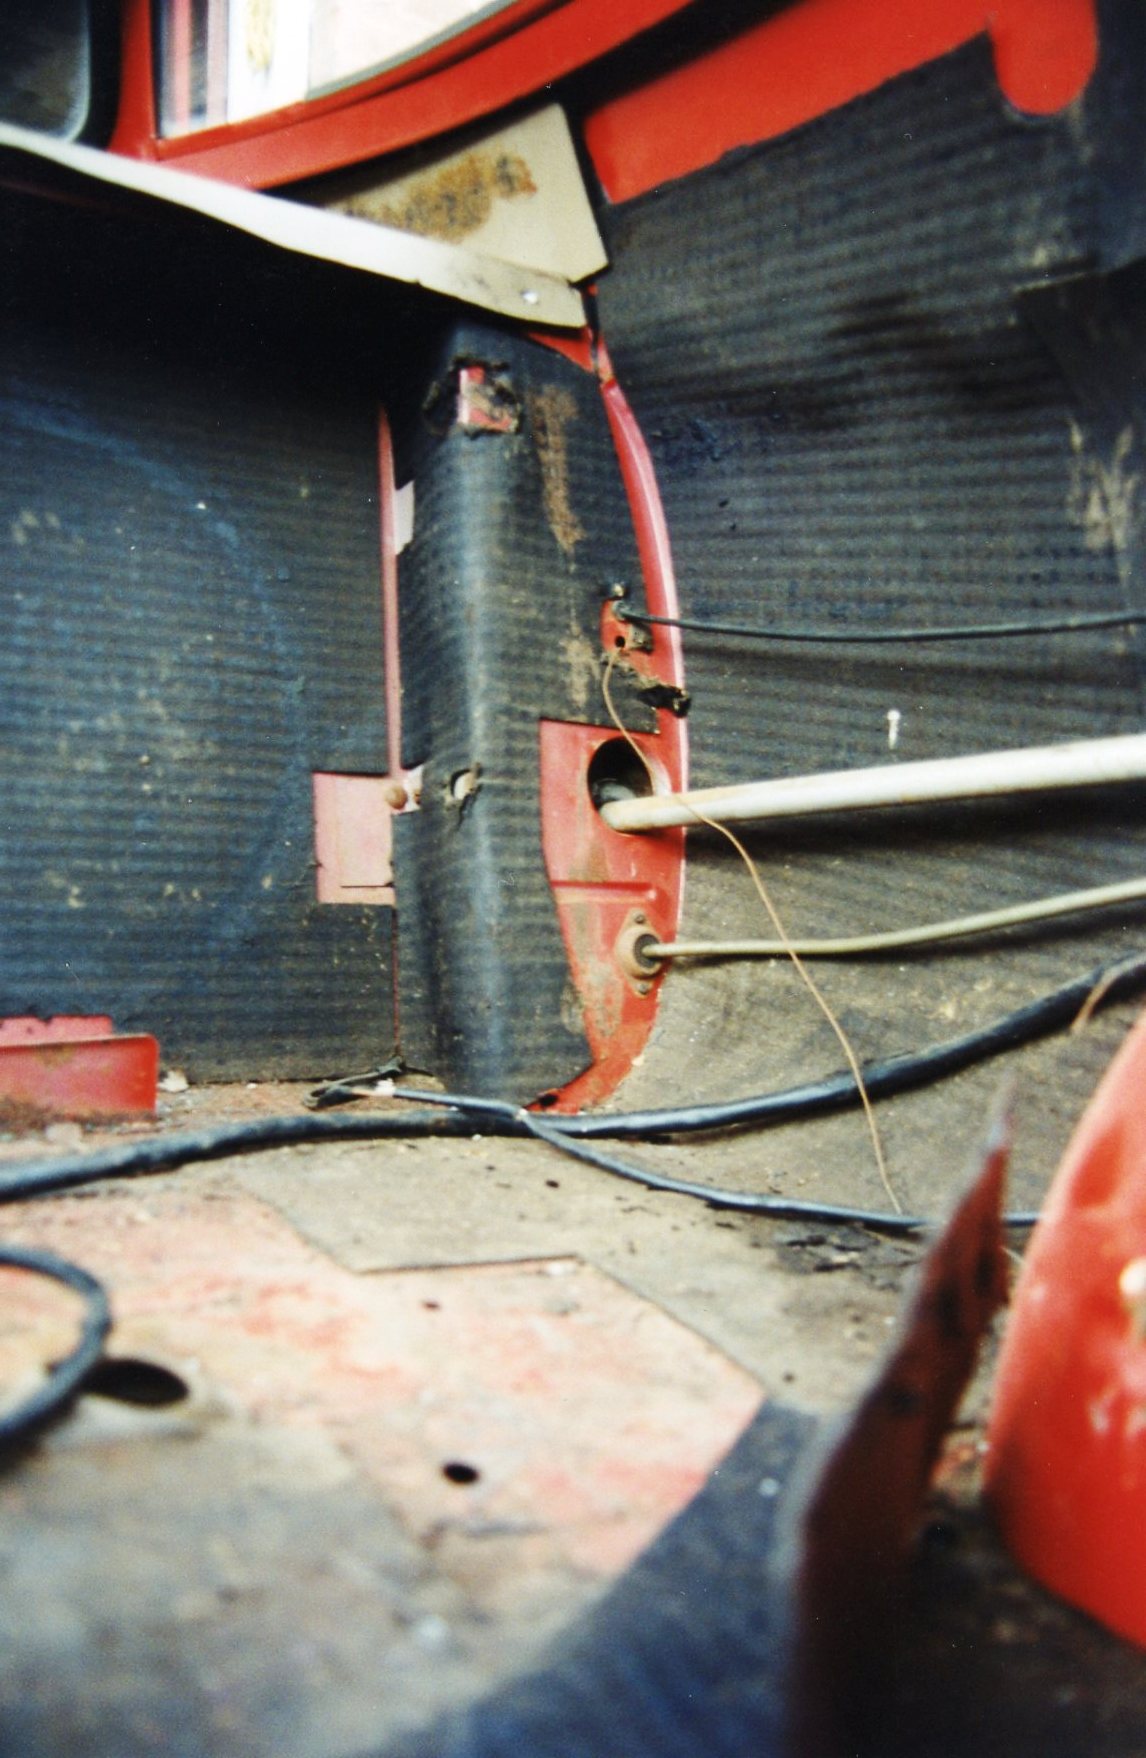
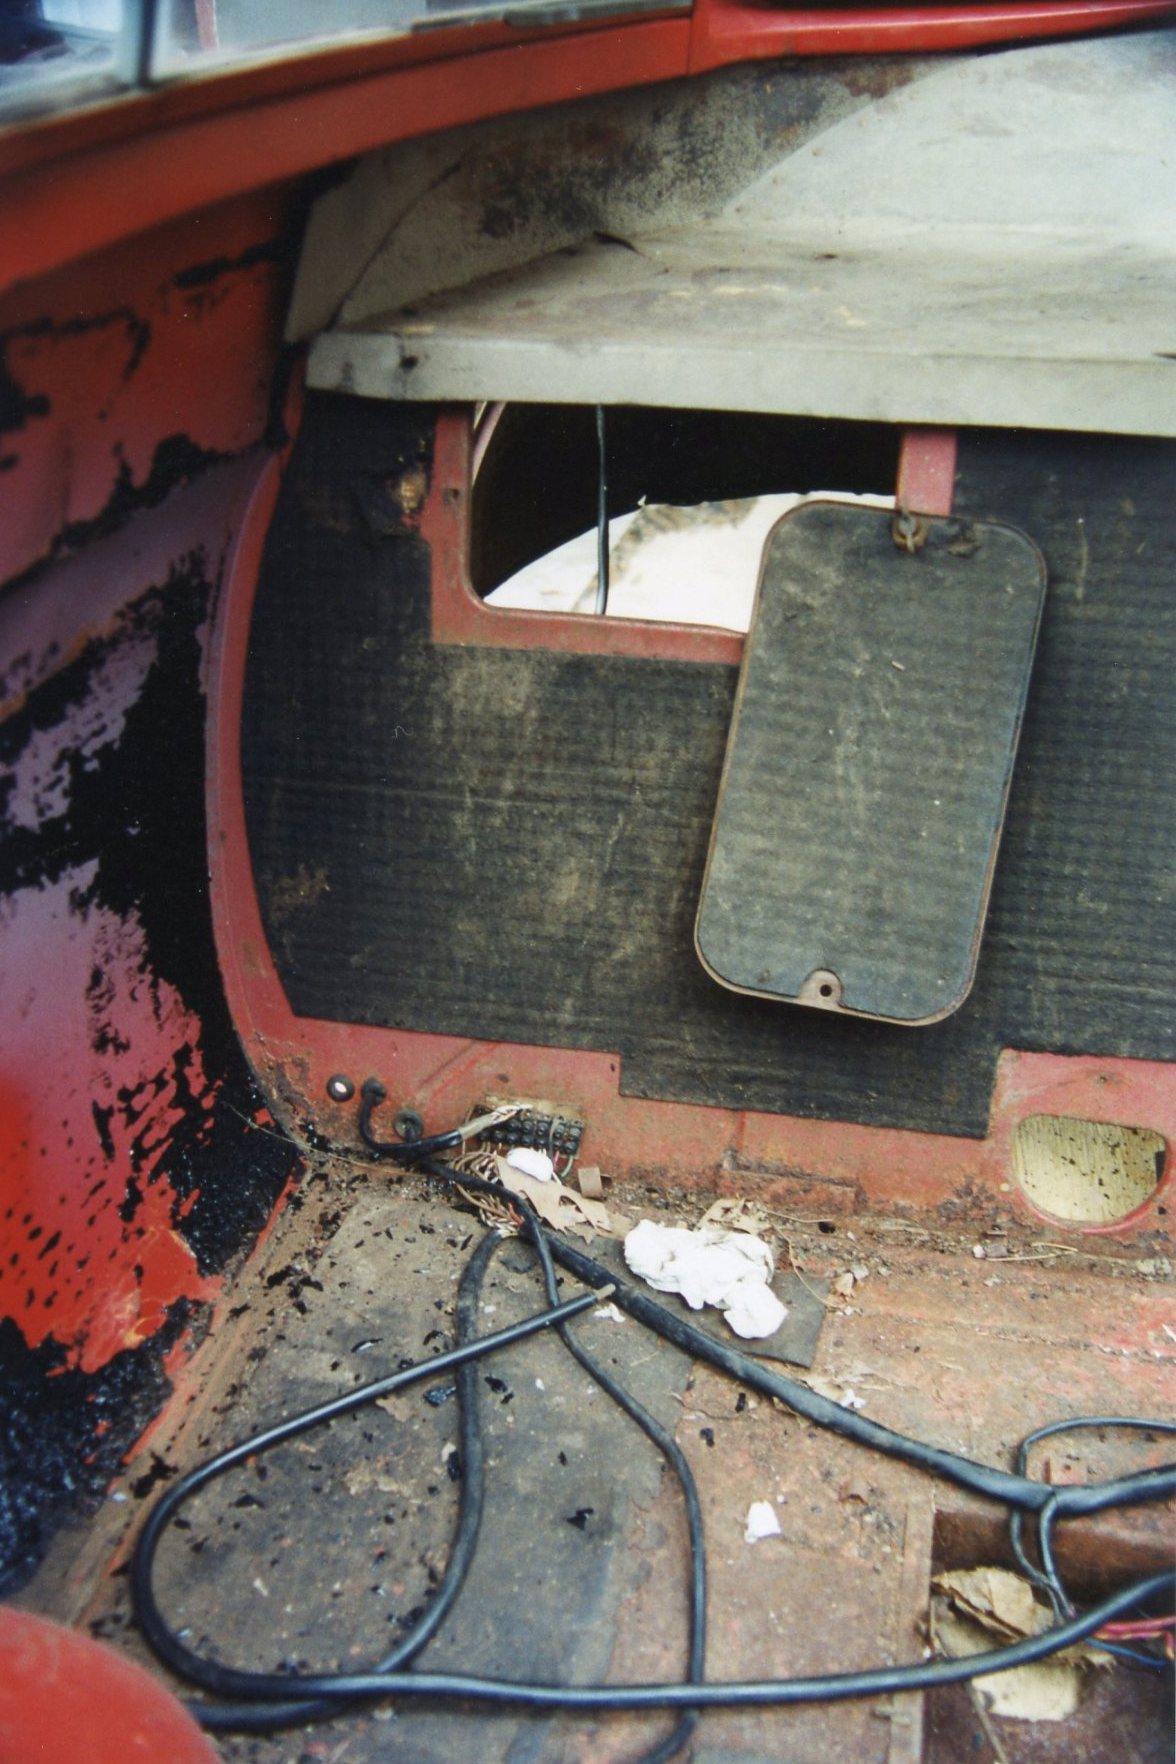
Stripping the body of its mechanical and trim pieces was straightforward. I had had practice with the two other body shells which got similar treatment through the years. Out came all the glass, followed by the bumpers, headlight and tail light buckets, and steering wheel & column. Then the wiring harness was removed as a complete assembly, taking care to tag as many of the terminal connections as possible.
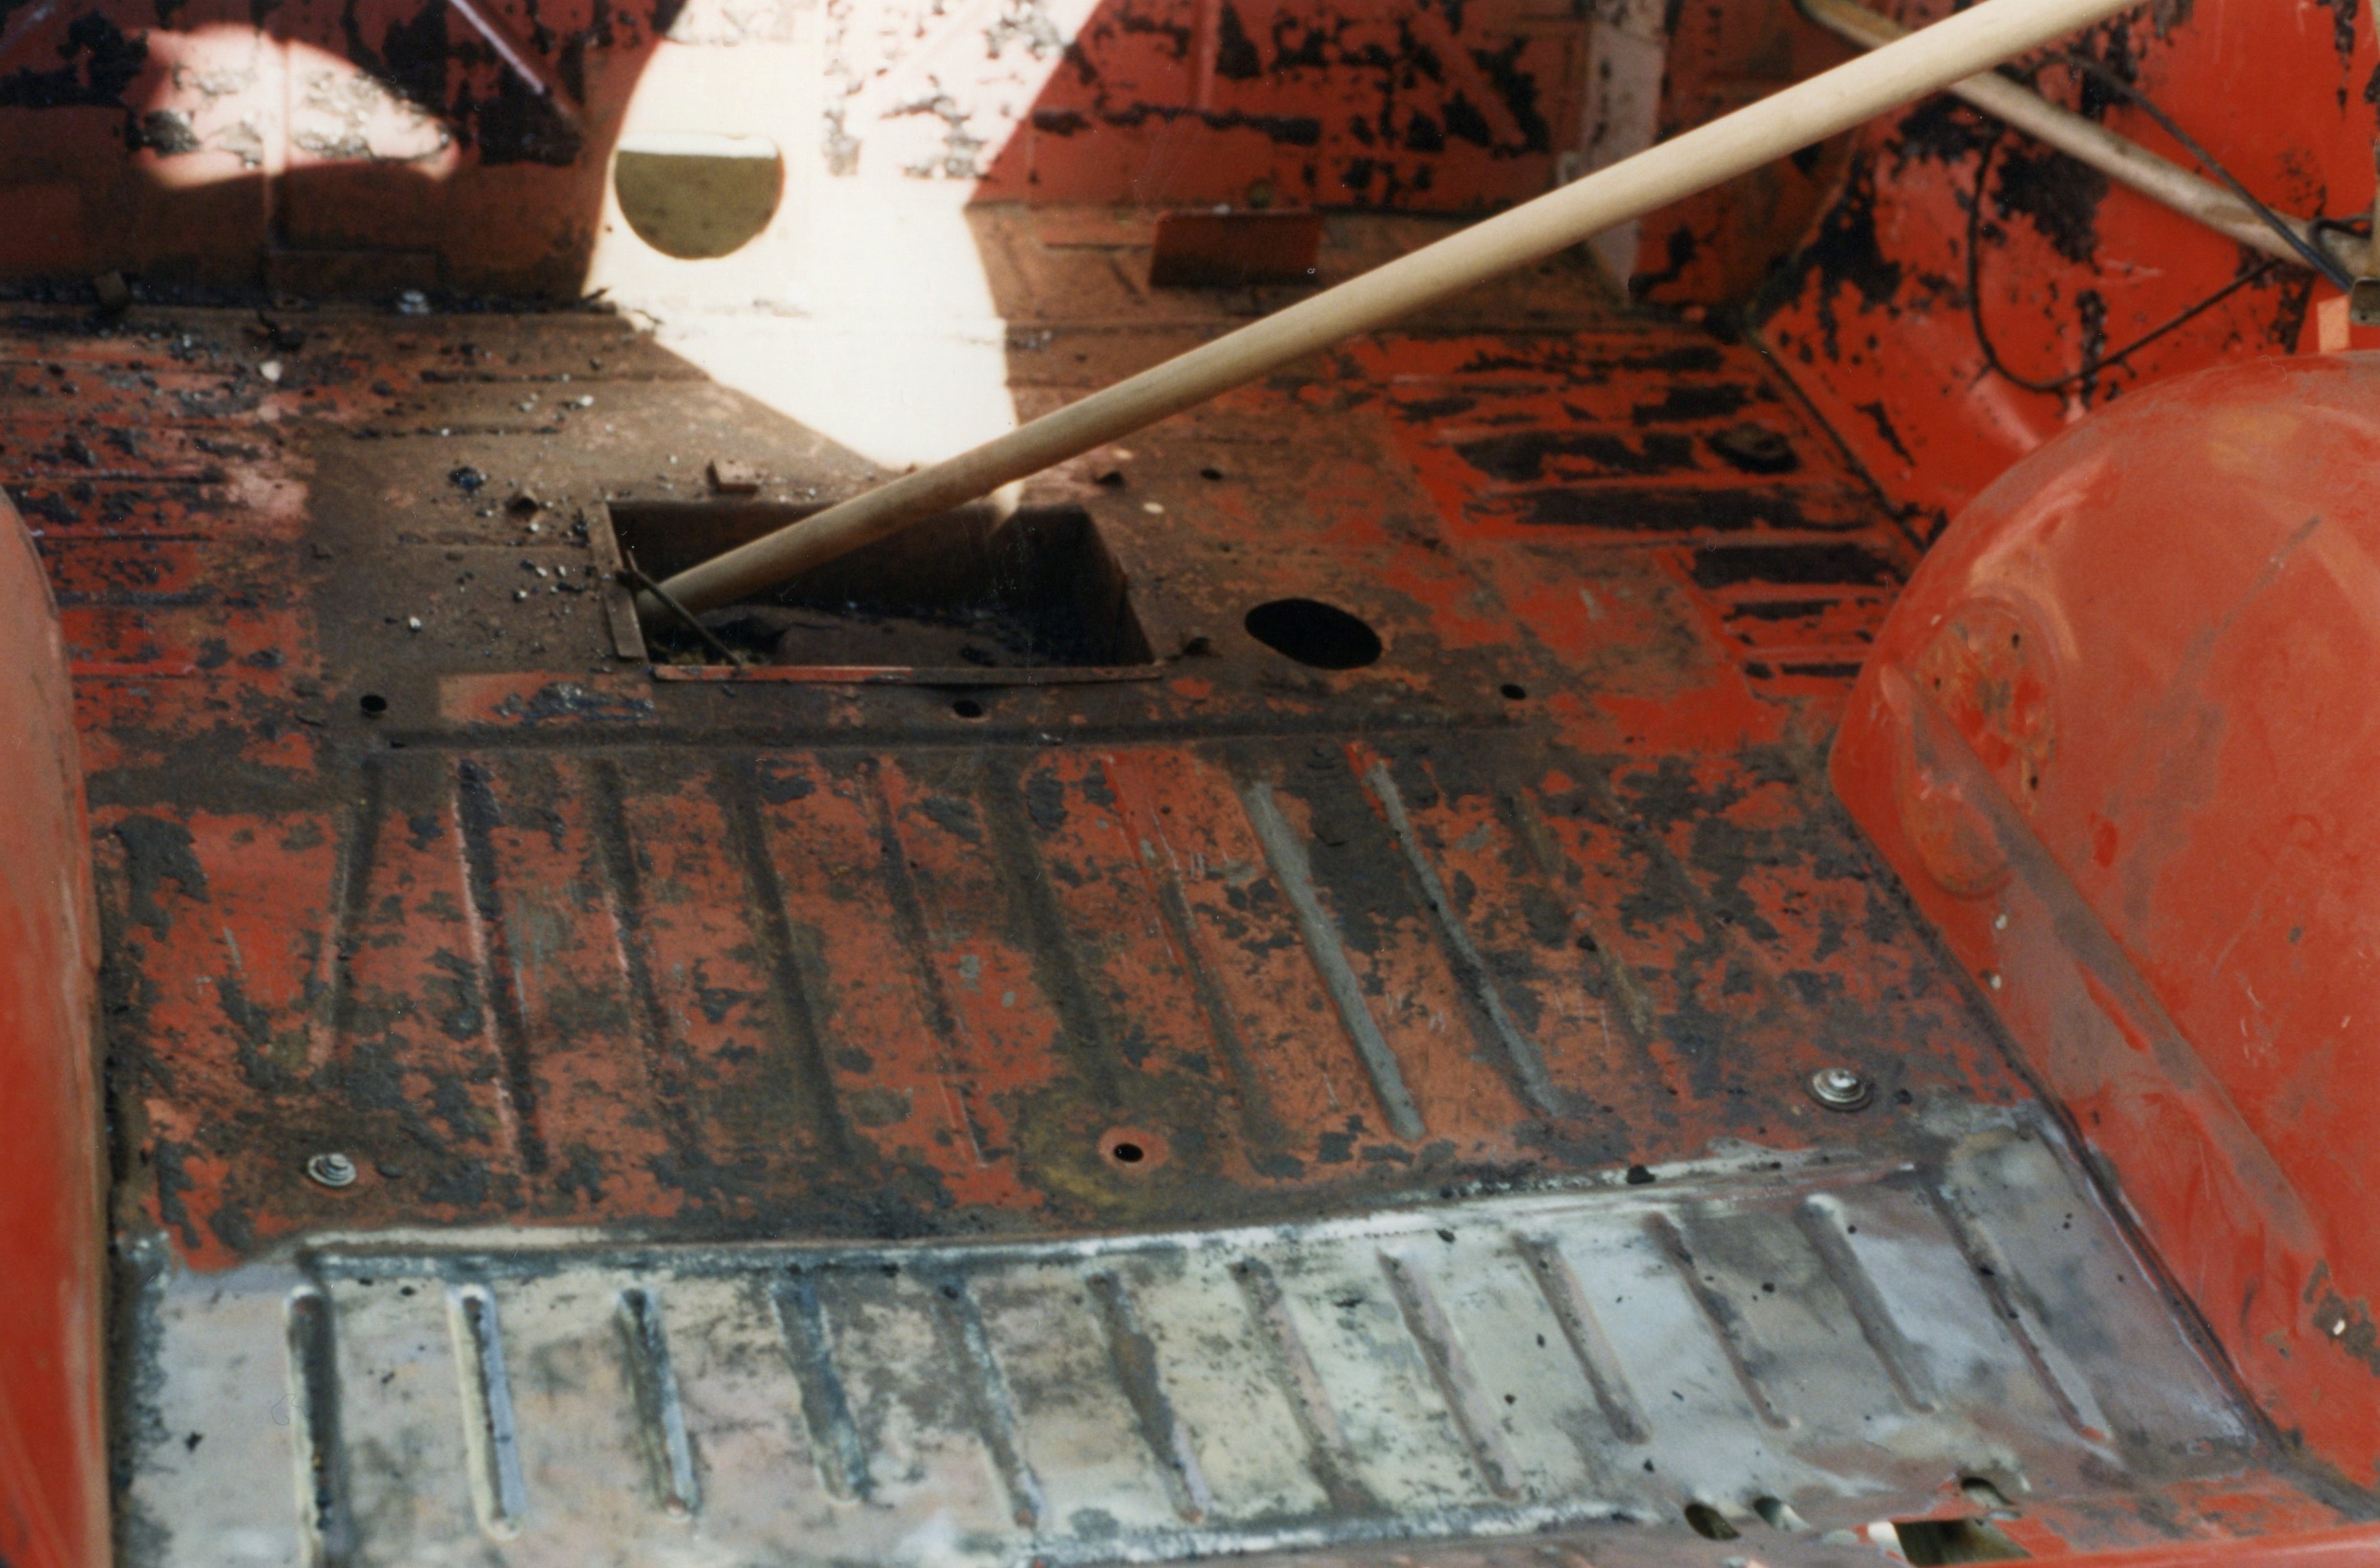
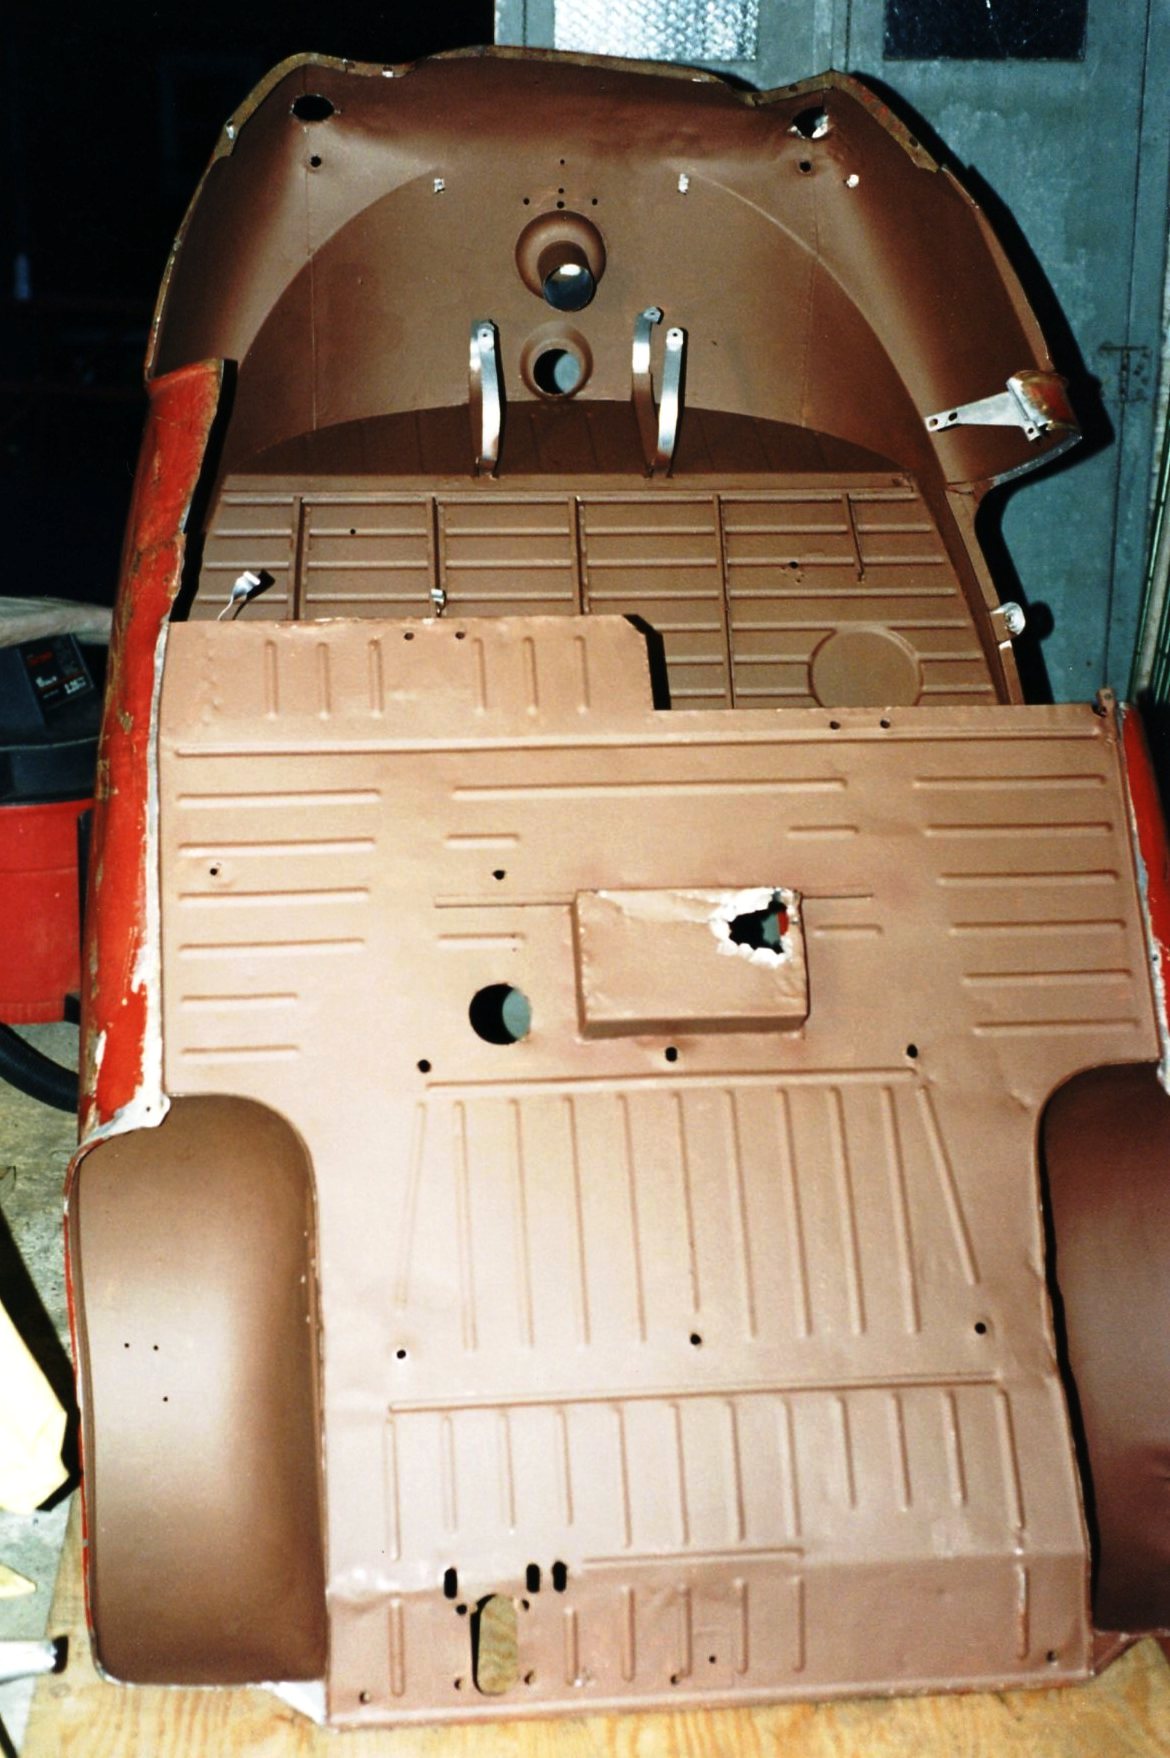
The interior was tackled next. The heavy black tar paper lining the inside of the shell was certainly original. The 38-year-old glue gave me a fight, and I fought back using a heat gun, a putty knife, and lots of grunt work. The final bits were broken loose using a wire brush chucked into my trusty Black & Decker electric drill. Given the age of the car, I went so far as to remove the paint from the floor and wheel wells, so that fresh paint could be applied to bare metal.
Floor in process of being stripped; broomstick holds door open.
The only rust-through in the entire body was a hole in the battery box (as the lowest part of the interior, any water which leaked in was going to settle there.) Since this wasn’t an appearance concern, and I’m no body man, the fix was a thick piece of sheet metal stock, bent to shape, glued and riveted into place from the inside. This was done as opposed to covering the hole from the outside in order to provide support for the battery.
Sheet metal repairs done while you wait
Once the inside was stripped down to bare metal, the body was tipped up onto its door opening (door removed of course), which provided full access to the underside. I’m not sure how the factory finished off the bottom of the body (if they did at all), but I faced a floorpan completely covered with old paint and surface rust. Like the interior, the underside was brought down to bare metal with wire brushes mounted in an electric drill; tedious work, to state the obvious.
James Nanry, having assisted with body tilts, poses with his accomplishments
I decided on a multi-coat approach to provide maximum protection for the sheetmetal. Certainly the car was not going to be driven in inclement weather, but there would still be times when it would be outside in damp and humid conditions.
Midway through the messy job of stripping the underside
First coat: Bill Hirsch zinc paint prep/converter, to neutralize any remaining rust, and to help convert the surface to accept the paint:
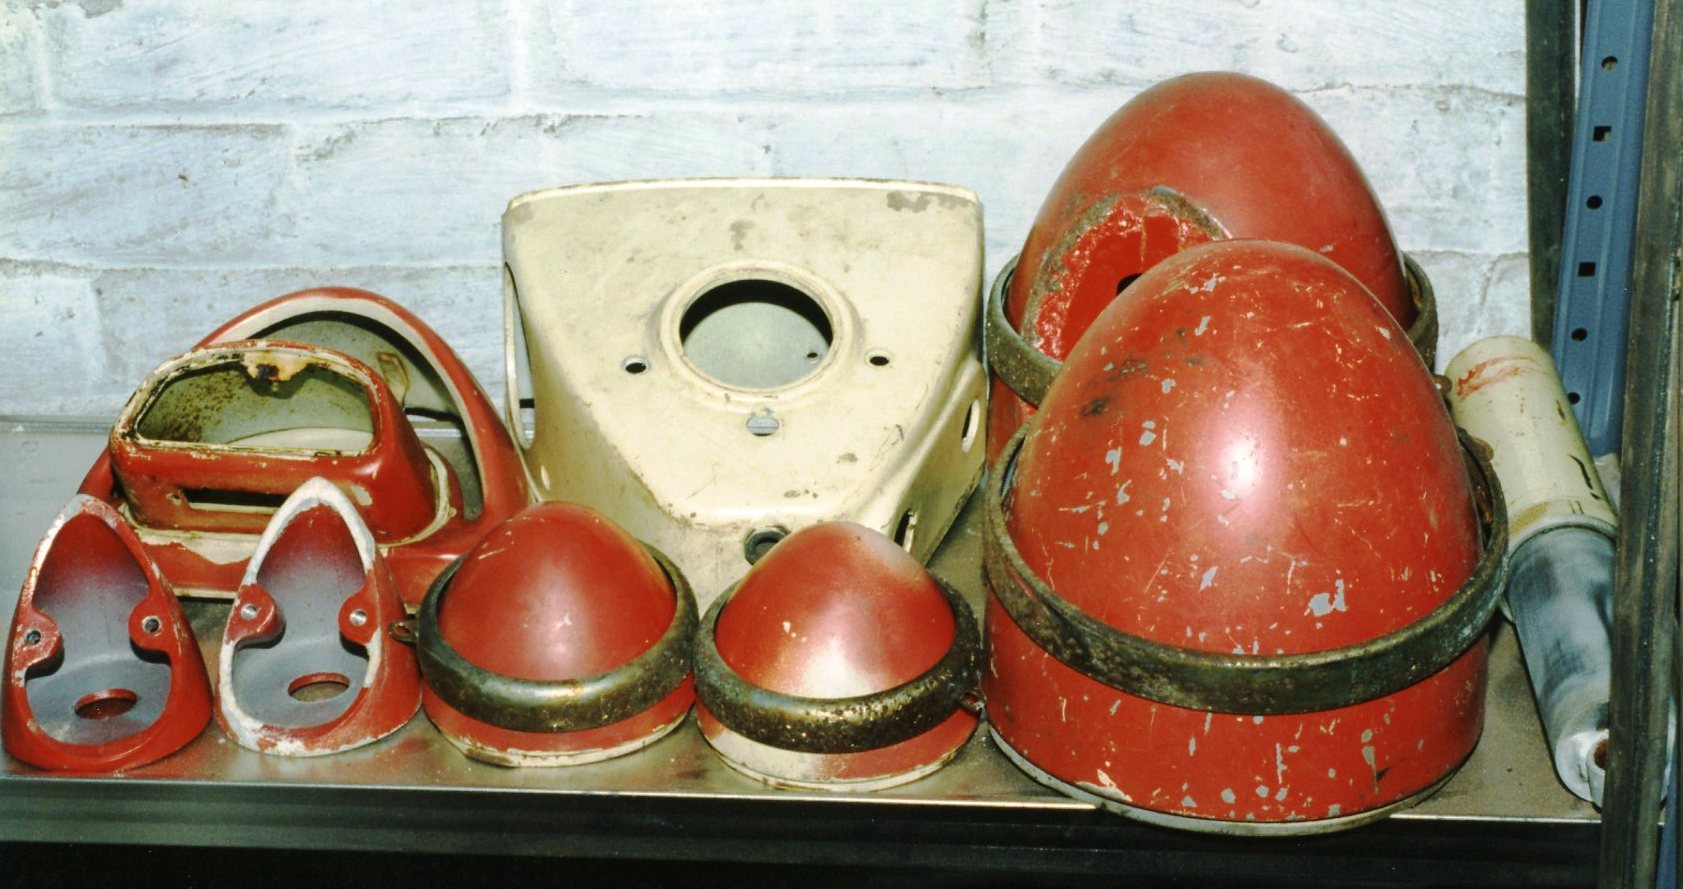
Extraneous parts were delivered along with the body
The body (along with the door, headlight buckets, engine cover, and instrument panel, all to be painted the same red) was ready to head to “The Shop”. I bought two 2x4s, glued strips of carpet to them, and bolted them to the underside of the shell using existing mounting holes. I then bolted the 2x4s to the wooden floor of my trailer. It was secure. Photos document my dear departed friend Chris Beyer who so graciously and generously accompanied me that day.
Chris shows off red paint
and 2x4s bolted to body
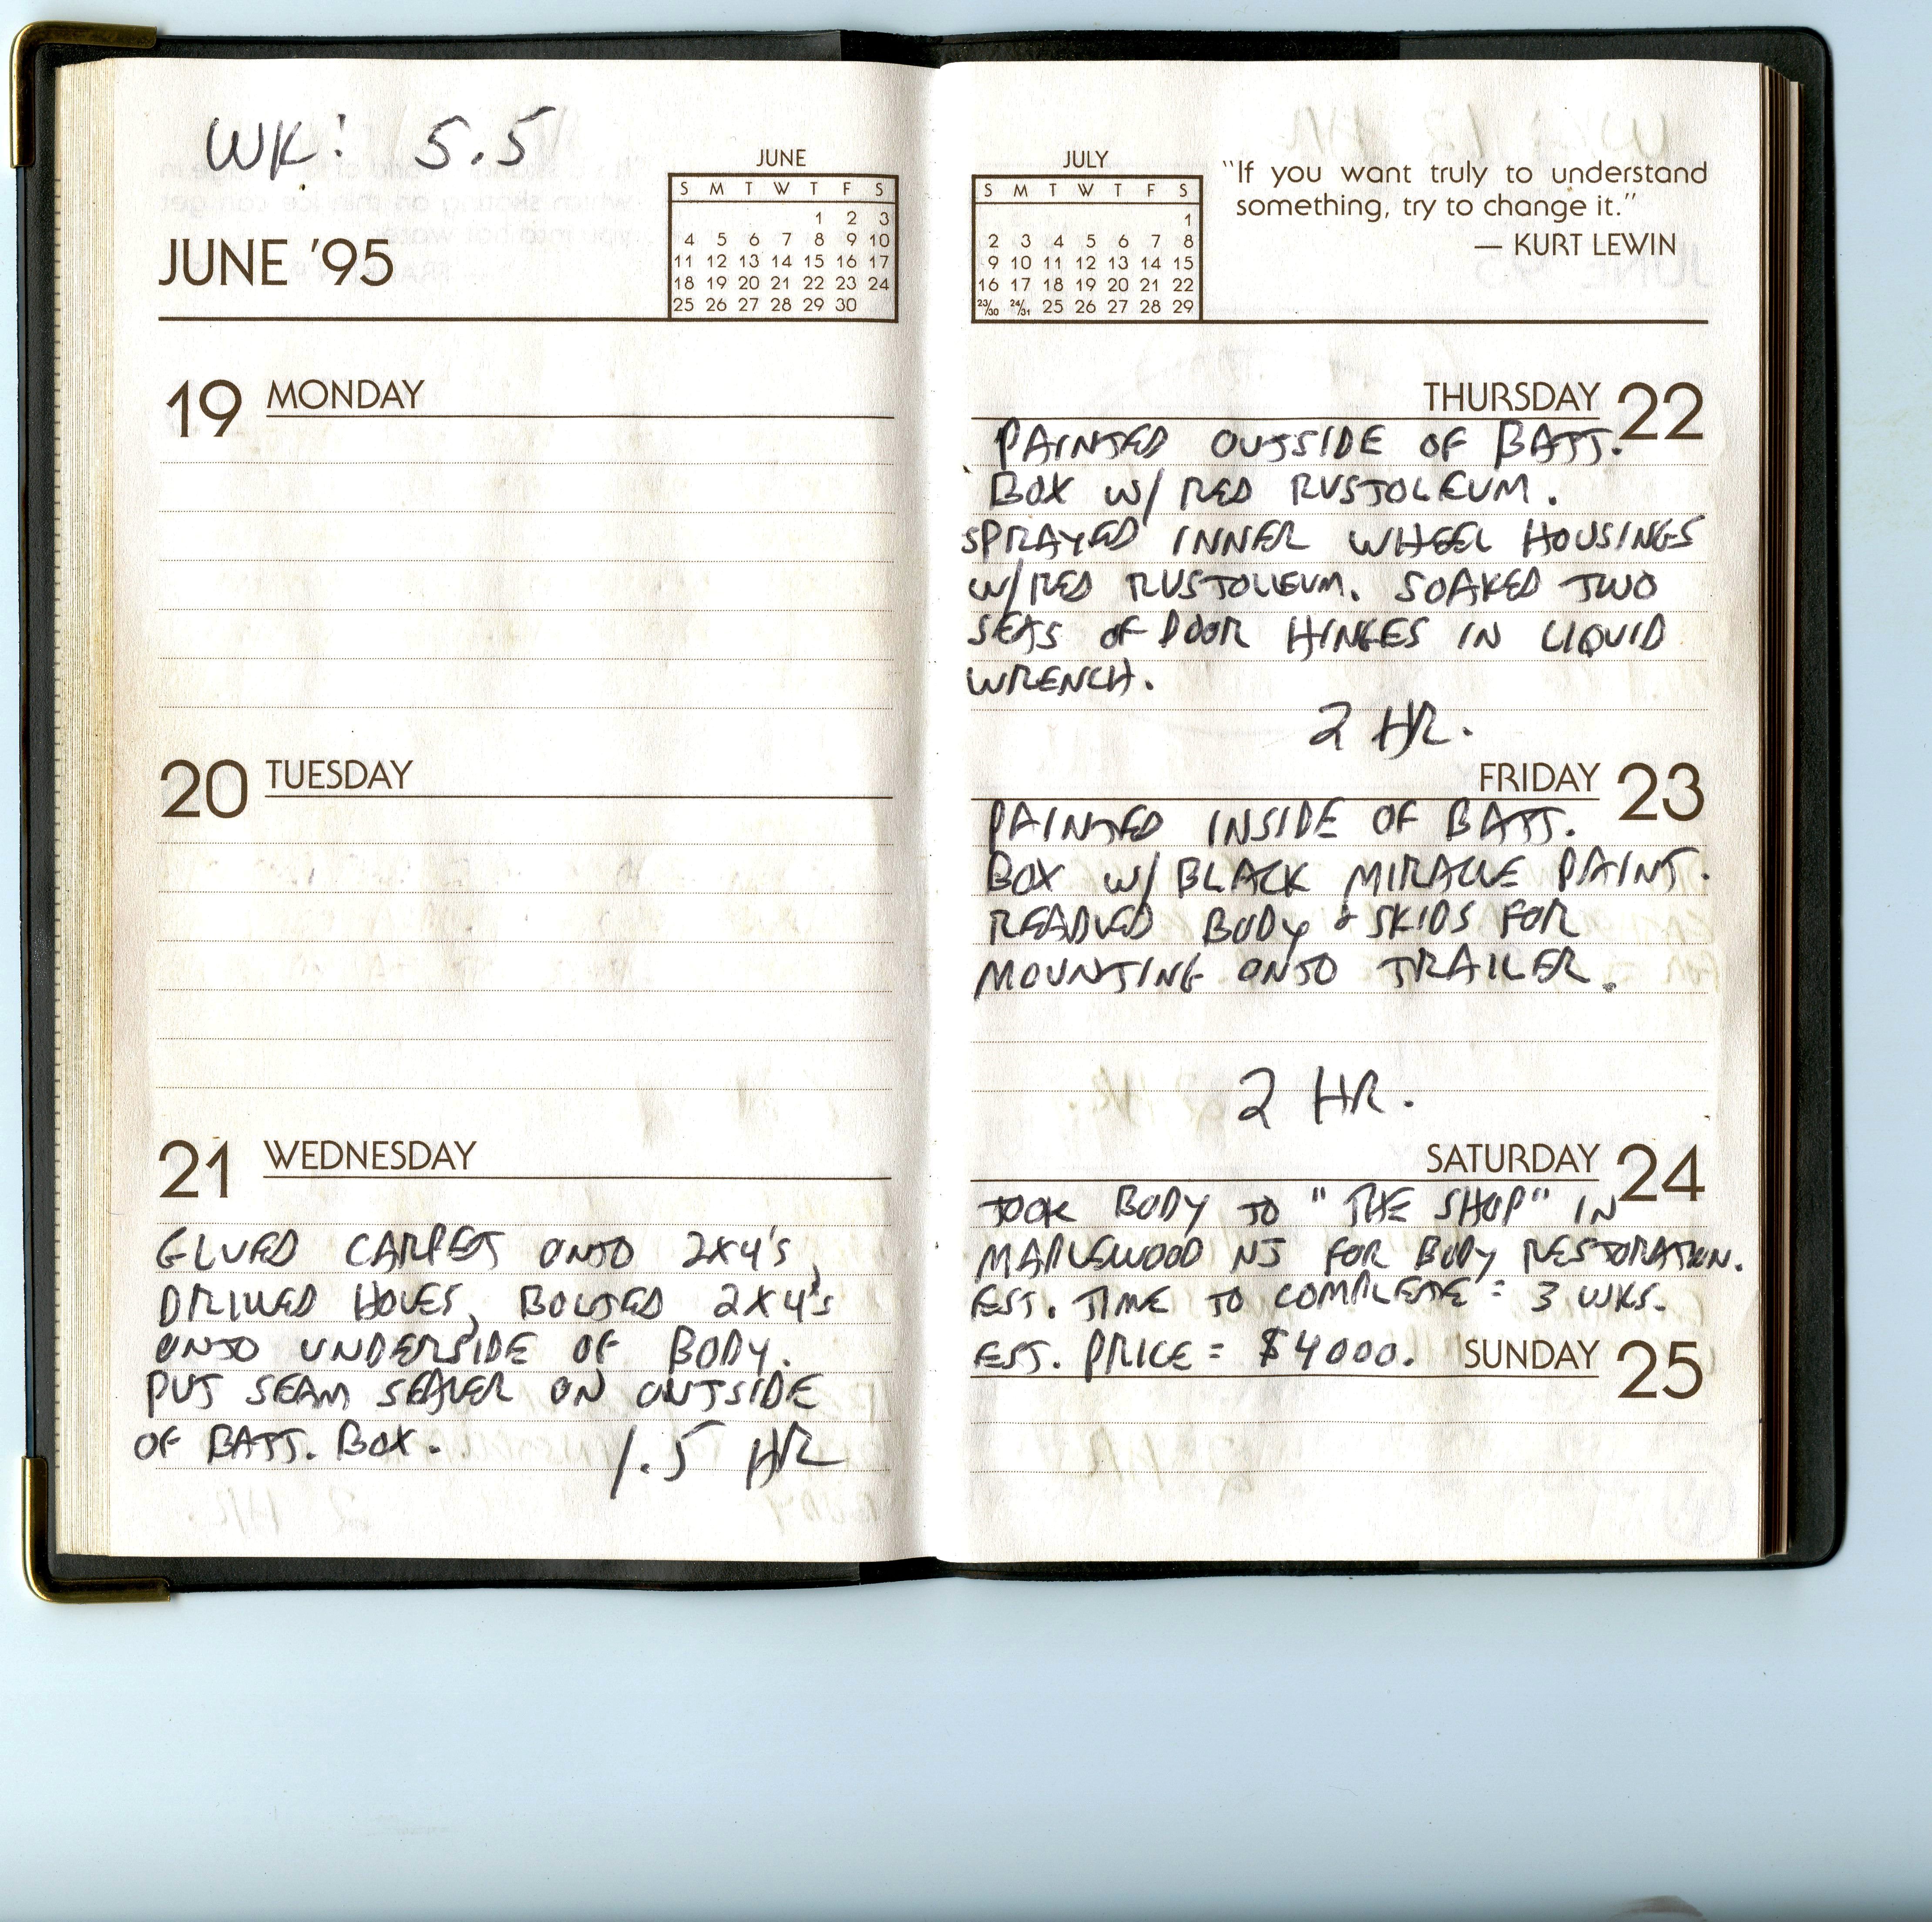
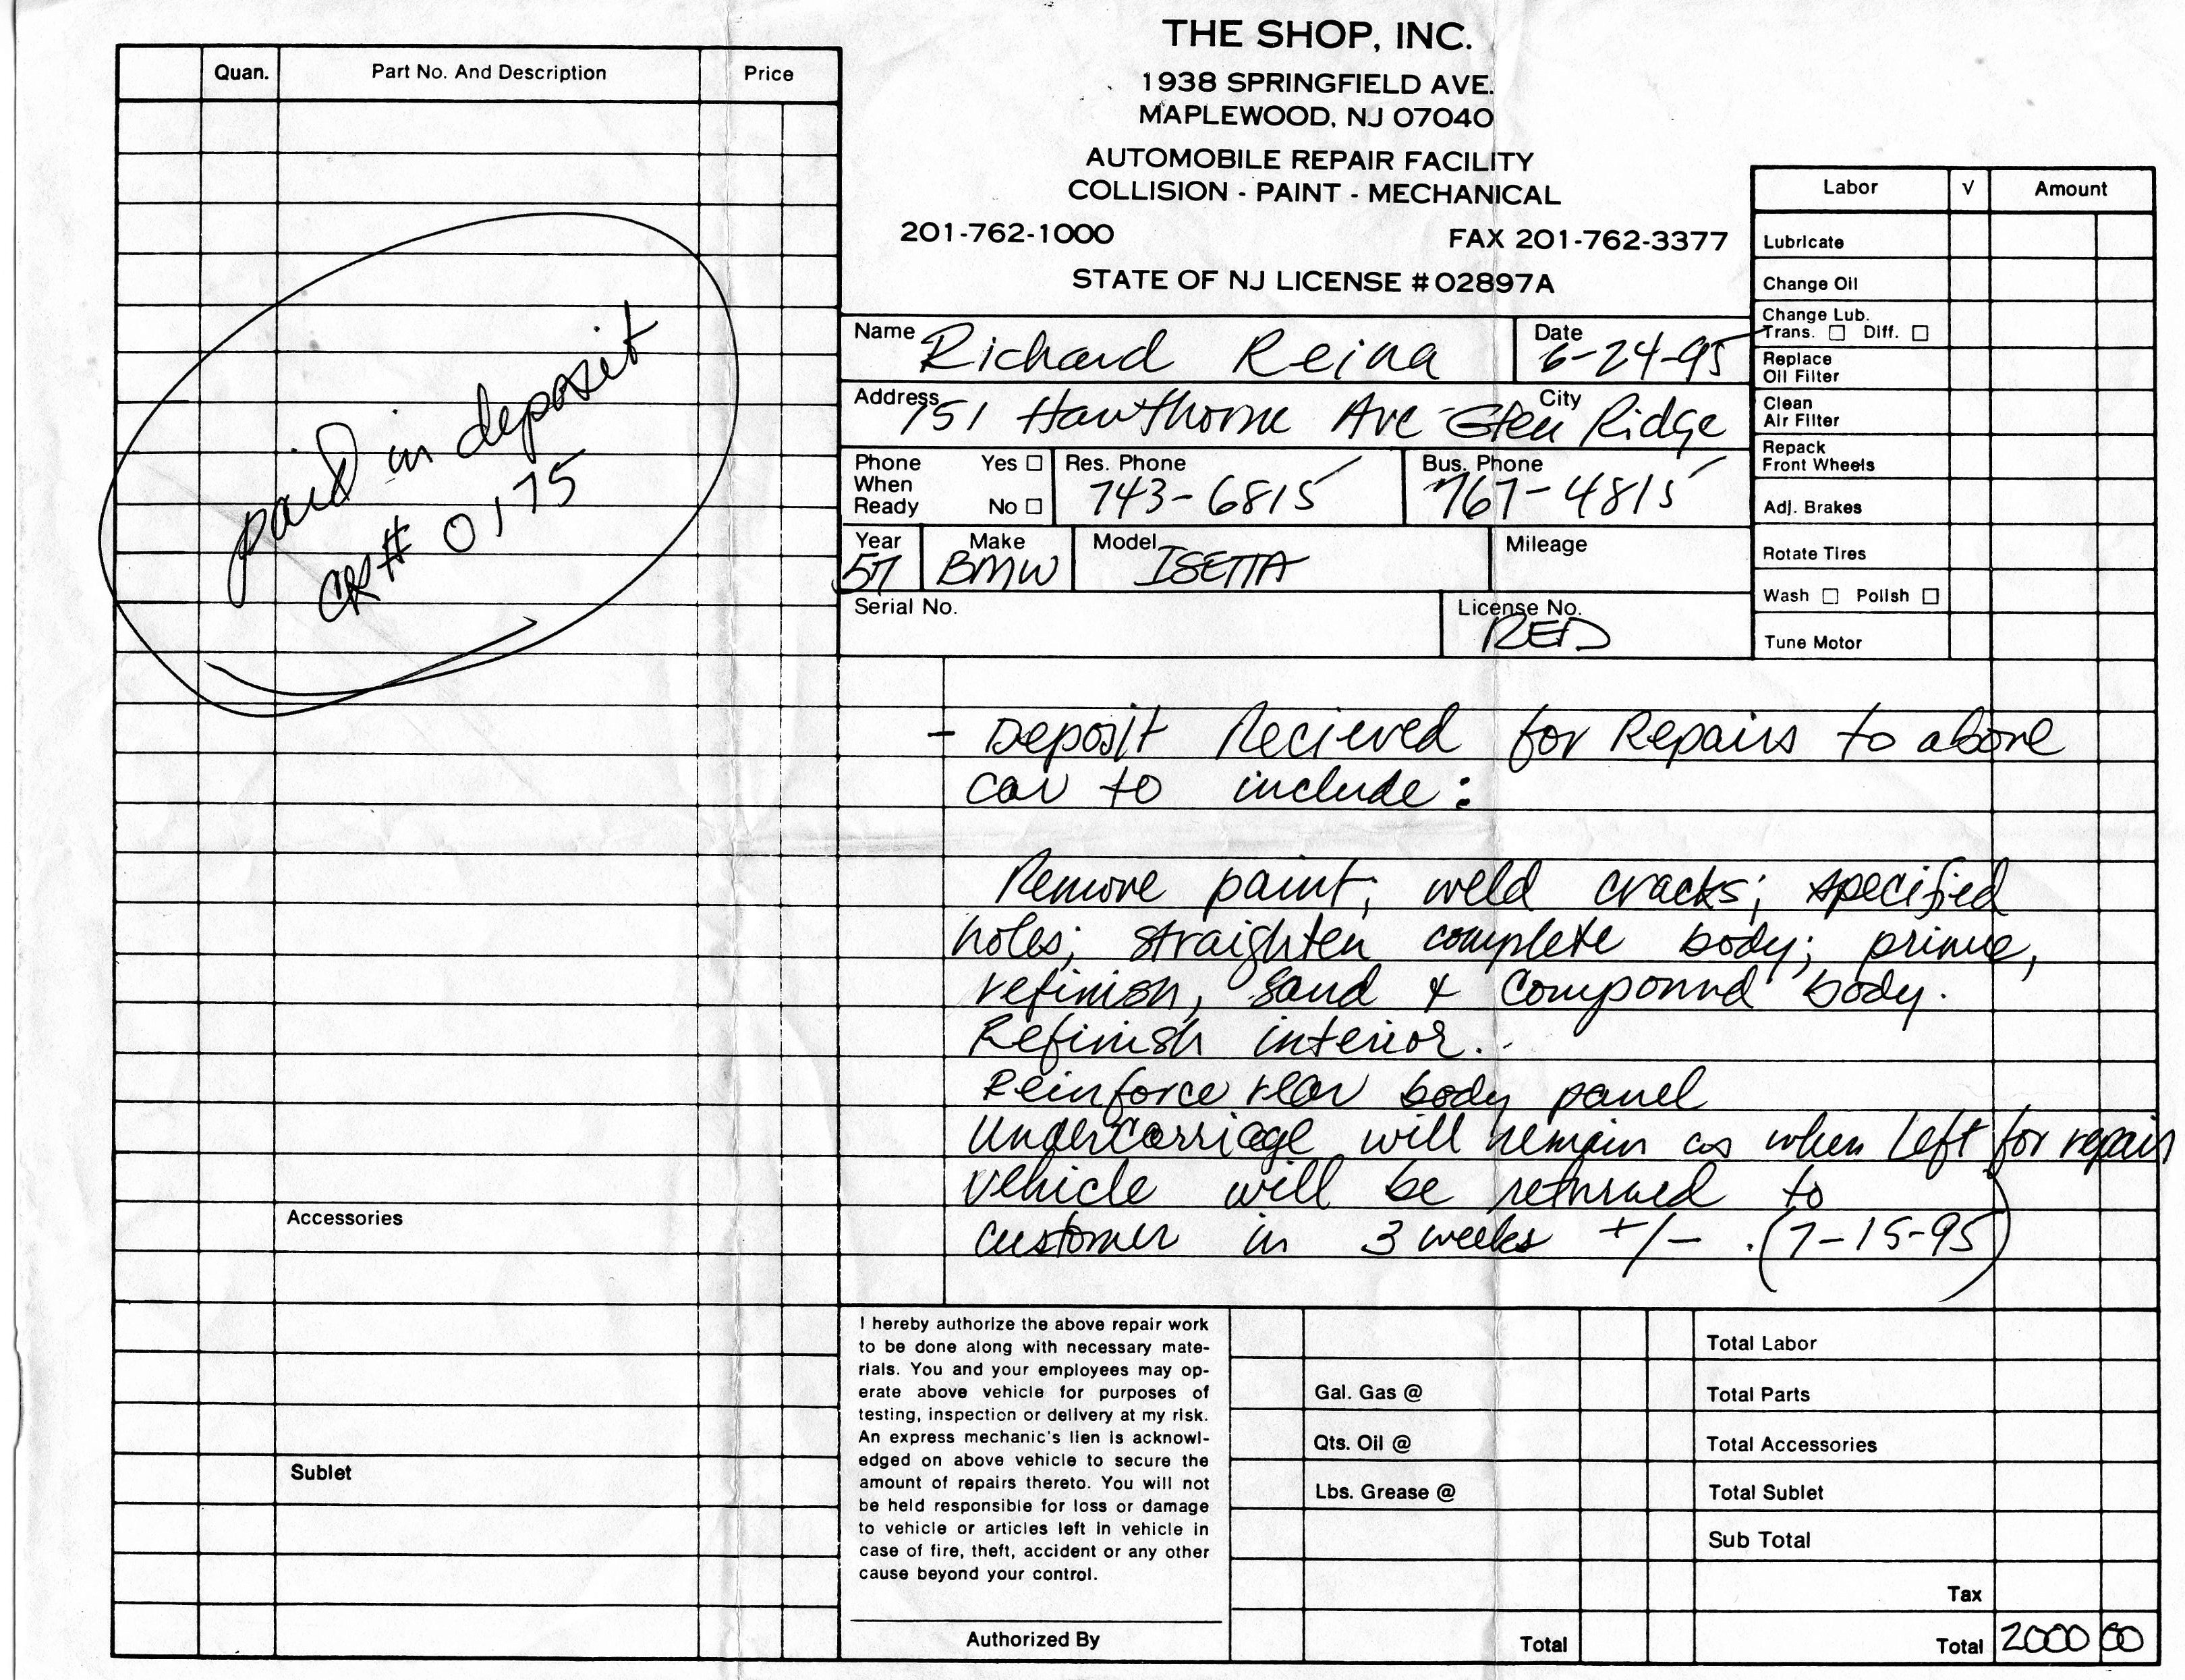
My Isetta log book contains this entry for Saturday, June 24, 1995:
Took body to “The Shop” in Maplewood NJ for body restoration. Est. time to complete = 3 wks. Est. price = $4000.
Deposit of $2000 paid at dropoff; balance due at completion
Now it was up to Jody. I think I went home and had a stiff drink.
My Alfa is a mostly completely original car, meaning that it’s never been “restored”, not in the sense that classic cars are restored with all-new cosmetics and completely overhauled mechanicals. Yet with 65,000 miles on it (and counting), there have been maintenance and wear items needing attention.
The car is wearing about 90% of the paint and 100% of the interior with which it left the factory. The engine, gearbox, and rear axle are likewise the same assemblies that Tony, Vito and their fellow factory workers installed. During the past 51 years, the car has gotten new tires, brakes, belts, hoses, bulbs, shocks, clutch, tune-up parts, and fluids. I’m very conscious of my role as “steward” of this car, and hope that when it eventually moves to its next owner, the preservation efforts will continue.
As you may know from reading this blog, I’m not shy about putting several thousand miles a year on it, and if the paint gets a little worn or slightly chipped from my enjoyable time behind the wheel, so be it. But I would never consider repainting the car. Likewise, should a major engine component fail, I’ll repair it as necessary, but I’m not going to seek out a larger engine from another Alfa. I’m continually striving to maintain that balance whereby I get to enjoy the car while only fixing what needs fixing.
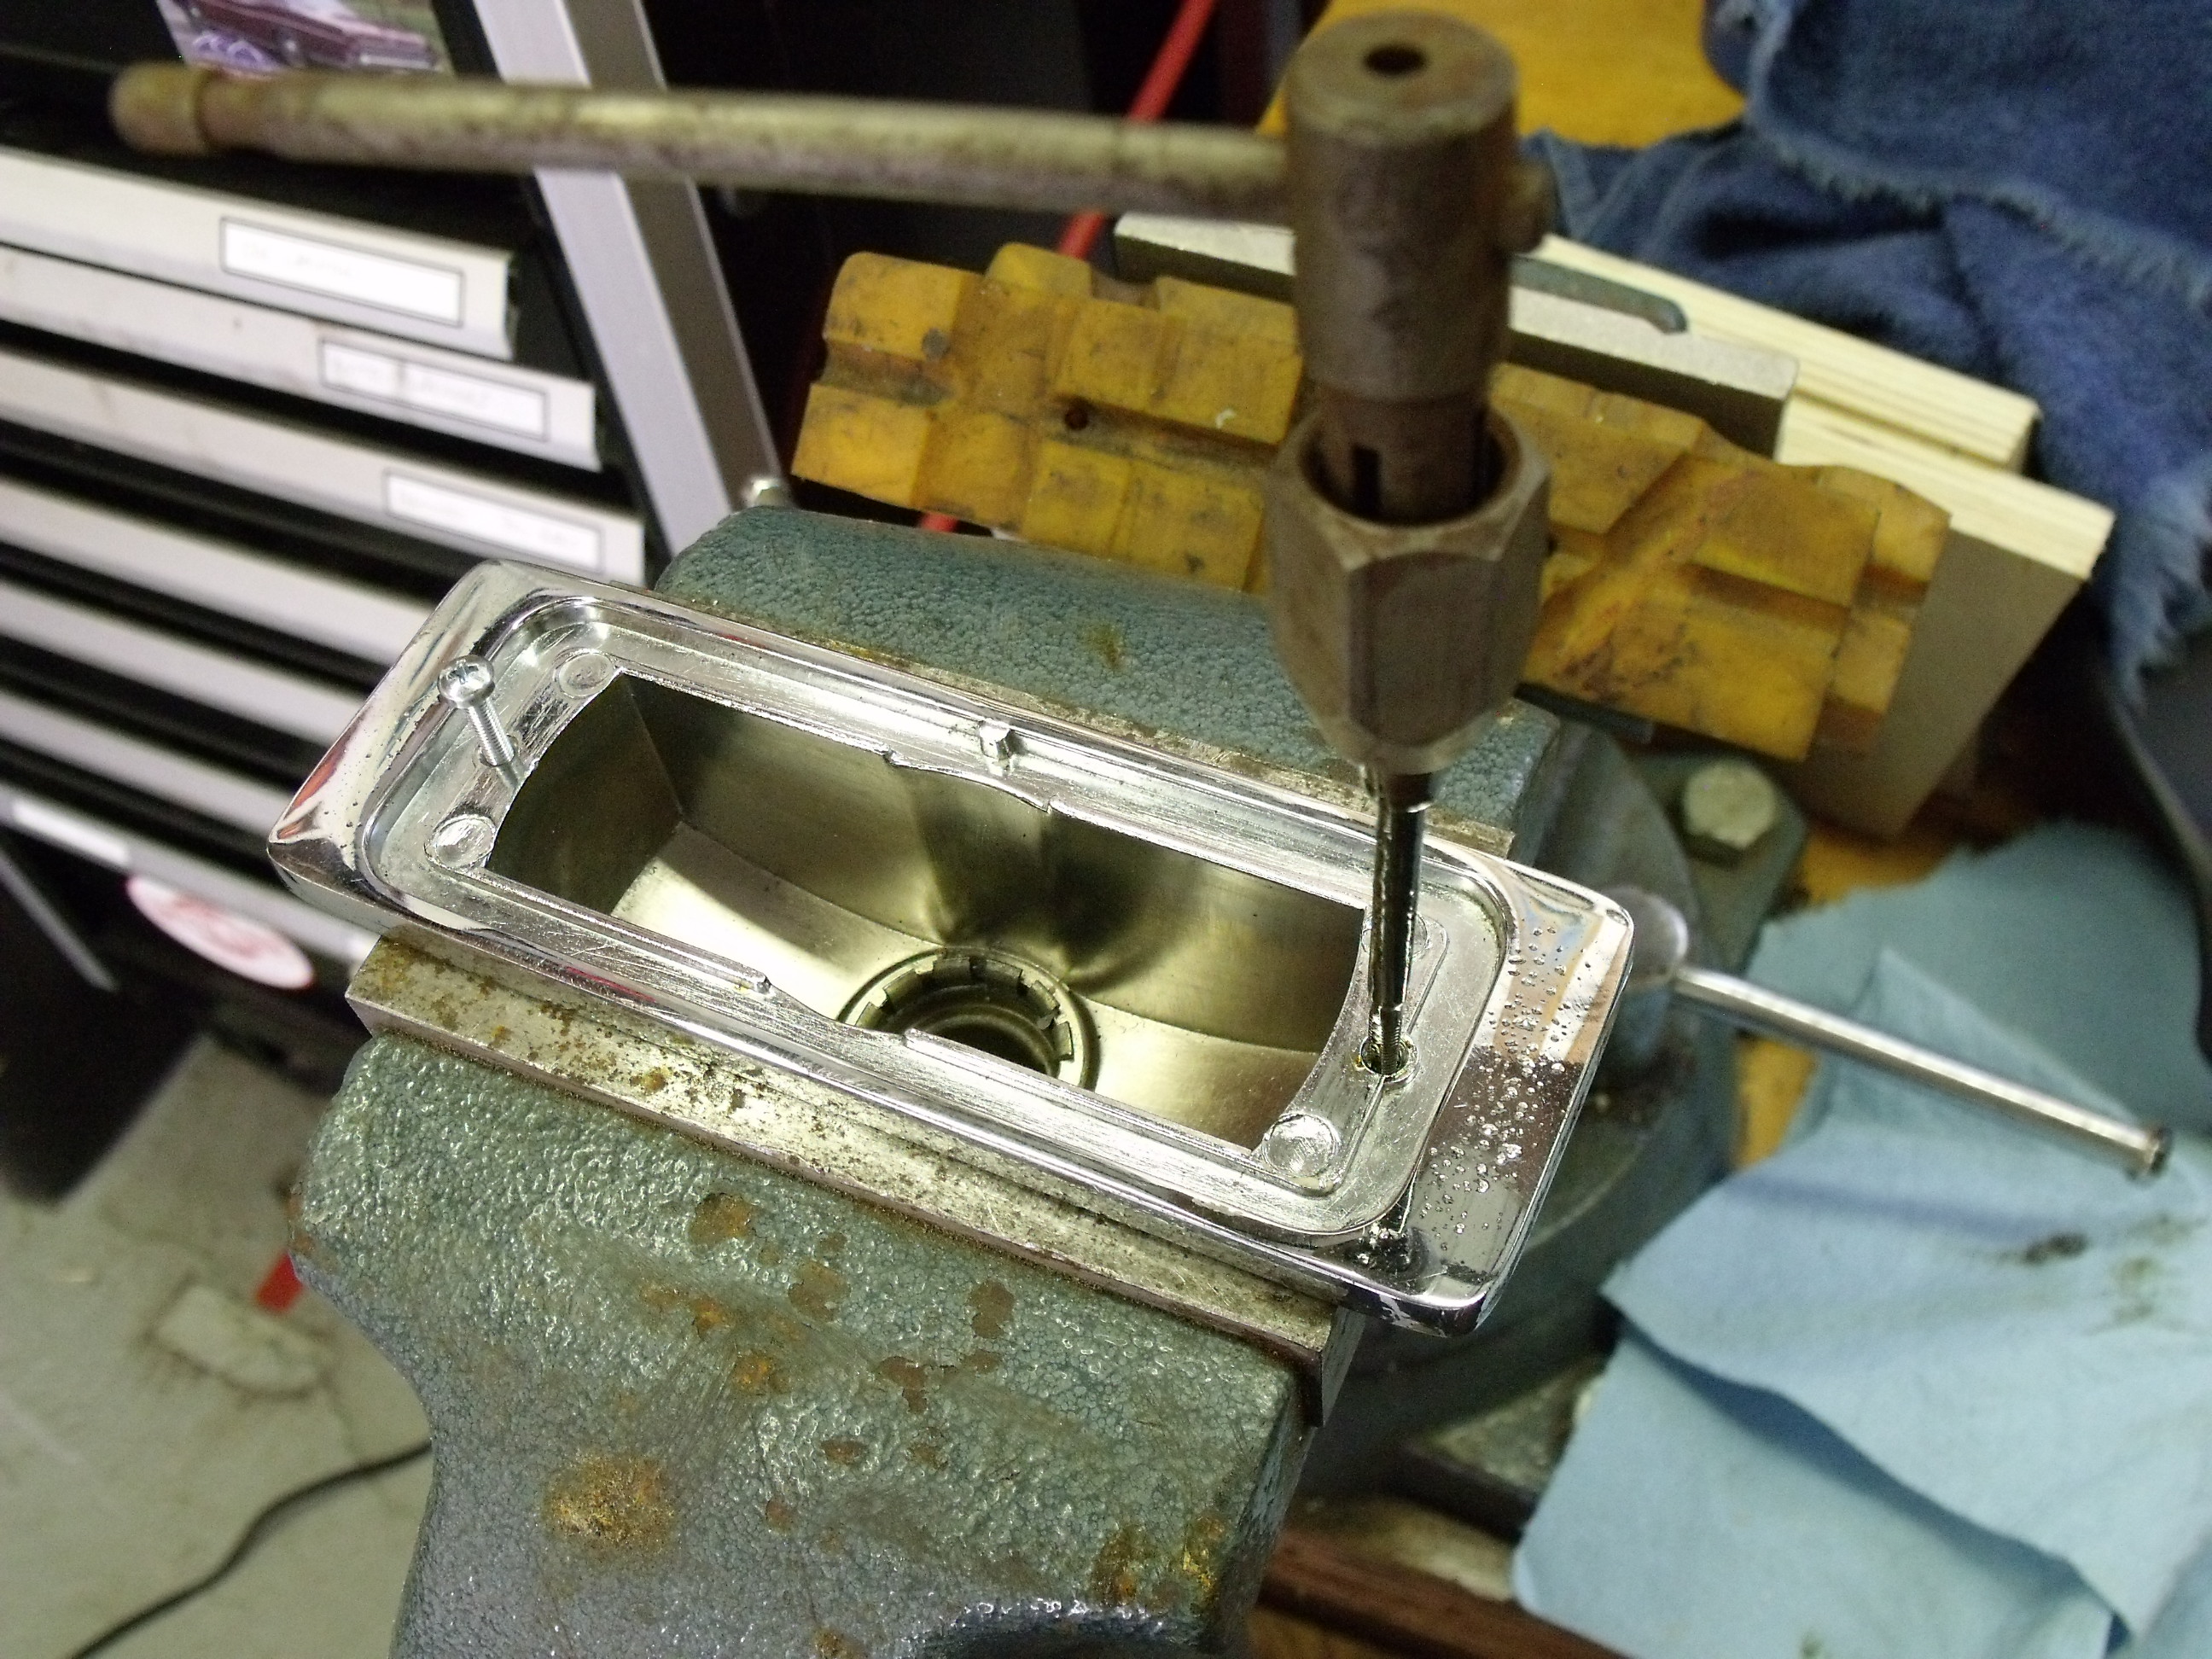
Earlier this year, I discovered that the reverse light didn’t work. The truth is, in the 5 years I’ve owned the car, I don’t think I had ever checked the back-up light. Its inoperative status gave me the impetus to remove the light assembly (there’s only one, below the rear bumper) and get it working again. The overall goal was not to replace it, but refurbish it, reusing as many of the original components as possible.
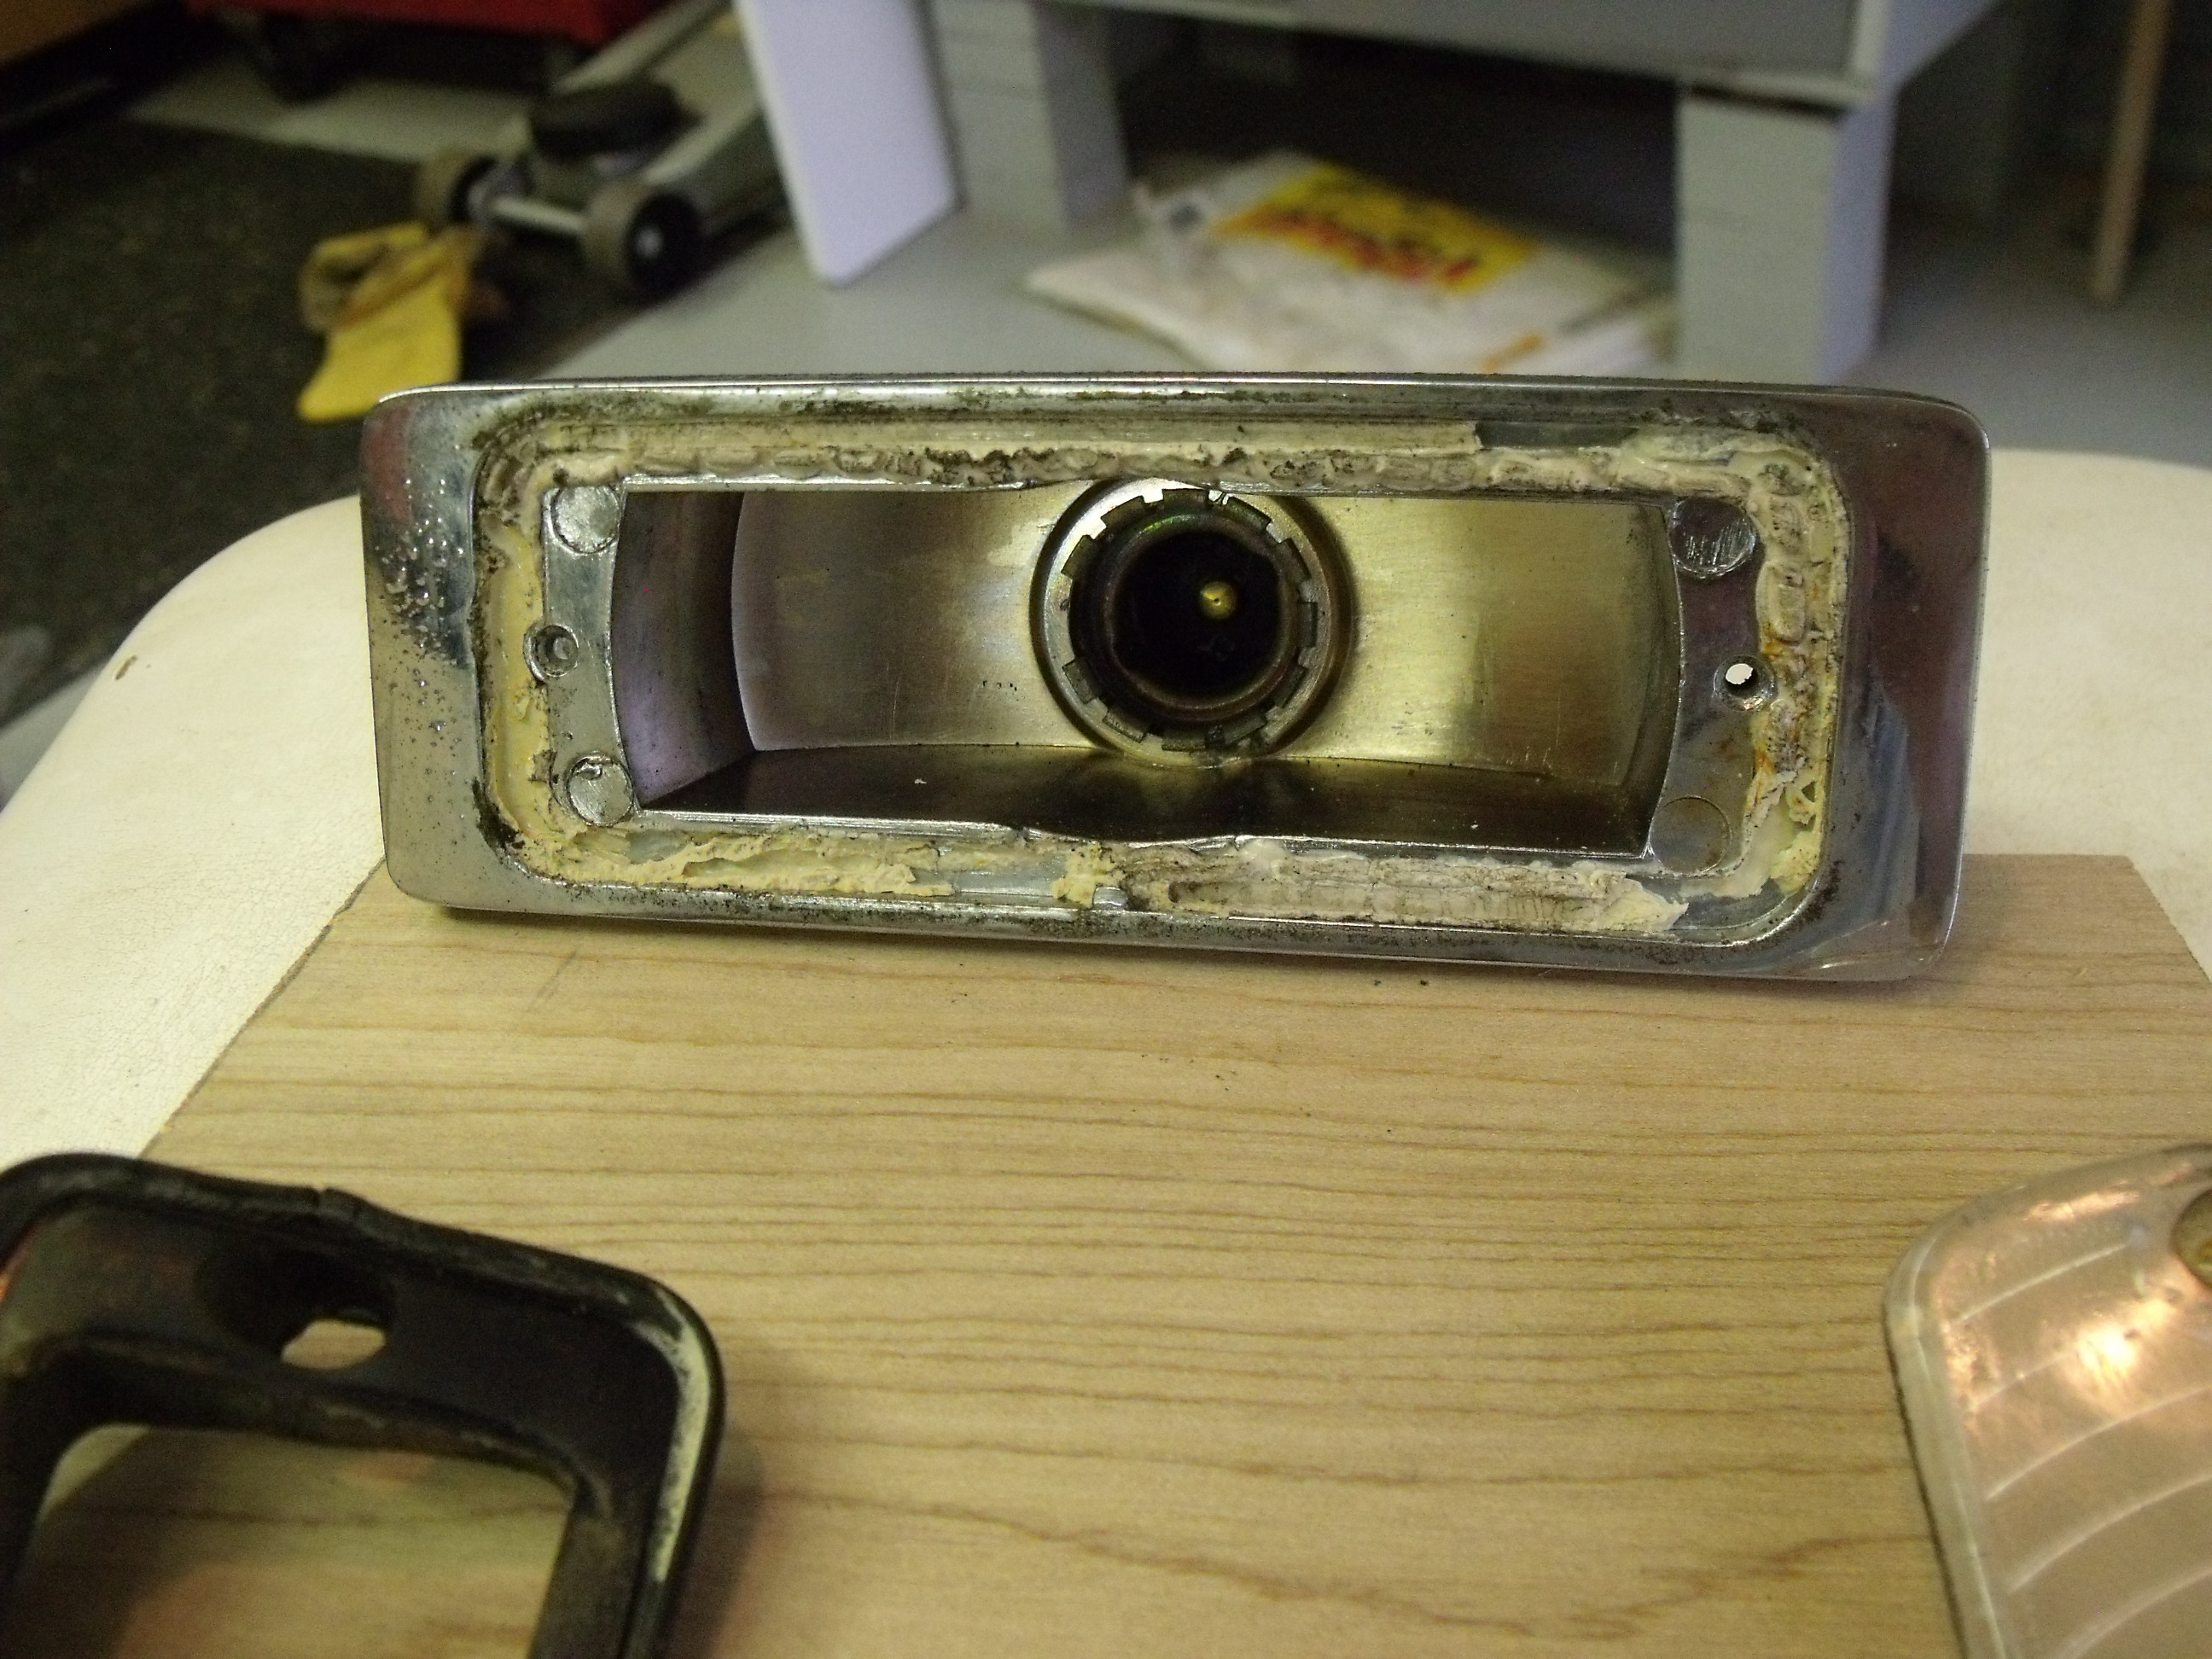
Bezel, housing, lens, and broken hardware after removal from car
The first challenge presented itself when two of the four fasteners snapped during removal. The clear lens was held in place by two Philips head screws, and half of one stayed in the housing. The housing itself used two studs with nuts, and one stud broke in half. Unlike the recessed screw for the lens, the broken stud projected far enough above the housing that a pair of locking pliers got it out the rest of the way.
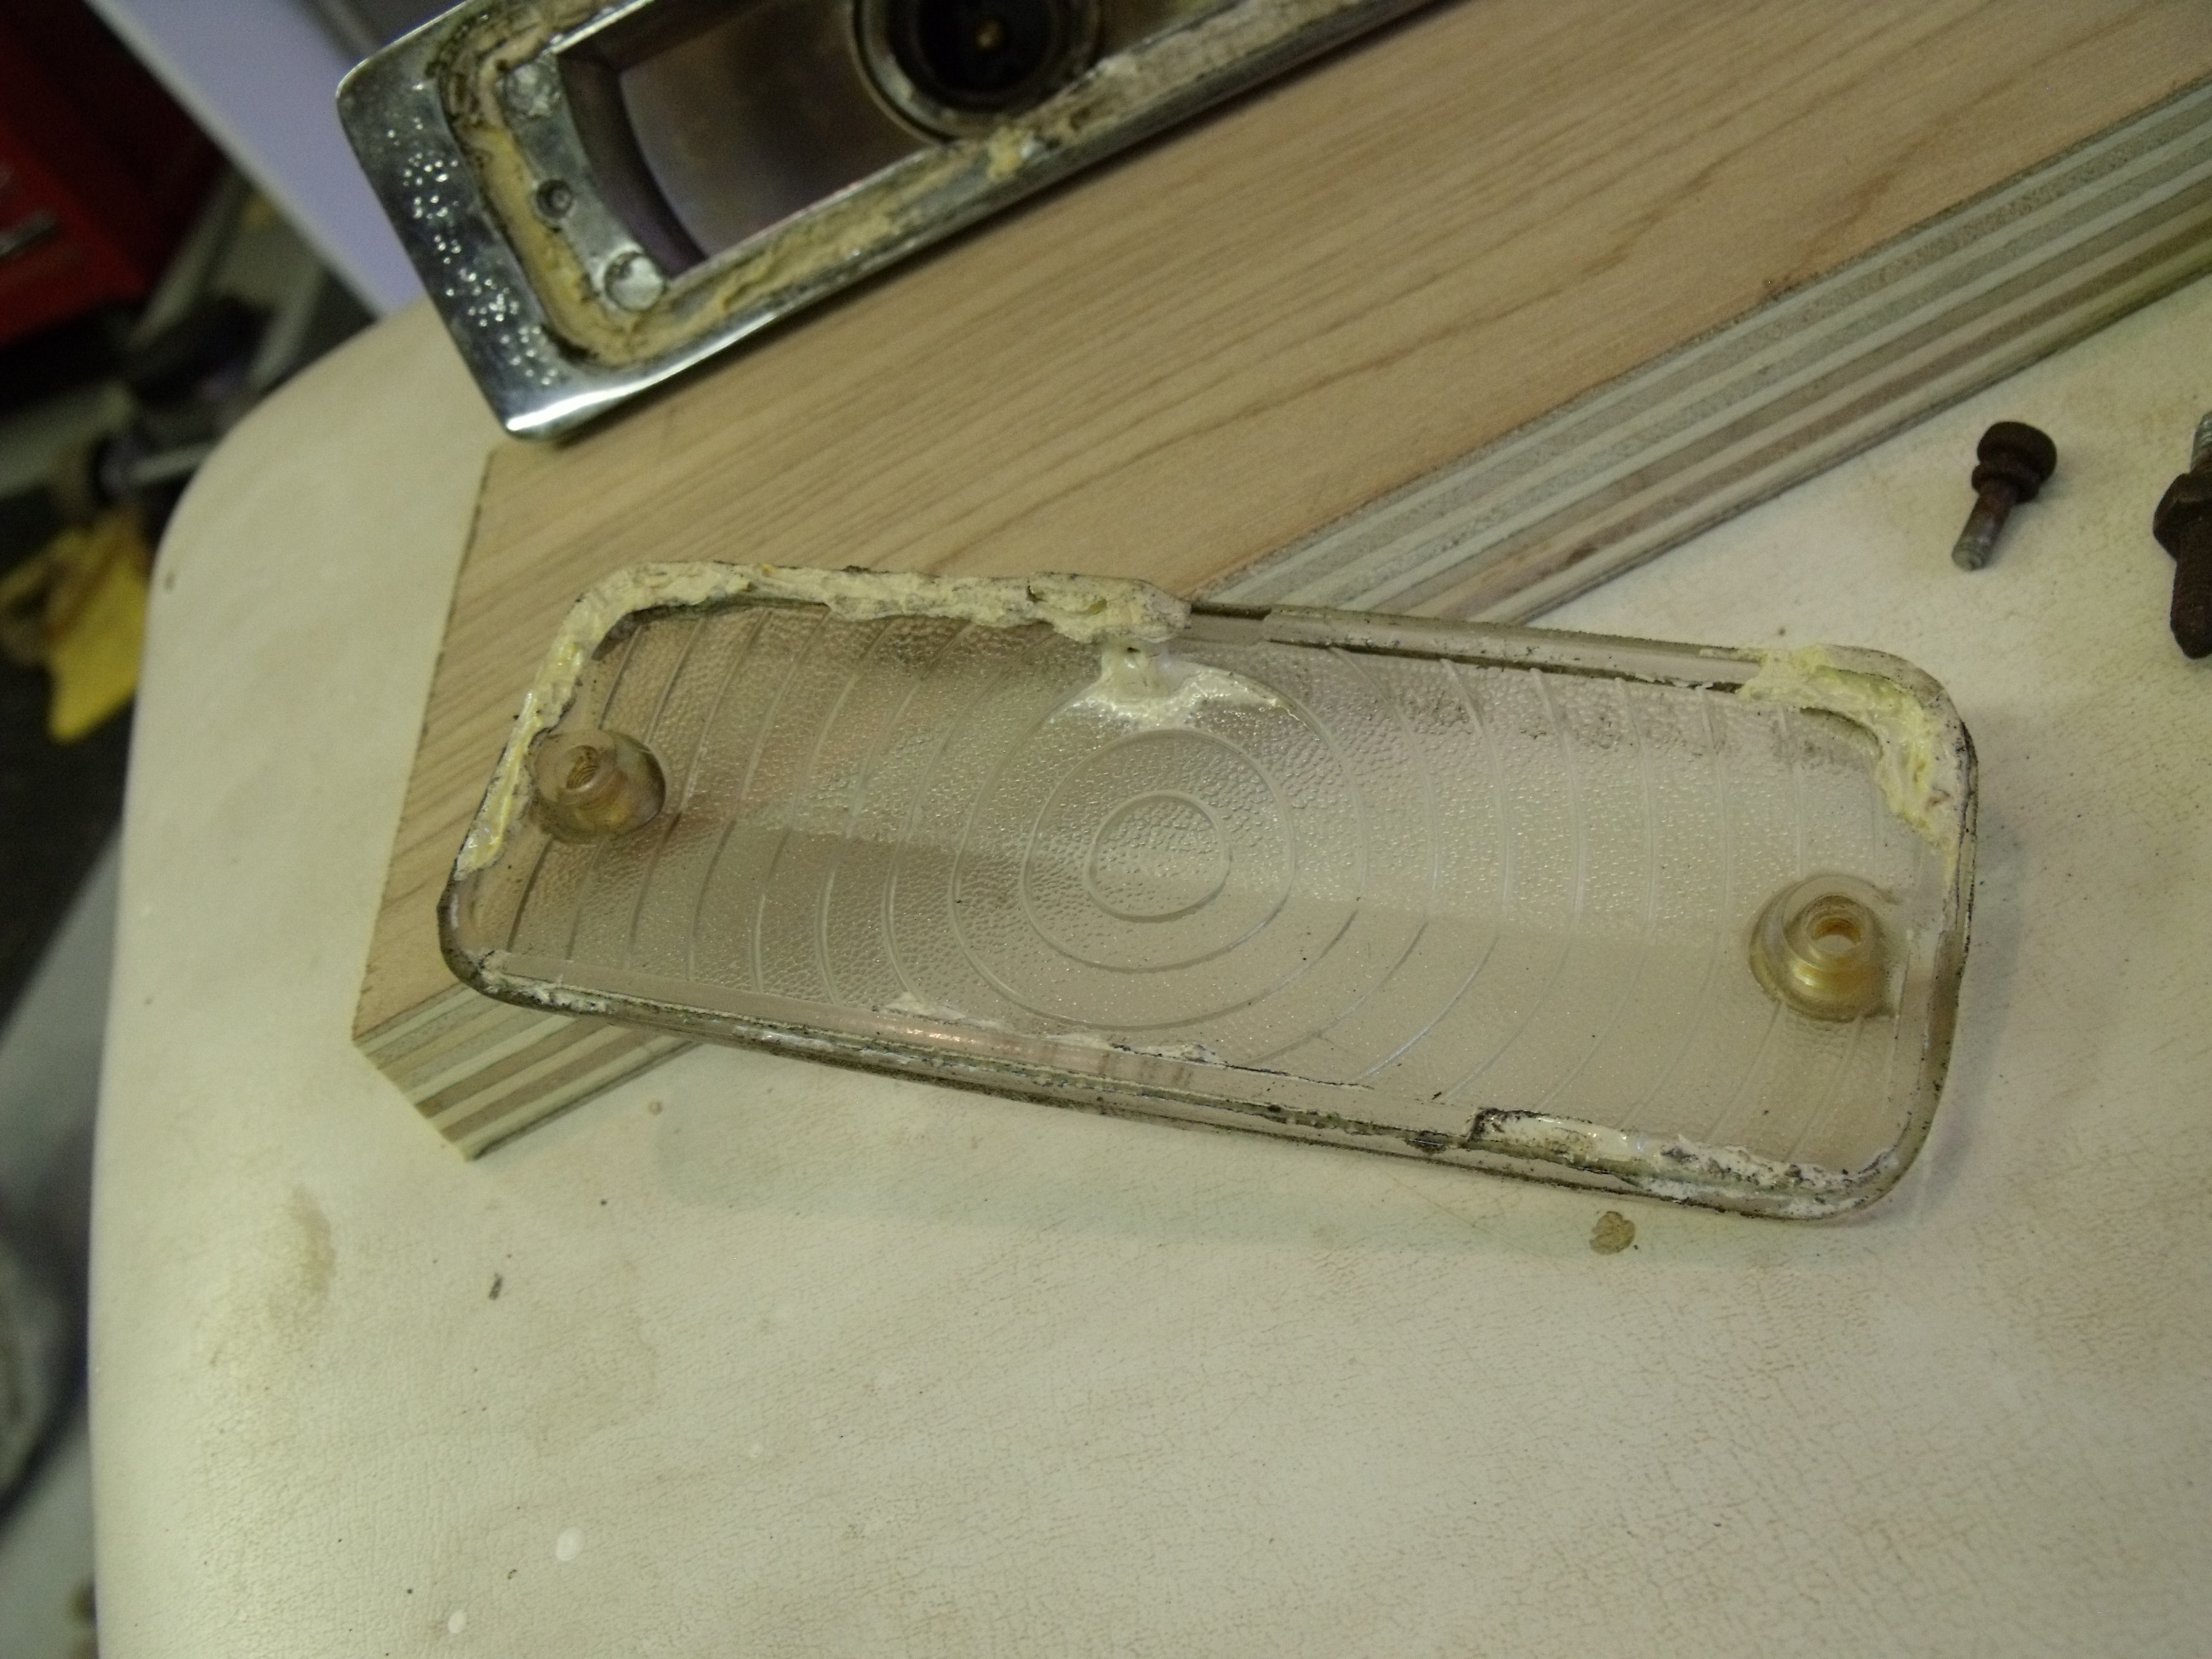
Closeup of housing. Note broken screw on left, and hardened white gasket.
The gasket beneath the lens had been some kind of rubber that had turned to stone. It’s likely that it had never been disturbed until now. The chrome housing was somewhat pitted, and looked like it would respond to some metal polishing. The rubber bezel, mounted between the housing and the painted rear valence, would be treated to a trick I successfully deployed during the Isetta restoration: using Meguiar’s #40 Rubber Reconditioner, the bezel would be submerged and soaked for several days, hopefully returning some of the rubber’s pliancy.
I had my doubts about salvaging the lens; the old gasket was that hard.
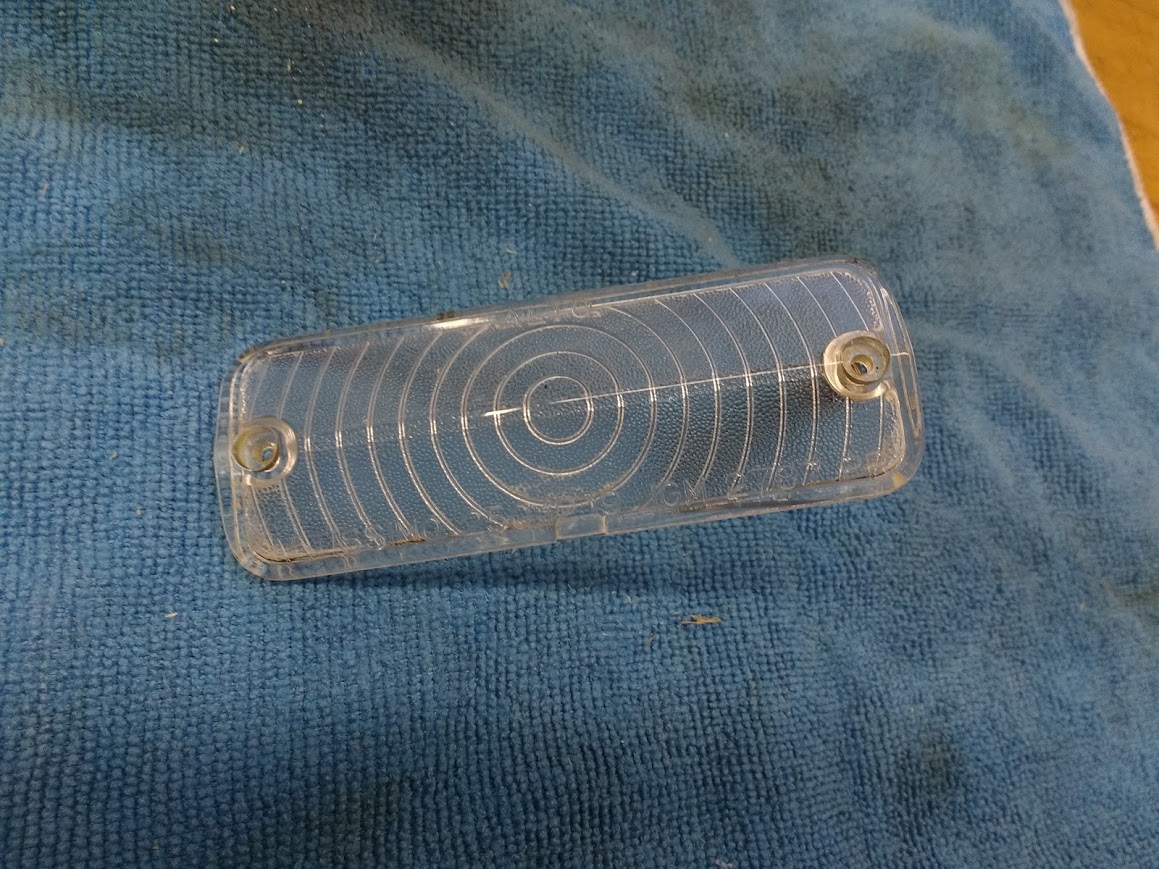
While that sat in its bath, I tackled the removal of the old gasket. This was more of a fight than I anticipated. Not wanting to damage either the housing or the lens, I started with a plastic scraper, but made little progress. Next, I tried various solvents, attempting to soften the material. WD-40 had a minor effect on it, so I kept at it with that, fearful that anything stronger would also harm the lens. The most effective removal tool turned out to be a single-edge razor blade, but this took time. Eventually, both surfaces were rid of the hardened white material.
The lens did clean up nicely
Instead of purchasing a replacement gasket, I fashioned one from sheet cork which I keep just for such purposes. I tacked it in place using non-hardening gasket glue. Three days in the conditioning bath brought the rubber bezel mostly back to its former glory.
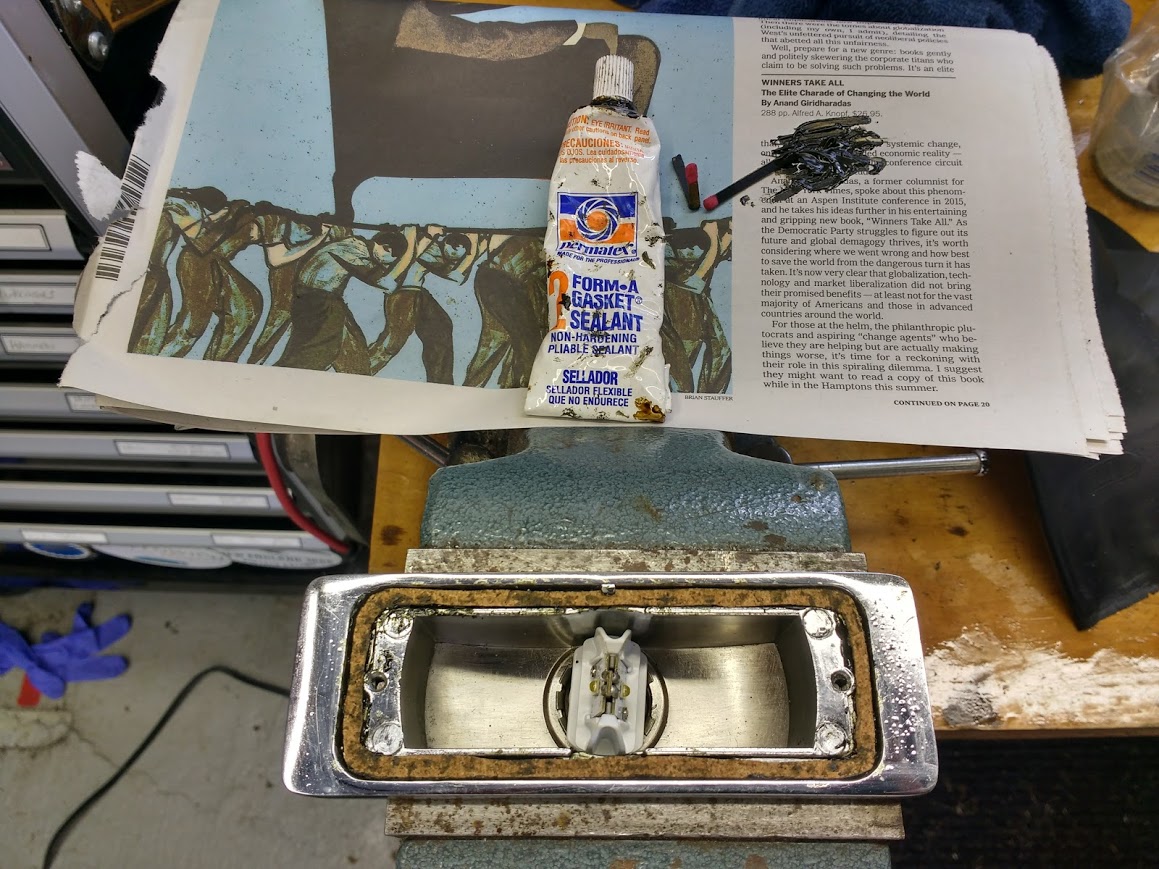
I’ve had great success with Permatex #2 non-hardening sealant; note LED bulb in place
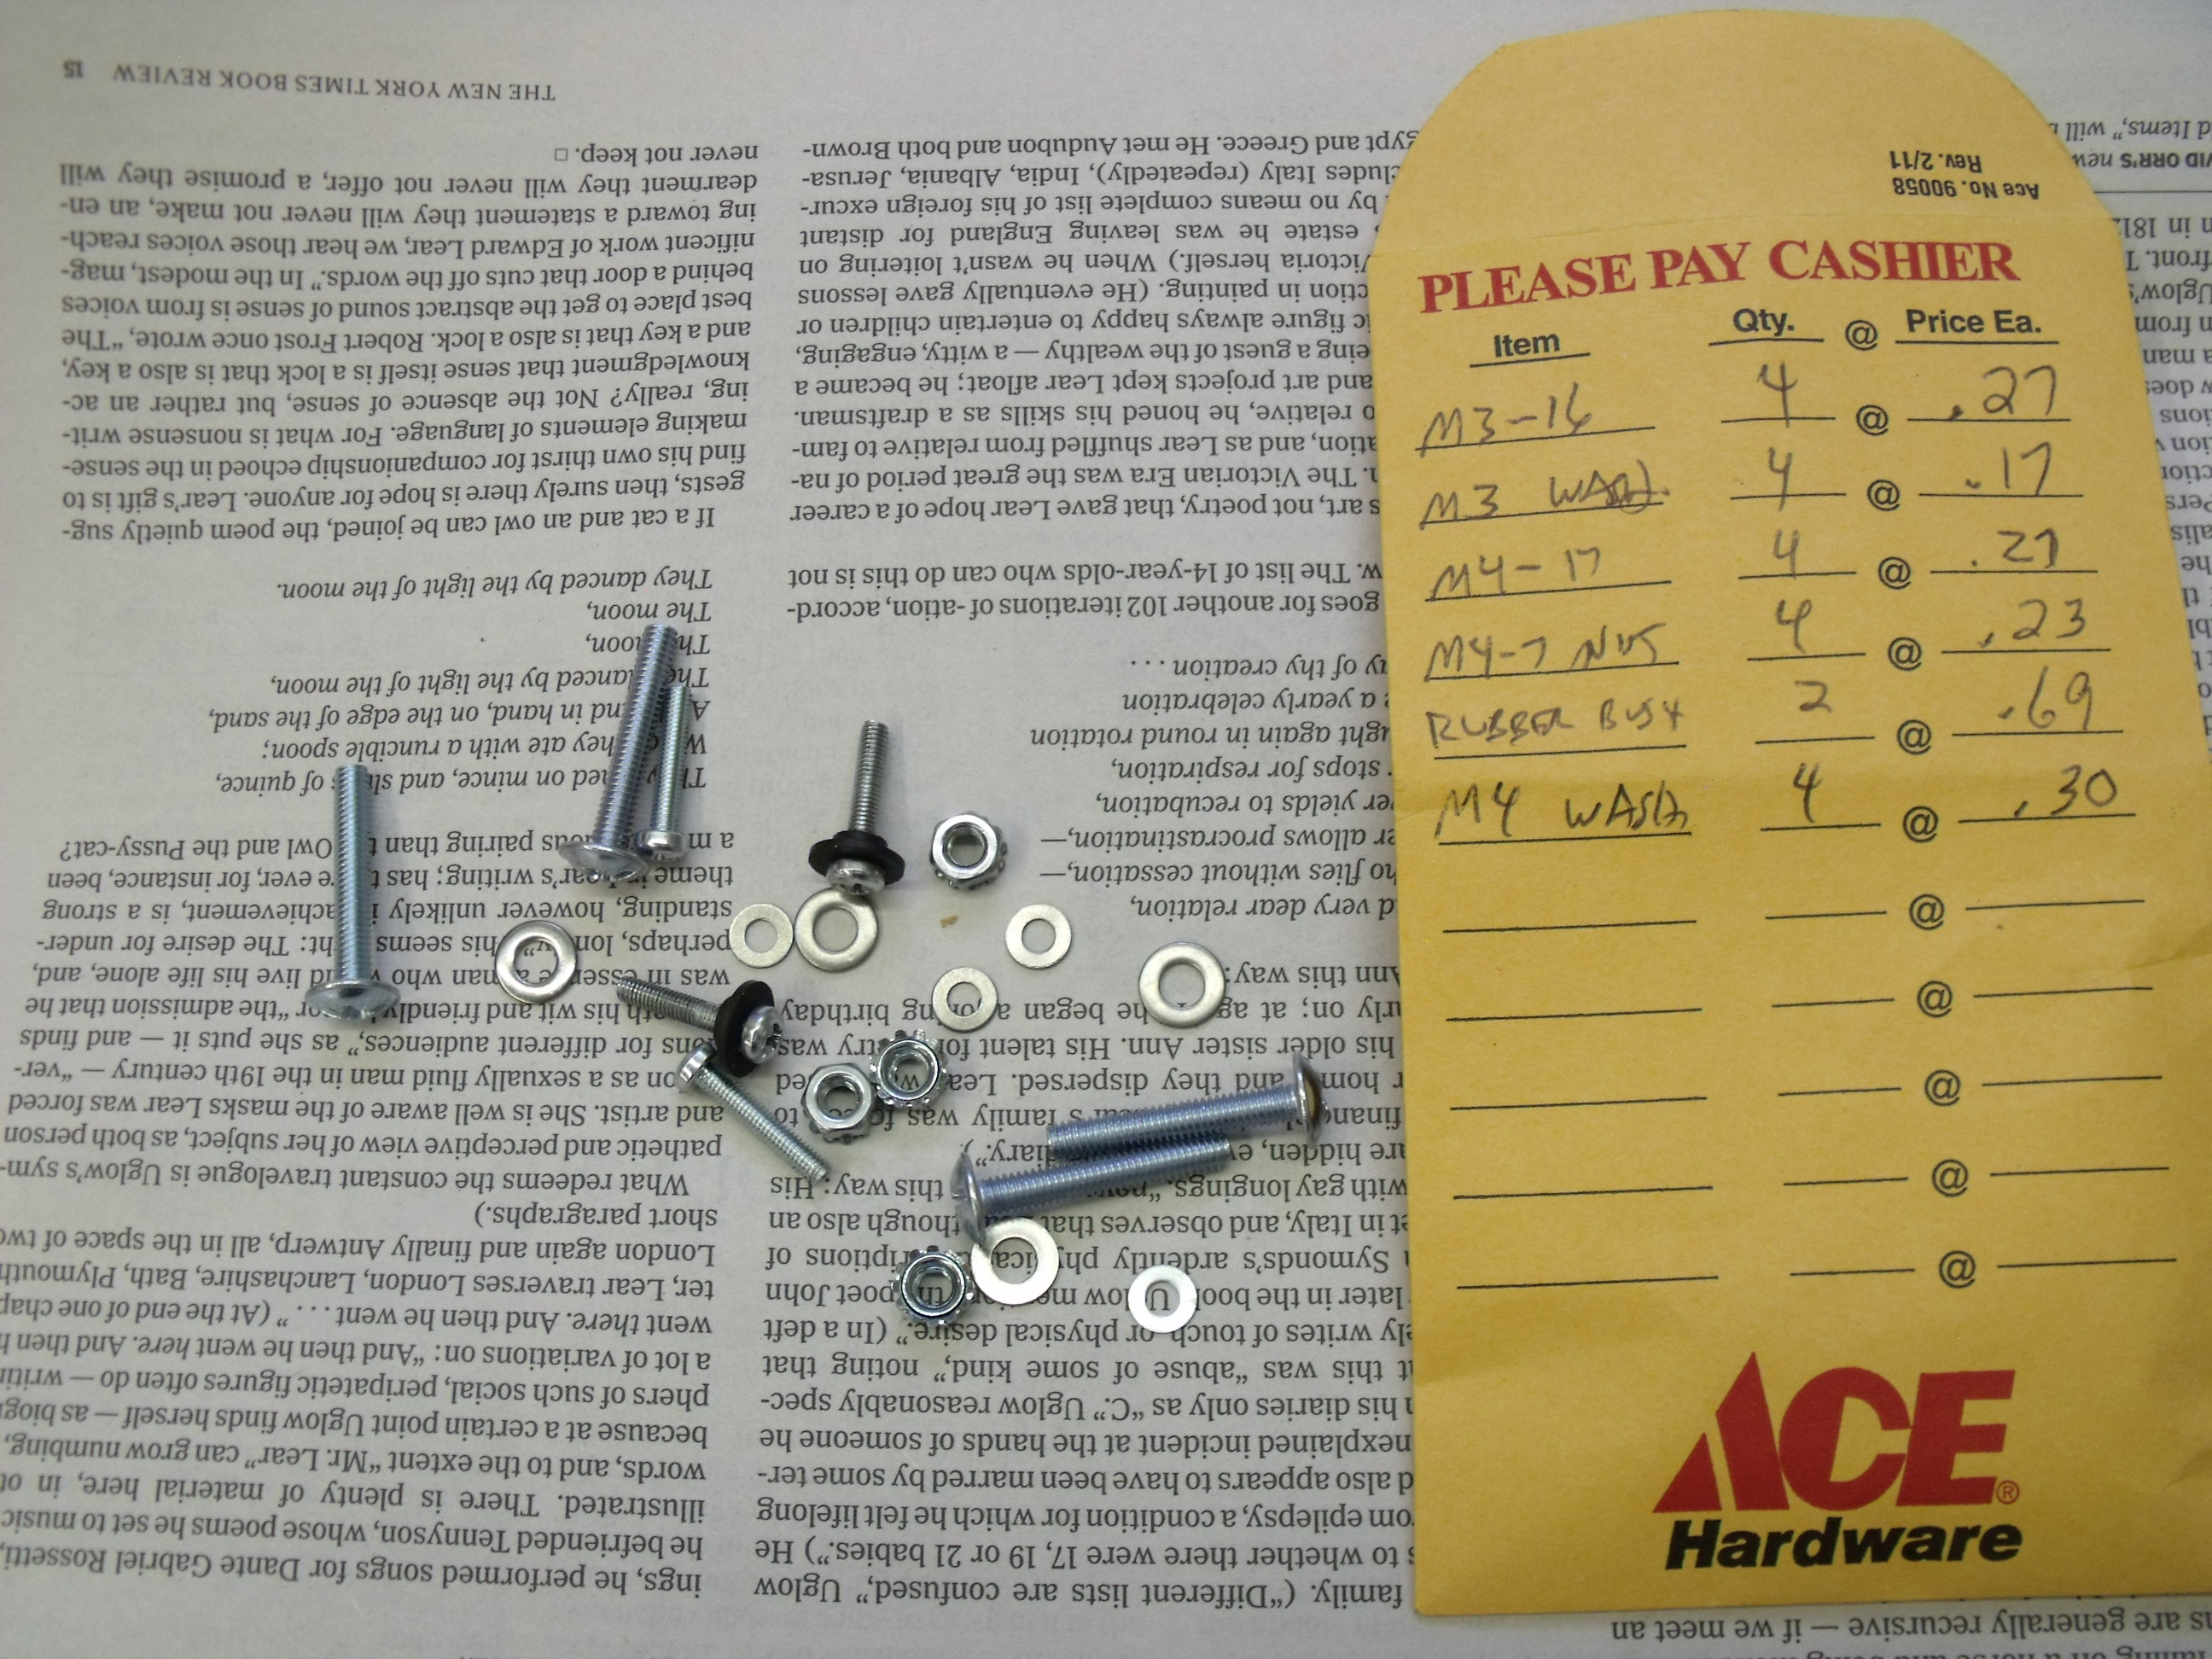
My best shot at finding the metric hardware I needed was the local ACE Hardware store, Post Hardware on Route 22 in Somerville NJ. They had the correct screws for the lens, but not the studs. So instead, I bought bolts with the right thread pitch, and hacksawed off the bolt heads. Viola! Metric studs.
There’s a reason they say that ACE is the place
The broken screw was drilled out, and retapped with my metric tap and die kit. The studs were installed with a dollop of thread-locking compound. The old incandescent bulb was replaced with an LED bulb from CARiD.com. As the repair books state: “reassembly is the reverse of disassembly”.
I may use the tap & die set infrequently, but it’s great to have
As you can see, the back-up lamp burns brightly. There’s just one more thing to report, but before I do, I must ask you to think like an Italian. You see, when I first tested the refurbished assembly, it still didn’t work. And that’s when I remembered: in 1967, as far as the Italians were concerned, a driver didn’t need the back-up light to illuminate everytime you put the car in reverse! After all, it would provide little or no help in daylight. But if the headlampsare on, indicating it’s dark out, THEN a reverse lamp would prove helpful. So the back-up light is wired to come on only when the light switch is on. I’ll be taking a night cruise just to confirm how well I can see behind me….
Nice and bright (as long as the headlights are on)
I just recently came across these photos, which I had frankly forgotten about, which is why this technical procedure, performed in May, is only getting its own blog post now.
If your memory is good, then you’ll recall reading back in May’s report on this year’s New England 1000 that the Alfa’s alternator failed us in the middle of the rally. If your memory is not so good, or if you’re just joining us, you can read about it here.
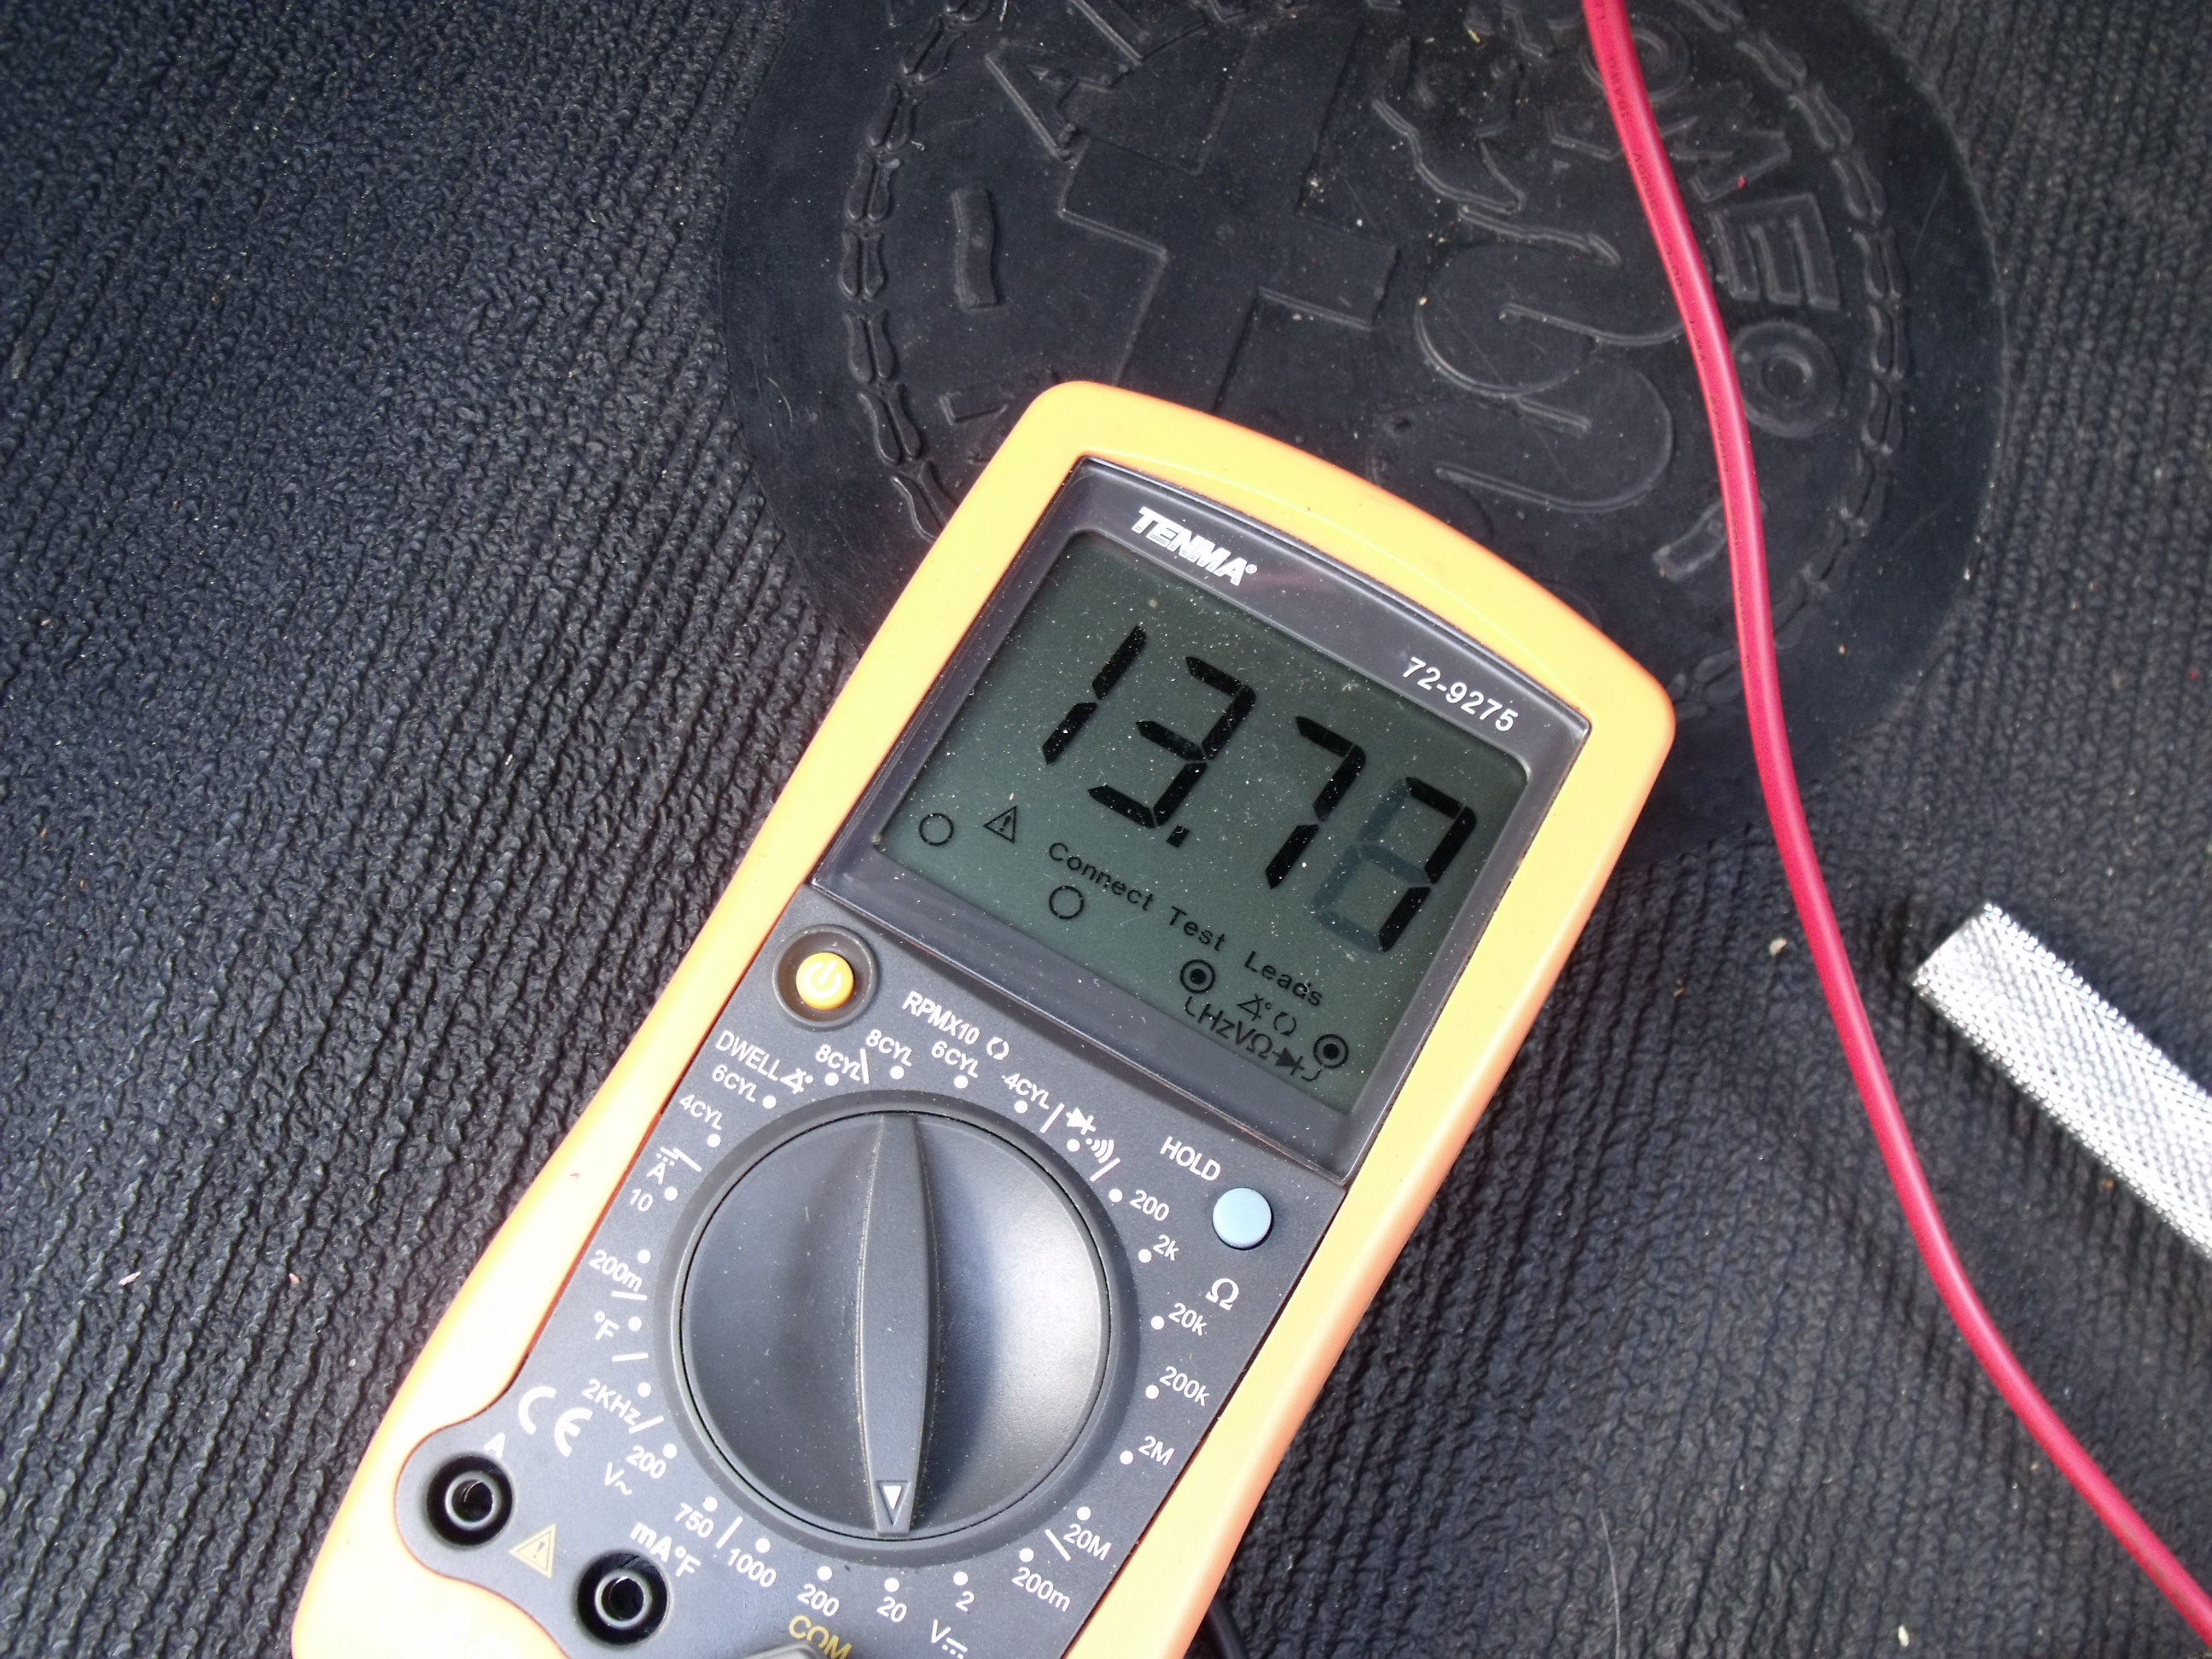
The truth is, I should have been wise to an impending failure, as even with the Red-Top Optima battery on trickle charge, the car would still occasionally need a boost. Alternator output measured at the battery was barely 13 volts, a weak statistic which I rationalized to a low idle.
As mentioned in the rally write-up, the drive to our starting destination was done in a steady rain, with lights blazing and wipers flailing. It’s likely that was enough to seal the fate of the battery.
Tuesday morning, we bought a NAPA-brand battery, and leaving the Optima in its place in the trunk, we simply swapped the cables onto the new unit, using bungee cords to keep it from sliding around. The alternator wasn’t completely dead, just on life support. With the new battery, we had zero starting issues the rest of the week, and coasted home on Friday.
Once again I must give a shout to my friends at Classic Alfa in the UK. A new alternator, ordered Tuesday afternoon after they had closed for the day, arrived at my house on Thursday evening. I dare say that most U.S.-based suppliers would not have been able to get me one with such speed. So Memorial Day weekend was spent in part performing the alternator-ectomy.
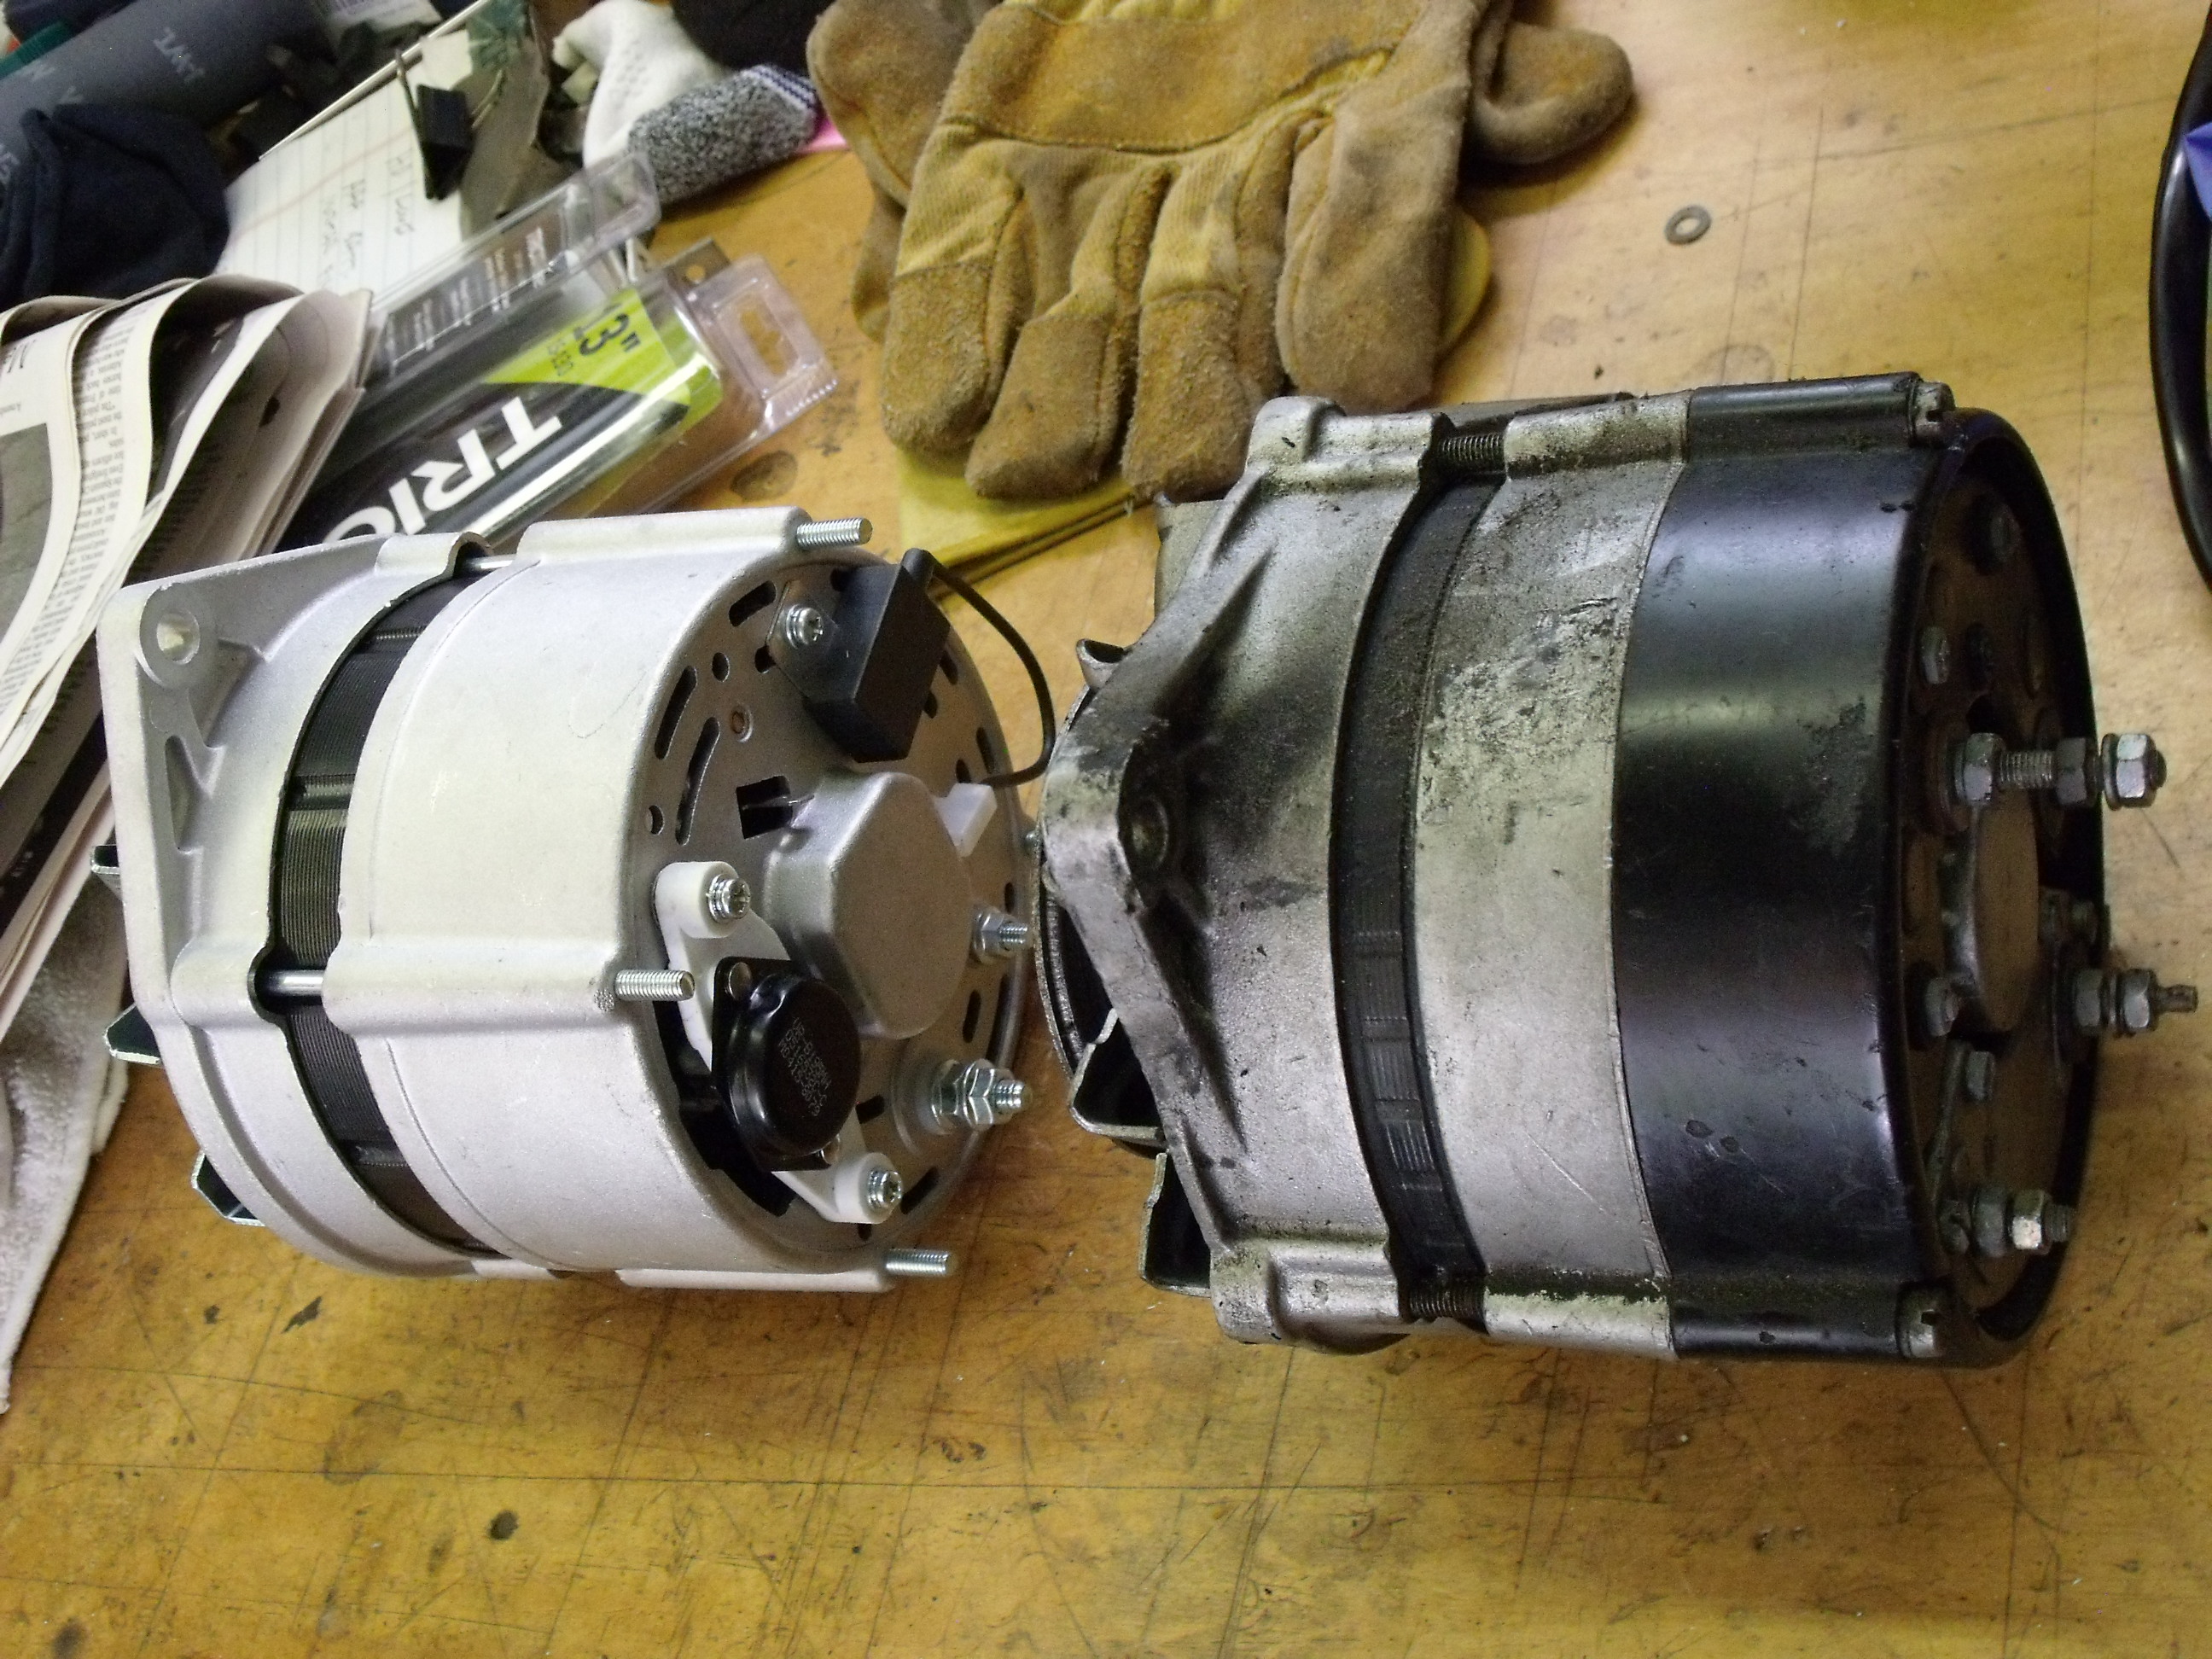
Old alternator and attendant wiring connections
Access to the unit in the engine compartment was quite good, improved by the battery’s relocation to the trunk, performed by the previous owner (PO). The PO had also removed the factory generator (which I still have) and installed this alternator plus an external voltage regulator. My new replacement alternator has an internal regulator, and it’s a so-called one-wire job.
Old one again. Note alignment of upper bracket.
I photographed the wiring to help with any reinstallation questions, then removed the two components. I noted that the alternator’s upper mounting bracket was at a slight angle, and vowed to focus on improving that geometry when putting it all back together.
New & old side-by-side
Note pulley sizes
With everything hooked up, I measured a steady 13.8 volts at the battery (yet another new Red-Top that I purchased to be on the safe side). I was able to recover the old Optima by very slowly trickle-charging it, and both that battery and the barely-used NAPA one were sold to a young man in my office who is always working on 3-4 project vehicles at a time. (And for the record, both the old alternator and regulator were put in the trash. I don’t keep worn-out parts around.)
New alternator in place, and better aligned too
The only issue, and it’s the smallest of nits to pick, is that the one-wire alternator needs to be ‘excited’ after initial start before it will charge (much the same can be said about me). The ammeter reads zero until I bring engine revs above 3,500 rpm (waiting a few minutes so that oil circulates), at which point, the amp gauge needle jumps to life. It’s a small price to pay to be secure in the knowledge that the battery’s got the juice to crank that 1300cc monster to life.
In Chapter 12, it was early spring 1995, and the blog post contained video evidence which proved that the “thumper”, as one-cylinder engines are sometimes called, would start and run. You could say that this completed the mechanical portion of the restoration. Of course, there were “mechanical” elements to be addressed once the body and chassis were reunited, such as pedal and shifter linkages, gauges, lights, and so on, but, the running chassis was essentially done.
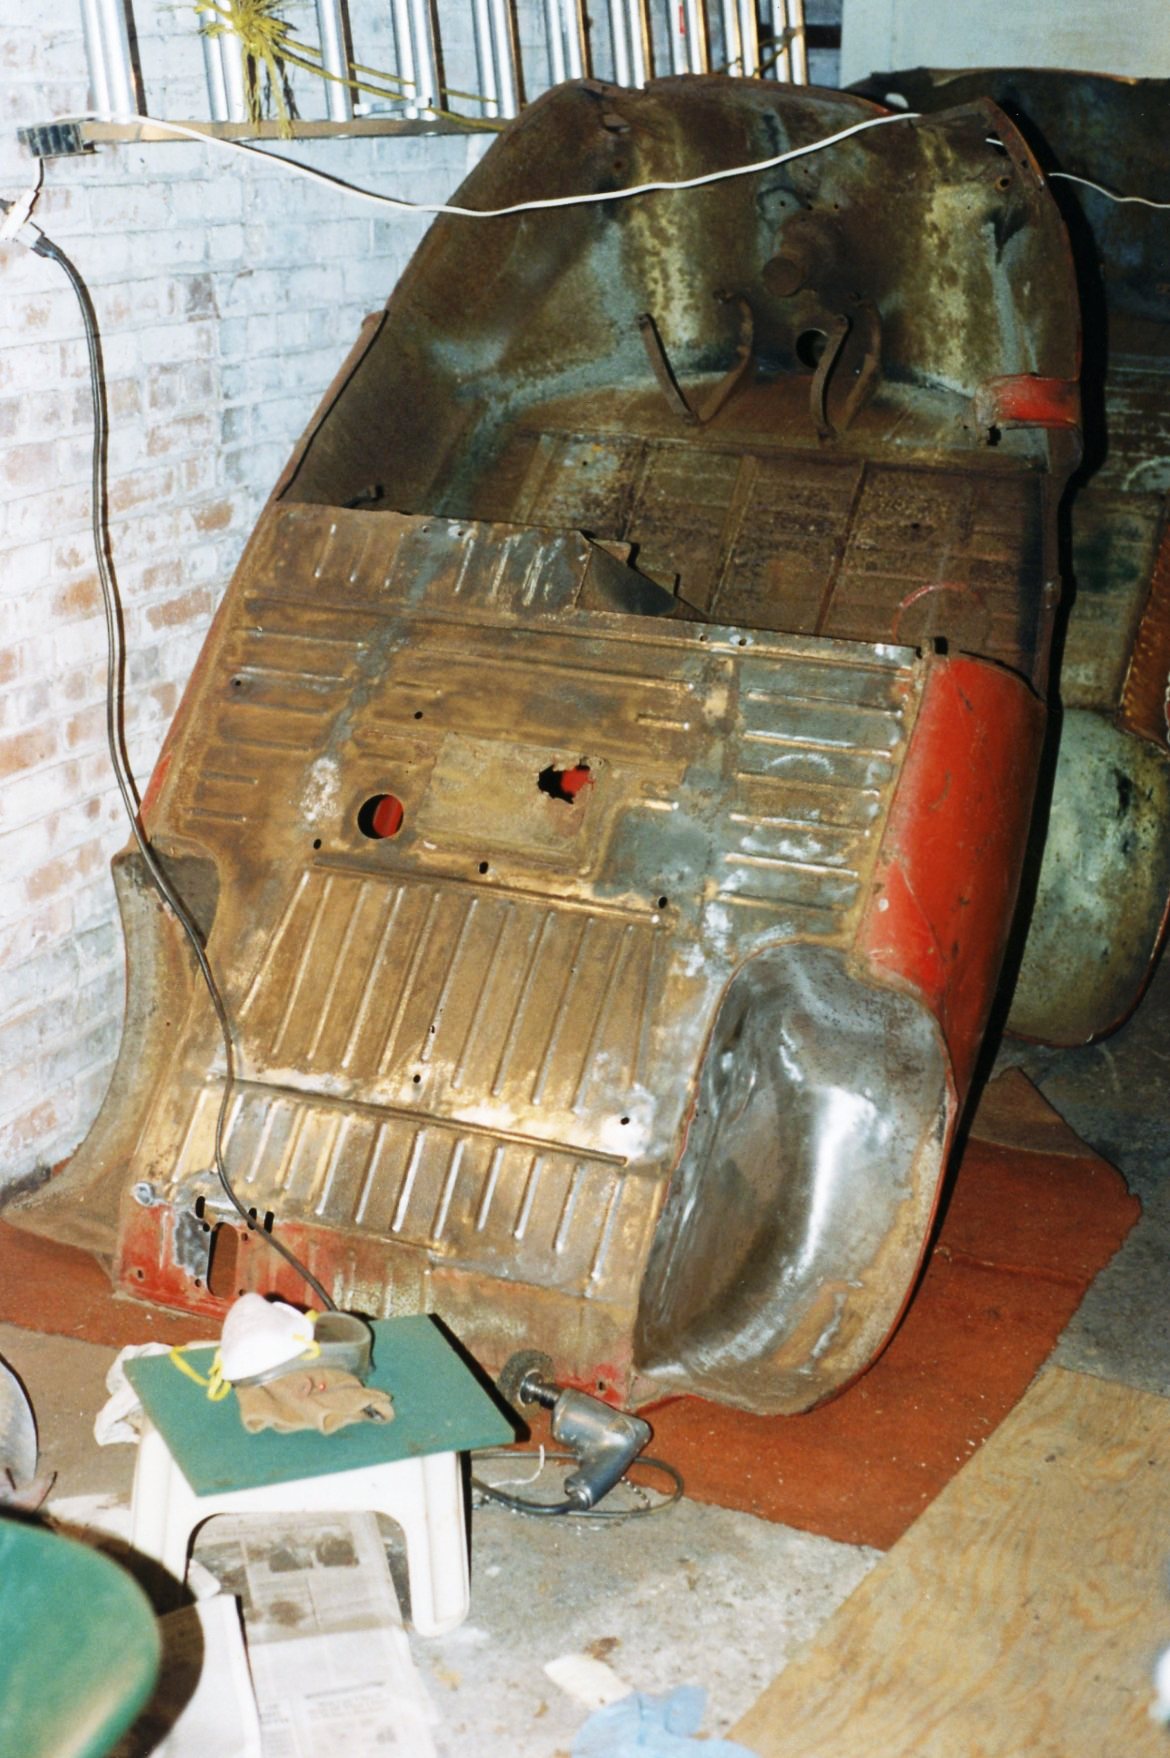
Now it was crunch time. Now, a fear crept into me because I was about to embark on a path over which I would have much less control. I am a technician, an automotive repairman, by trade. The nuts and bolts were, if not easy, at least resolvable by me. As I looked at the forlorn Isetta body, I was reminded of how little I knew about body and paint work. There was also an element of procrastination in play here. I could have sought out body estimates in 1994. However, it was easier to tell myself to push forward with the chassis work, and allow the bodywork to wait until it was absolutely necessary to move on it. That time was now.
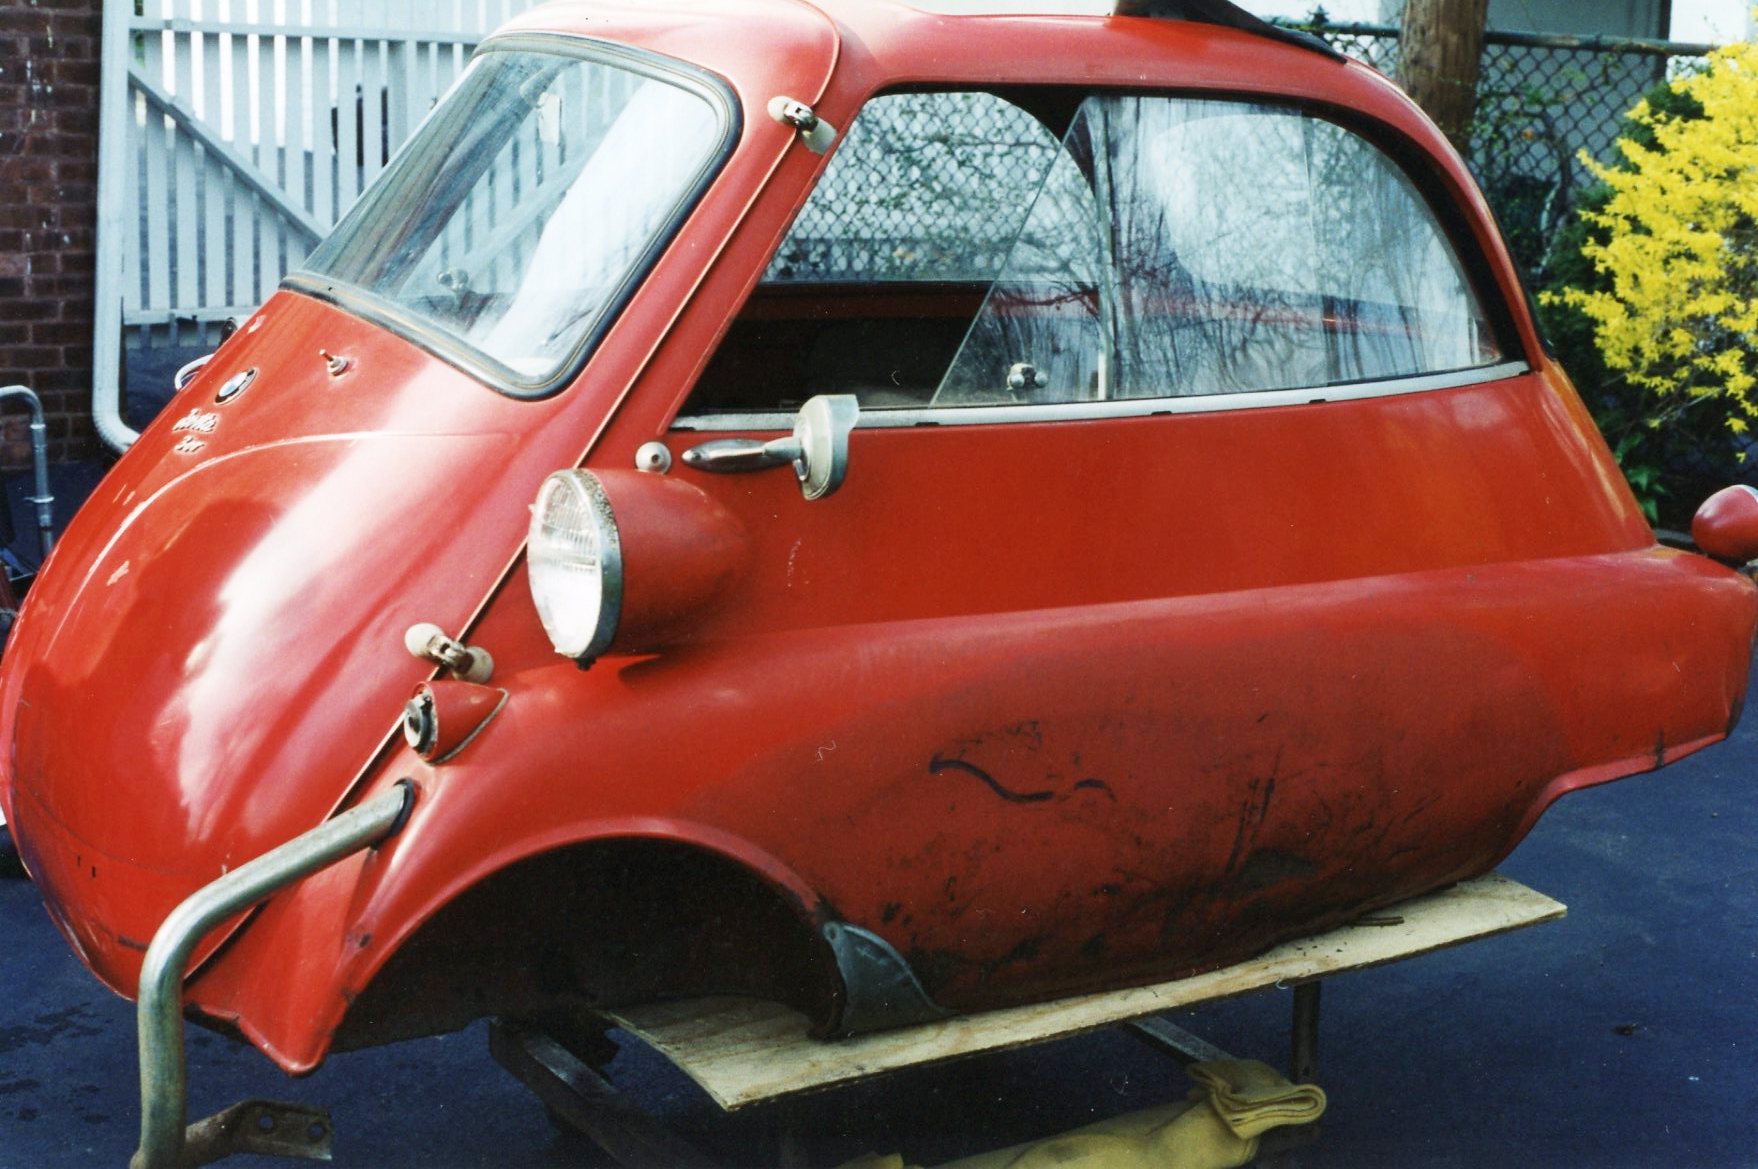
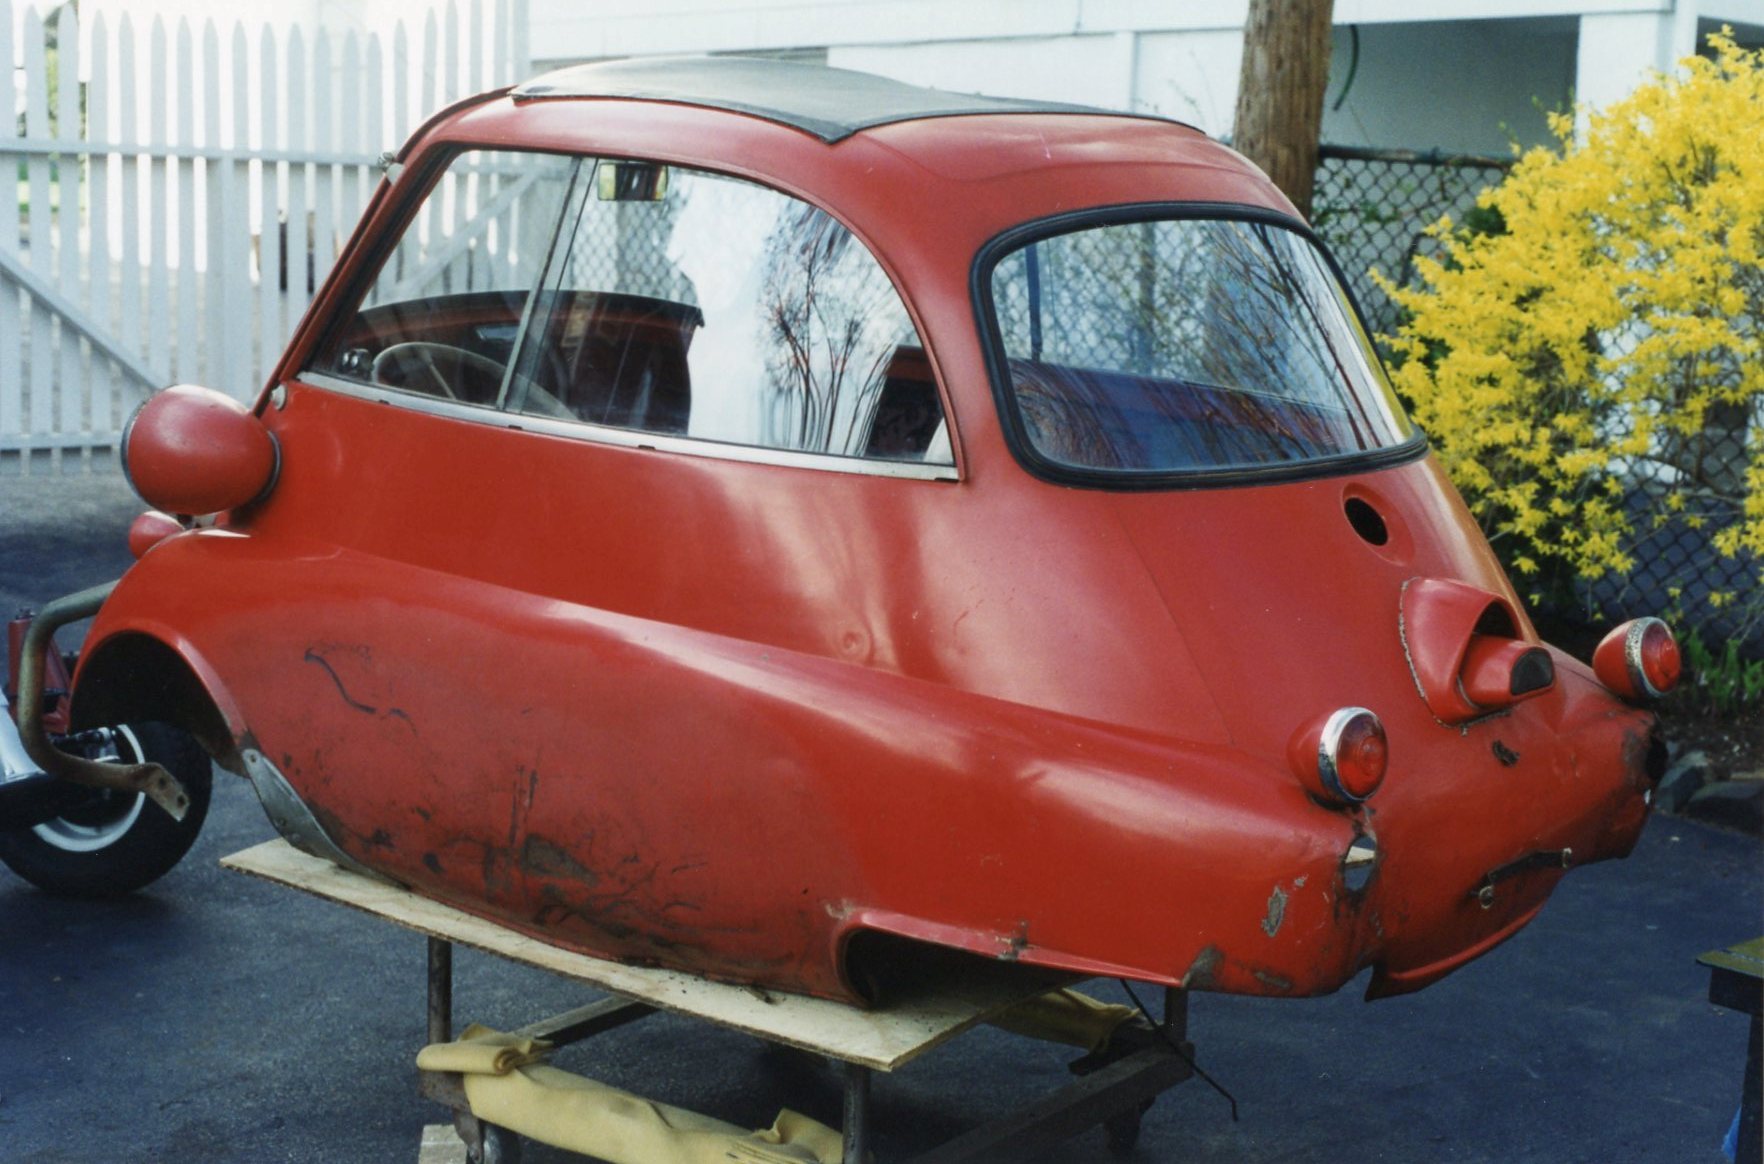
Left front: lots of scars along side
Right front: door is OK, but strange circular gash above engine door opening
As had been my habit for this entire project, I grabbed my trusty Nikon EM, loaded it with a fresh roll of Kodak ISO 100 (or 200) film, and photographed all the details of the red body in its “before” state. This was done both to document its current condition as well as to provide a guide during reassembly. The body was still complete, with door, glass, sunroof, lights, wiring harness, and interior panels in place. There was no sense in disassembling any of it until I understood the next steps, which would only happen after speaking with several body shops.
Left rear: metal is split at wheel well
Right rear: rear bumpers have left gaping holes in sheet metal
The body was loaded onto my landscape trailer, and the trailer was hooked to the back of my Volvo wagon. Off I went to visit two different restoration facilities in northern New Jersey. As both these shops are still in business, and as I have nothing to gain by presenting potentially disparaging remarks about them in this public forum, I shall refer to them as “Shop A” and “Shop B”.
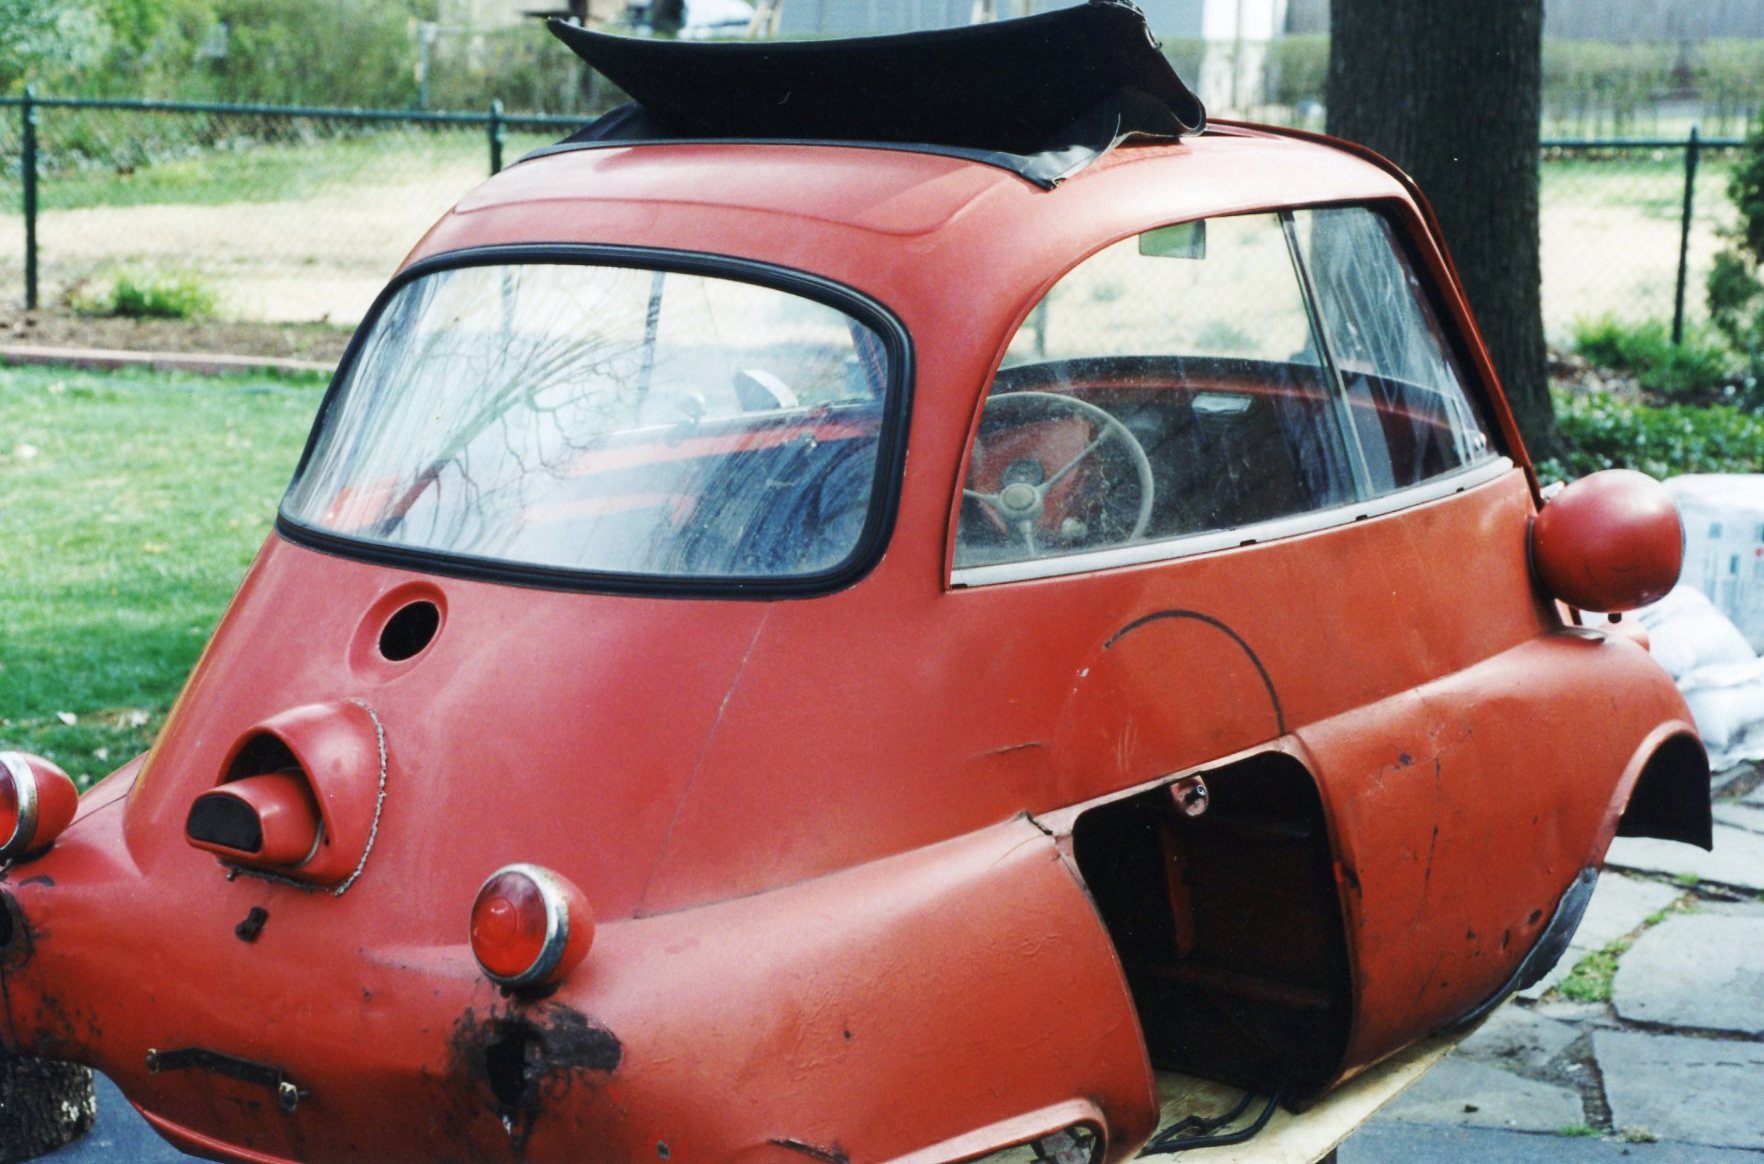
Interior left front showing shifter & linkage, wiring, factory sound insulation (which was to be removed)
Interior right front: VIN plate, but rust along bottom of wheel well
Shop A is a first-class enterprise with a stellar reputation in the hobby. They are known for their award-winning vehicles, and even market their own line of automotive paint. The patriarch of the business greeted me personally, and invited me to sit with him so we could discuss my progress and my intentions.
I told him that I had essentially completed the drivetrain, and wanted a shop to take on only the body shell. “You have done an excellent job managing your own restoration”, he said to me, and I wasn’t sure if the comment was a compliment, or if he regretted that I hadn’t handed over the whole stinkin’ pile of parts for him to sort out. He continued: “We can restore this body, certainly can. Our process will be, you leave it with us while we do our research and preliminary work, and we will send you an itemized bill on a monthly basis”.
My next question was obvious, or so I thought: “What will be the total cost of the body and paint work?” He replied “Oh, we have no way of knowing that. Besides, that’s not how we work. As I said, we will perform a certain amount of work every month and bill you accordingly. You are also welcome to stop by and see the progress first-hand”. I told him that I would think about it. The walk back to my car wasn’t complete before I had concluded my thinking about it. This was the traditional model of automotive restoration. The owner trusts the restoration shop to proceed at a fair pace, and pays the bills with no clear end date in sight. This shop was not getting my business.
With seat out, note spare tire witness mark, shift linkage
Shop B was introduced to me when its proprietor visited my office for an evening’s “hobbyists’ gathering”. He was fairly new to the business, and wanted to introduce himself to a wider audience. He spoke in a friendly and down-to-earth manner, and explained that his shop was the restoration place of choice for the common man. At the end of his presentation, I approached him and asked about paying a visit. A short time later, I trailered the red body out to him for his inspection, and he promised to get back to me ASAP.
This was 1995, so we used fax as a speedy means of communication. The first page of the fax was a cover sheet, and the second page had a detailed line-by-line estimate for metal work, fabrication, priming, sanding, and painting. I knew I was in trouble reading the first line of his cover page: “Dear Rich, I hope you’re sitting down!” His estimate for total parts and labor? $11,150. That only meant I needed to keep looking.
This is behind passenger seat. Removable panel is for spark plug access.
Parcel shelf with factory interior panel still in place.
A work colleague, friend, and all-around great fellow hobbyist Dennis Nash was someone I sought out for advice. Dennis said that he knew someone through the Rolls-Royce Owners Club who ran a collision shop but also fit in a fair amount of restoration work. He was in Maplewood, about a 20 minute drive from my house, and much closer than either Shop A or Shop B. The person’s name was Jody Fitzgerald, and the name of this business was The Shop.
I called. Jody answered, “This is …. The Shop”. (This is how he always answered the phone, with a purposeful delay between “this is” and “The Shop”.) We had a pleasant initial conversation, and he invited me to visit with body in tow. It didn’t take him long to look it over and for him to tell me that this was something he could handle. He made himself very clear that there were certain things he would, and would not, do. He said that he would:
Expect me to deliver the body with glass and soundproofing removed.
Paint the body in a single-stage urethane, and color-sand and polish the exterior.
Paint the interior to match, but not color-sand or polish it.
NOT paint the underside of the body. (He suggested that I paint it before bringing it back to him.)
Complete all the body and paint work in an approximate 3-4 week time period.
Jody said that the total cost in material and labor would be $4,000. That was a very acceptable number to me. Before we signed any papers, Jody said he had one more item of importance to discuss with me:
“I will take on this job, which will cost you $4,000, only if you verbally assure me that you understand this cost exceeds the total value of the car.”
In retrospect, I don’t blame him one bit for wanting to ensure that I understood the price/value relationship. We both knew that good, but not perfect, running and driving Isettas were available for around $3,500 in 1995. There was too much emotional attachment in this project for me, so I was more than willing to spend what I believed was a fair price for the body shell restoration. Jody simply didn’t want to start this job and have me remorsefully abandon the car with him.
I rushed home to begin the disassembly so that I could deliver the shell to Jody. It was June of 1995. There was no time to waste.
Those of you who have followed this Isetta Saga have endured 11 chapters of a story that has covered parts of three decades. You’ve read about the initial discovery of these tiny cars, first in a magazine ad, then in a Vermont barn. You learned that I’m very good at letting a few years (like, ten) go by without any work transpiring. You saw that getting my own garage gave me the work space I longed for. My pictures illustrated progress with dismantling and restoring major components such as the chassis, engine, and rear axle.
At what point, dear readers, did you ask yourselves:
WHEN IS THIS THING GOING TO RESEMBLE A CAR?
Can’t say as I blame you. If you didn’t know better (and I have yet to prove that you will), you might conclude that the freshly-painted engine is destined for a museum display cabinet. And “rolling chassis”? Please. The cynics out there (I know who you are) are thinking “just throw a sheet of plywood on it and use it as a garden cart”.
But are we any closer to actually taking it for a drive? Let’s recap the two most recent chapters. Chapter 10 included the story of the combo starter-generator known as the Dynastart. Its renewed wiring was complete, even if it was yet to be reinstalled onto the crank nose. And Chapter 11 displayed photos of a Dynastart-less engine bolted to the chassis, with a complete transmission and final drive axle right behind it. The next steps were to install the Dynastart, obtain a voltage regulator and battery, and pick up a quart of fuel at the local gas station. Oh, and then try to start it.
Any book about the internal combustion engine will tell you that provided your internals are mechanically sound, only three things are needed to start an engine: air, fuel, and spark.
I made a checklist.
Air: check. (My backyard had an abundance of it, and there were no obstructions in front of the carb.)
Fuel: check. (The Isetta has no fuel pump. Someone just needed to hold a funnel higher than the carb, and pour fuel into it while a hose ran to the carb.)
Spark: check. (If I was correctly reading John Jensen’s Isetta Restoration, touching certain wires from the Dynastart and the voltage regulator to a 12 volt source would crank the engine and deliver spark to the plug.)
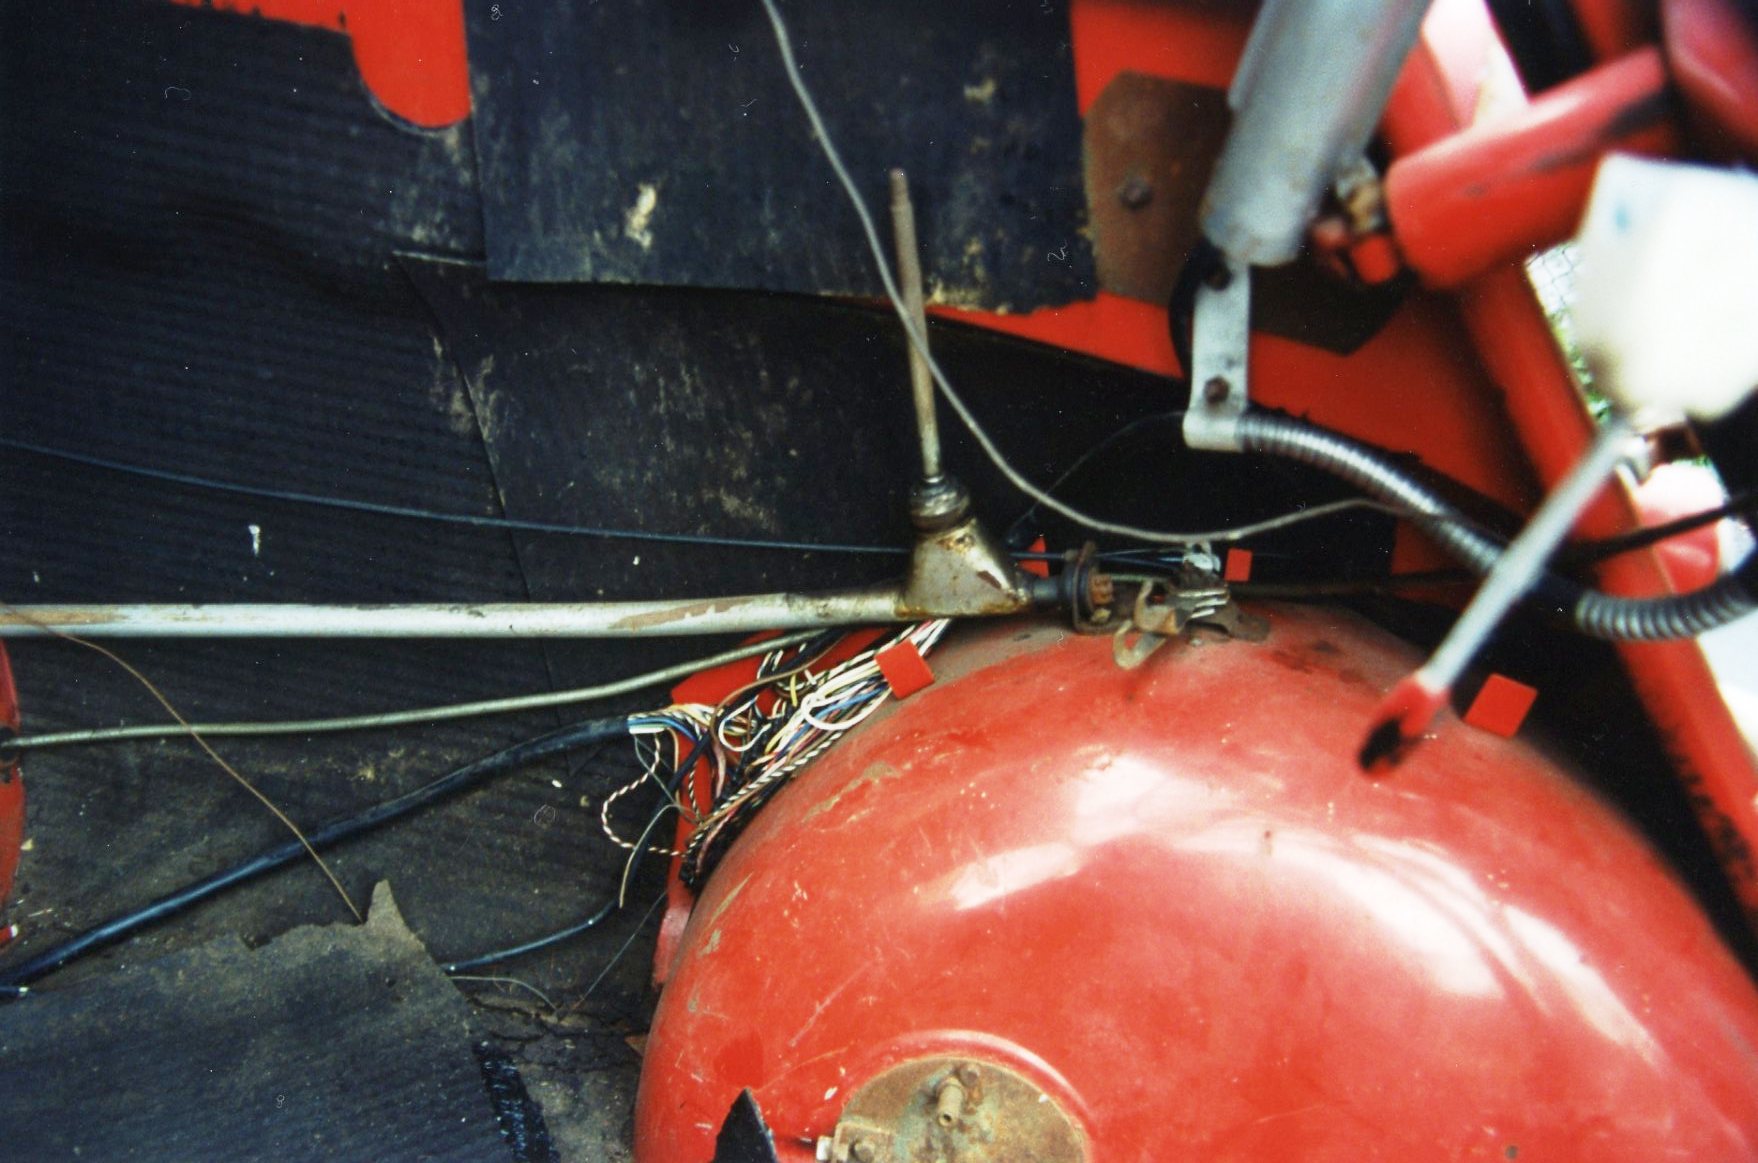
Heavy red cable feeds Dynastart; voltage regulator is temporarily clamped to chassis
On Sunday, March 26, 1995, I rolled the chassis out of the garage and into the backyard. Enlisting the help of my friend John M and his 10-year-old son Nick, we poured fuel into the funnel, and touched wires to the battery.
John not only lent the services of his son, perched as he was on a step stool for this grand experiment; John also had a video camera set up, ready to record the scene live as it happened.
This long-hidden VHS tape was recently rediscovered and transferred to DVD. Please click on the YouTube link below so that you may verify the results with your own eyes:
I assure you that these moments were not rehearsed. Once I remembered to supply sufficient fuel to the carburetor, the engine actually started on the first try. The fist-pumping at the end was a spontaneous display of exuberance, a reflexive reaction to the sheer joy of the moment. The feeling was indescribable; it certainly energized me to keep pushing myself to complete the car in the few short months I had remaining to meet my own self-imposed deadline.
The PLAN was to spend free time during this past winter working on the Miata. What happened? Where did the winter go? Of course, I ask that based on the CALENDAR, not on the actual WEATHER. (As I sit here composing this missive at 7:24 p.m. EDT on April 15, it is 38 degrees F outside, and the rain and wind make it feel like 31F. Clearly, it does NOT feel like spring!)
The to-do list for the ’93 Miata, drawn up last November, included: rear brake service, transmission service, new lights, new tires, and an engine compartment detail. I haven’t gotten very far. The first item to be tackled, the brakes, wasn’t started until March, and still needs bleeding and parking brake adjustment before it’s crossed off the list.
Since e-brake adjustment requires removal of the center console, I combined that with servicing the shifter. Here was a case where online forums provided information not to be found in a service manual.
My Miata service book, published not by Mazda itself but by an independent publisher, is quite good. However, it says nothing of servicing the shifter “turret”. The turret is an oil-filled box at the rear of the transmission, in which the shift rod connects to the external shift linkage. It does not share its oil with the rest of the gearbox.
Under the leather faux boot is the real rubber shift boot. Old (L) and new (R) side-by-side.
Once the shift knob was unscrewed and the center console lifted out of the way (the leather boot attached to the console is but a decorative item), it was obvious that repair work was overdue. (This is what happens when you drive the same car for 21 years, and the small deteriorations are not noticed.) The large rubber shift boot was shredded, and the flexible rubber cap, bonded to a metal plate which forms the top of the turret, was equally damaged. Removal of the cap allowed the shift rod itself to be extricated. The plastic bushings at the bottom of the rod were worn but not broken. Most of the turret’s gear oil was gone.
Bottom of shift rod, with old plastic bushings still attached
One of the major forum findings was just that: “You’ll find the turret to be empty or almost empty. Service it by refilling it with oil”. The mystery remains: where did the oil GO? Using a turkey baster which has been appropriated to the garage, the scant remaining oil was sucked out, and fresh 75W-90 gear oil was added until it almost reached the top of the turret.
Peering into the now-empty turret
It was time to rebuild the shift knob. The aftermarket replicates all the needed plastic and rubber parts; however, scanning the various online listings convinced me that spending a bit more and getting OEM components was the wiser move. A Mazda dealer in Vienna VA, Priority Mazda, runs an eBay store and had the best combination of price/availability/shipping cost/delivery time. I placed the order and had all my parts, in Mazda bags, at my house in 3 days.
Old (bottom) and new (top) service parts lined up
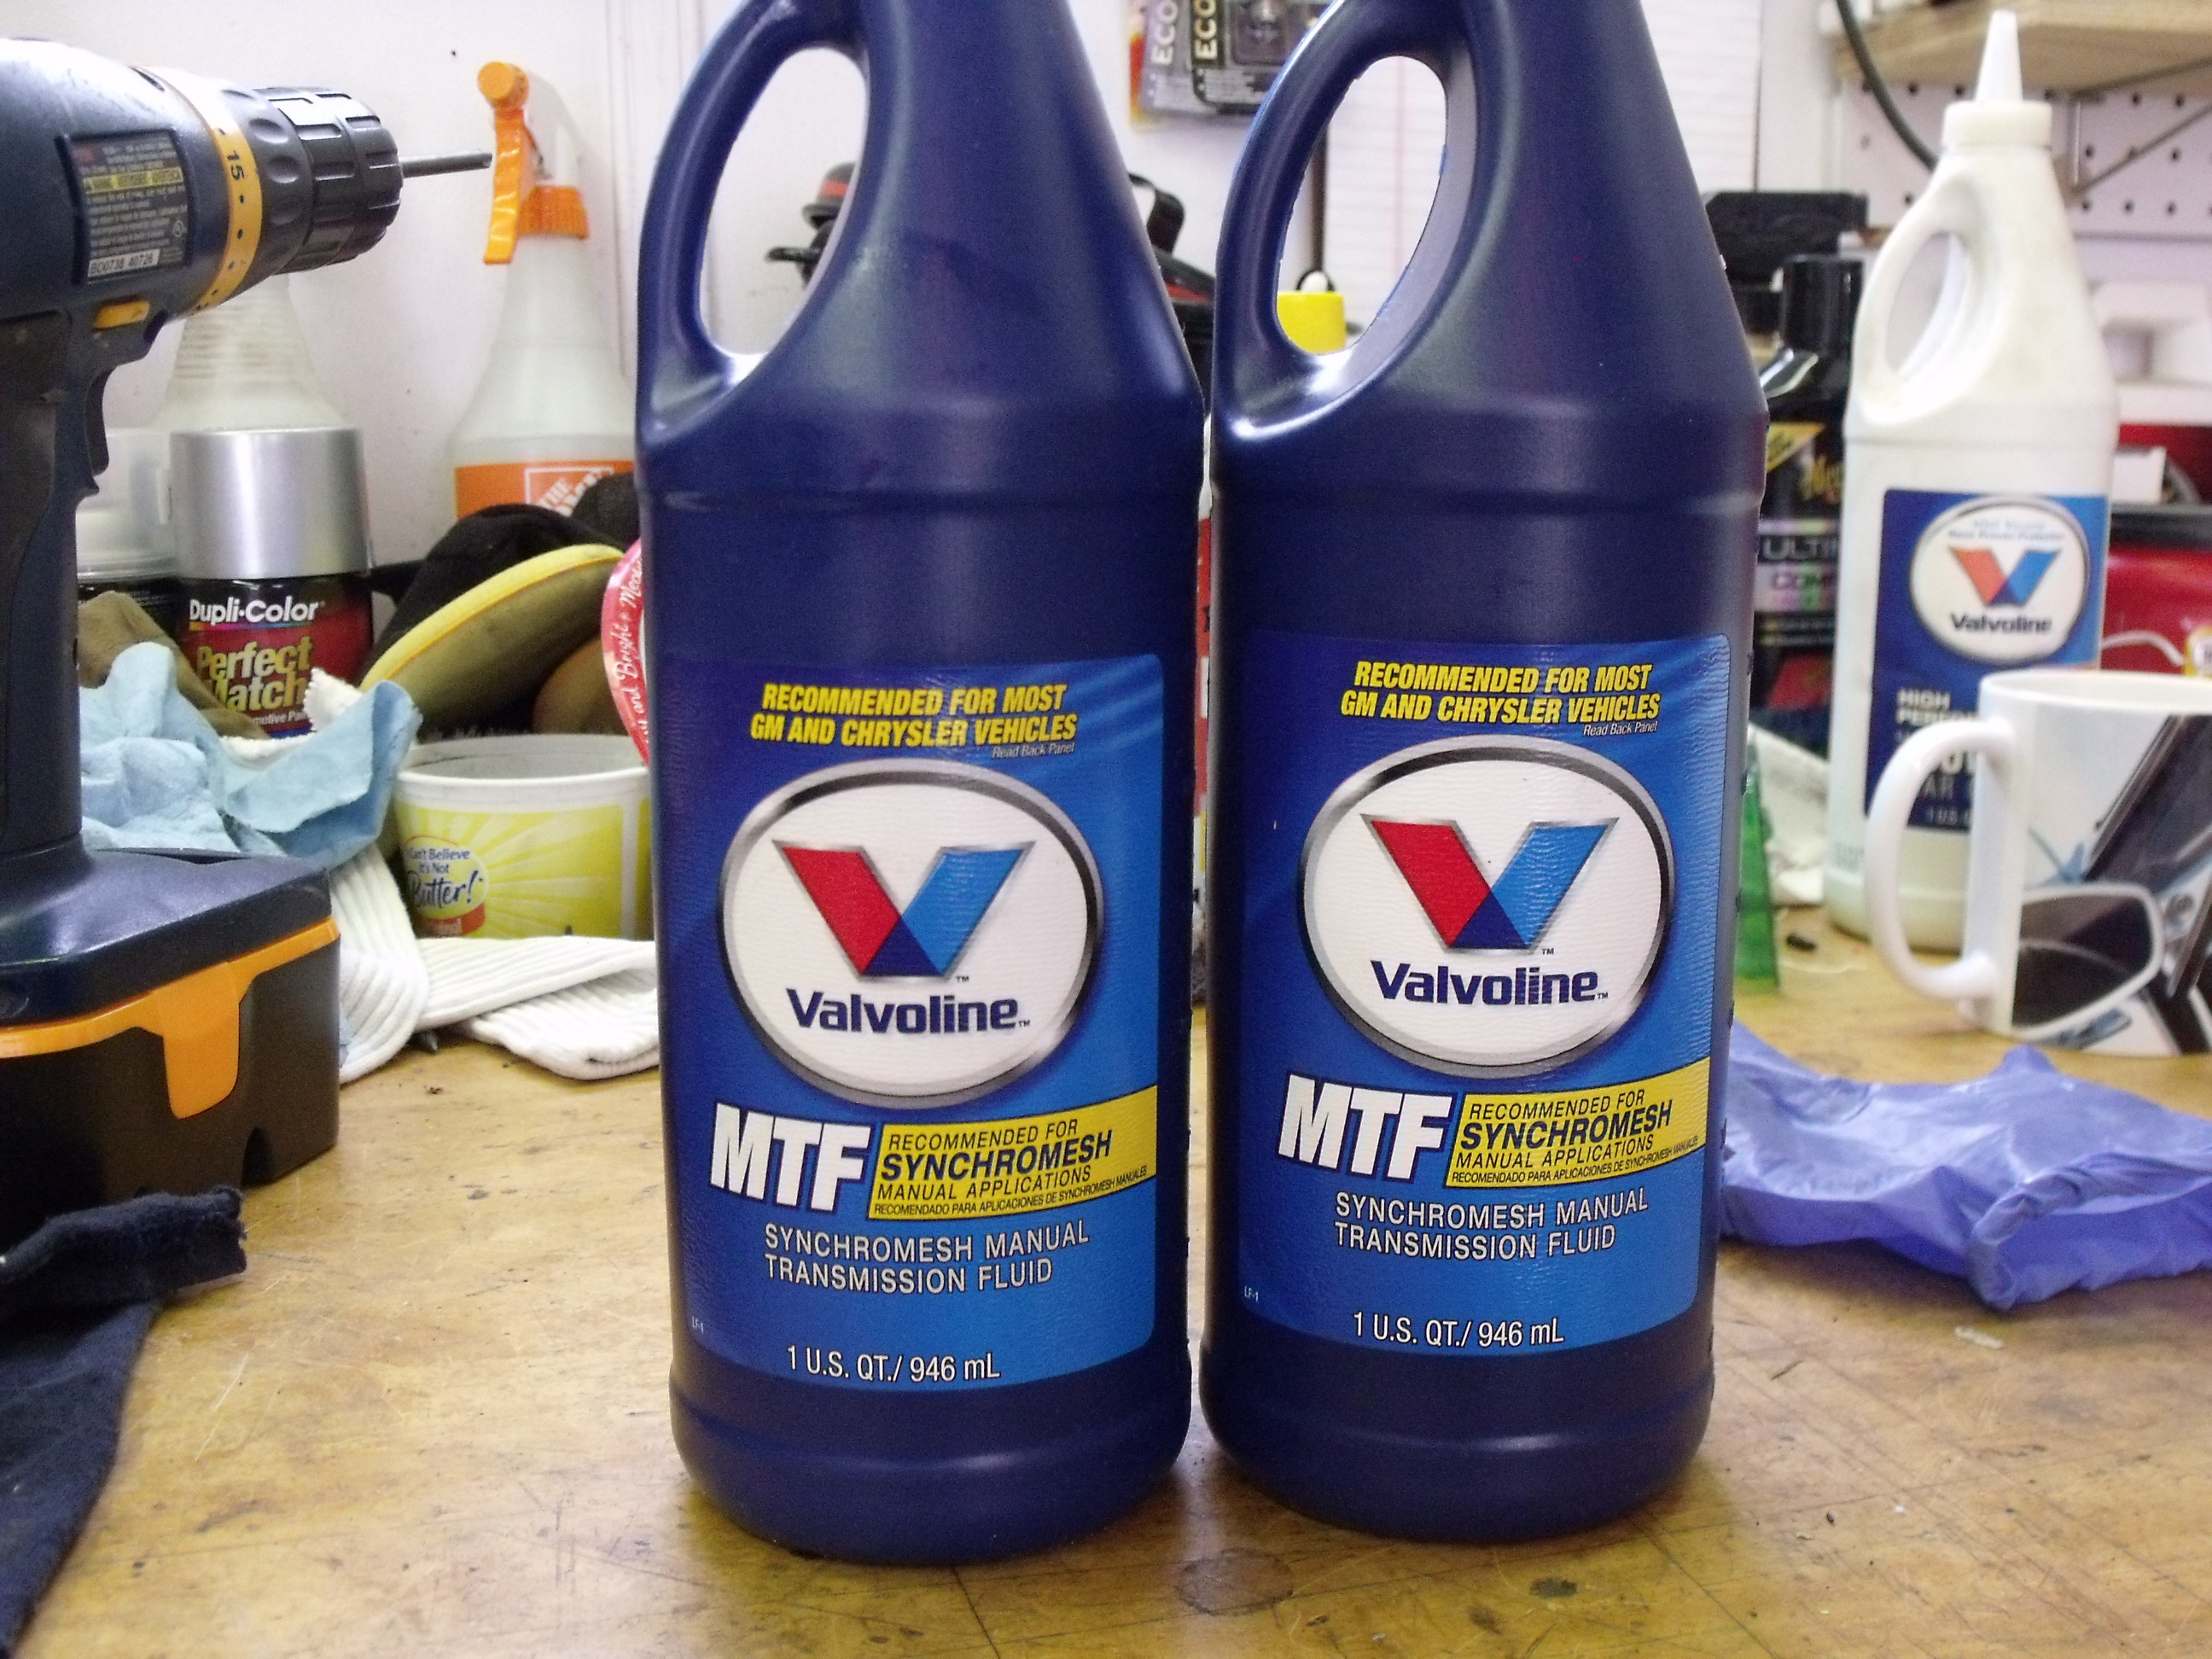
The new pieces went together quite easily. With the turret full, everything at the center console was reinstalled. While I was there, I drained the gearbox oil, and again using a recommendation from the forum, refilled it with Valvoline “Manual Transmission Fluid”, GL4, NOT GL5. After visiting 3 auto parts stores looking for this stuff, I had to order the Valvoline online also. What did we do before the World Wide Web?
Valvoline MTF, hard to find in stores
The trick to getting 75W-90 gear oil to flow in 50 degree weather
Rebuilt shift rod reattached to now-filled turret
The Miata is still up on 4 jackstands; just as well, because it ain’t goin’ out in this weather just yet. Once it warms up, I’m excited to take that first test drive and try out the shift action. With fresh tranny oil, refilled turret, and new rubber booties, I have great expectations. But I better put a hustle in my bustle. The NJ Region AACA annual car show is Sunday May 6, EXACTLY 3 weeks from today, and my now-25-year-old Miata will be making its AACA debut there. It’s at the Mennen Arena in Morristown. If you’re in the area, I expect you’ll come by.
The Isetta Saga has many more chapters to go before reaching its inevitable conclusion. With the help of some colleagues, I’m working on a big surprise, and hope to have it available for your viewing pleasure soon.
FUN FACT:
Road & Track magazine, in its July 1989 edition, ran its first full road test of the new 1990 Mazda Miata. A sidebar article crowned it one of the “World’s Best Cars”. Here’s what they said about its manual transmission:
“…. performance is further enhanced by a close-ratio 5-speed that rates nothing less than a 10 for its smooth, positive operation. With the feel of a Formula car, this tranny is fun just to run through the gears.”
In Chapter 10, the rolling chassis debuted to the world. In Chapter 11, that chassis gets the rest of its drivetrain reunited with it, but not before a very long drive turns fruitless.
The year 1995 had dawned. Staring me in the face was the sign I created and hung in my workshop: “The Isetta Will Drive in ’95”. Could this be possible? Theoretically, I had until 11:59 p.m. on December 31, but practically, I knew that it needed to happen before winter set in.
Never mind the still-unanswered dilemma about body and paint. There were two more immediate challenges:
The restoration had reached the point of discovering that many small pieces were completely missing. I had no ignition switch, headlight switches (on/off and low/high beam), turn signal switch, motor mount brackets, or hub caps. Some of the pieces I did have were in such poor repair that it would help if I could find other used ones in better condition.
My completed engine and transmission were not yet installed in the restored chassis. This was a priority because once installed, I needed to prove that the engine would start and run. Should there be a failure there, I wanted enough time to correct whatever needed correcting.
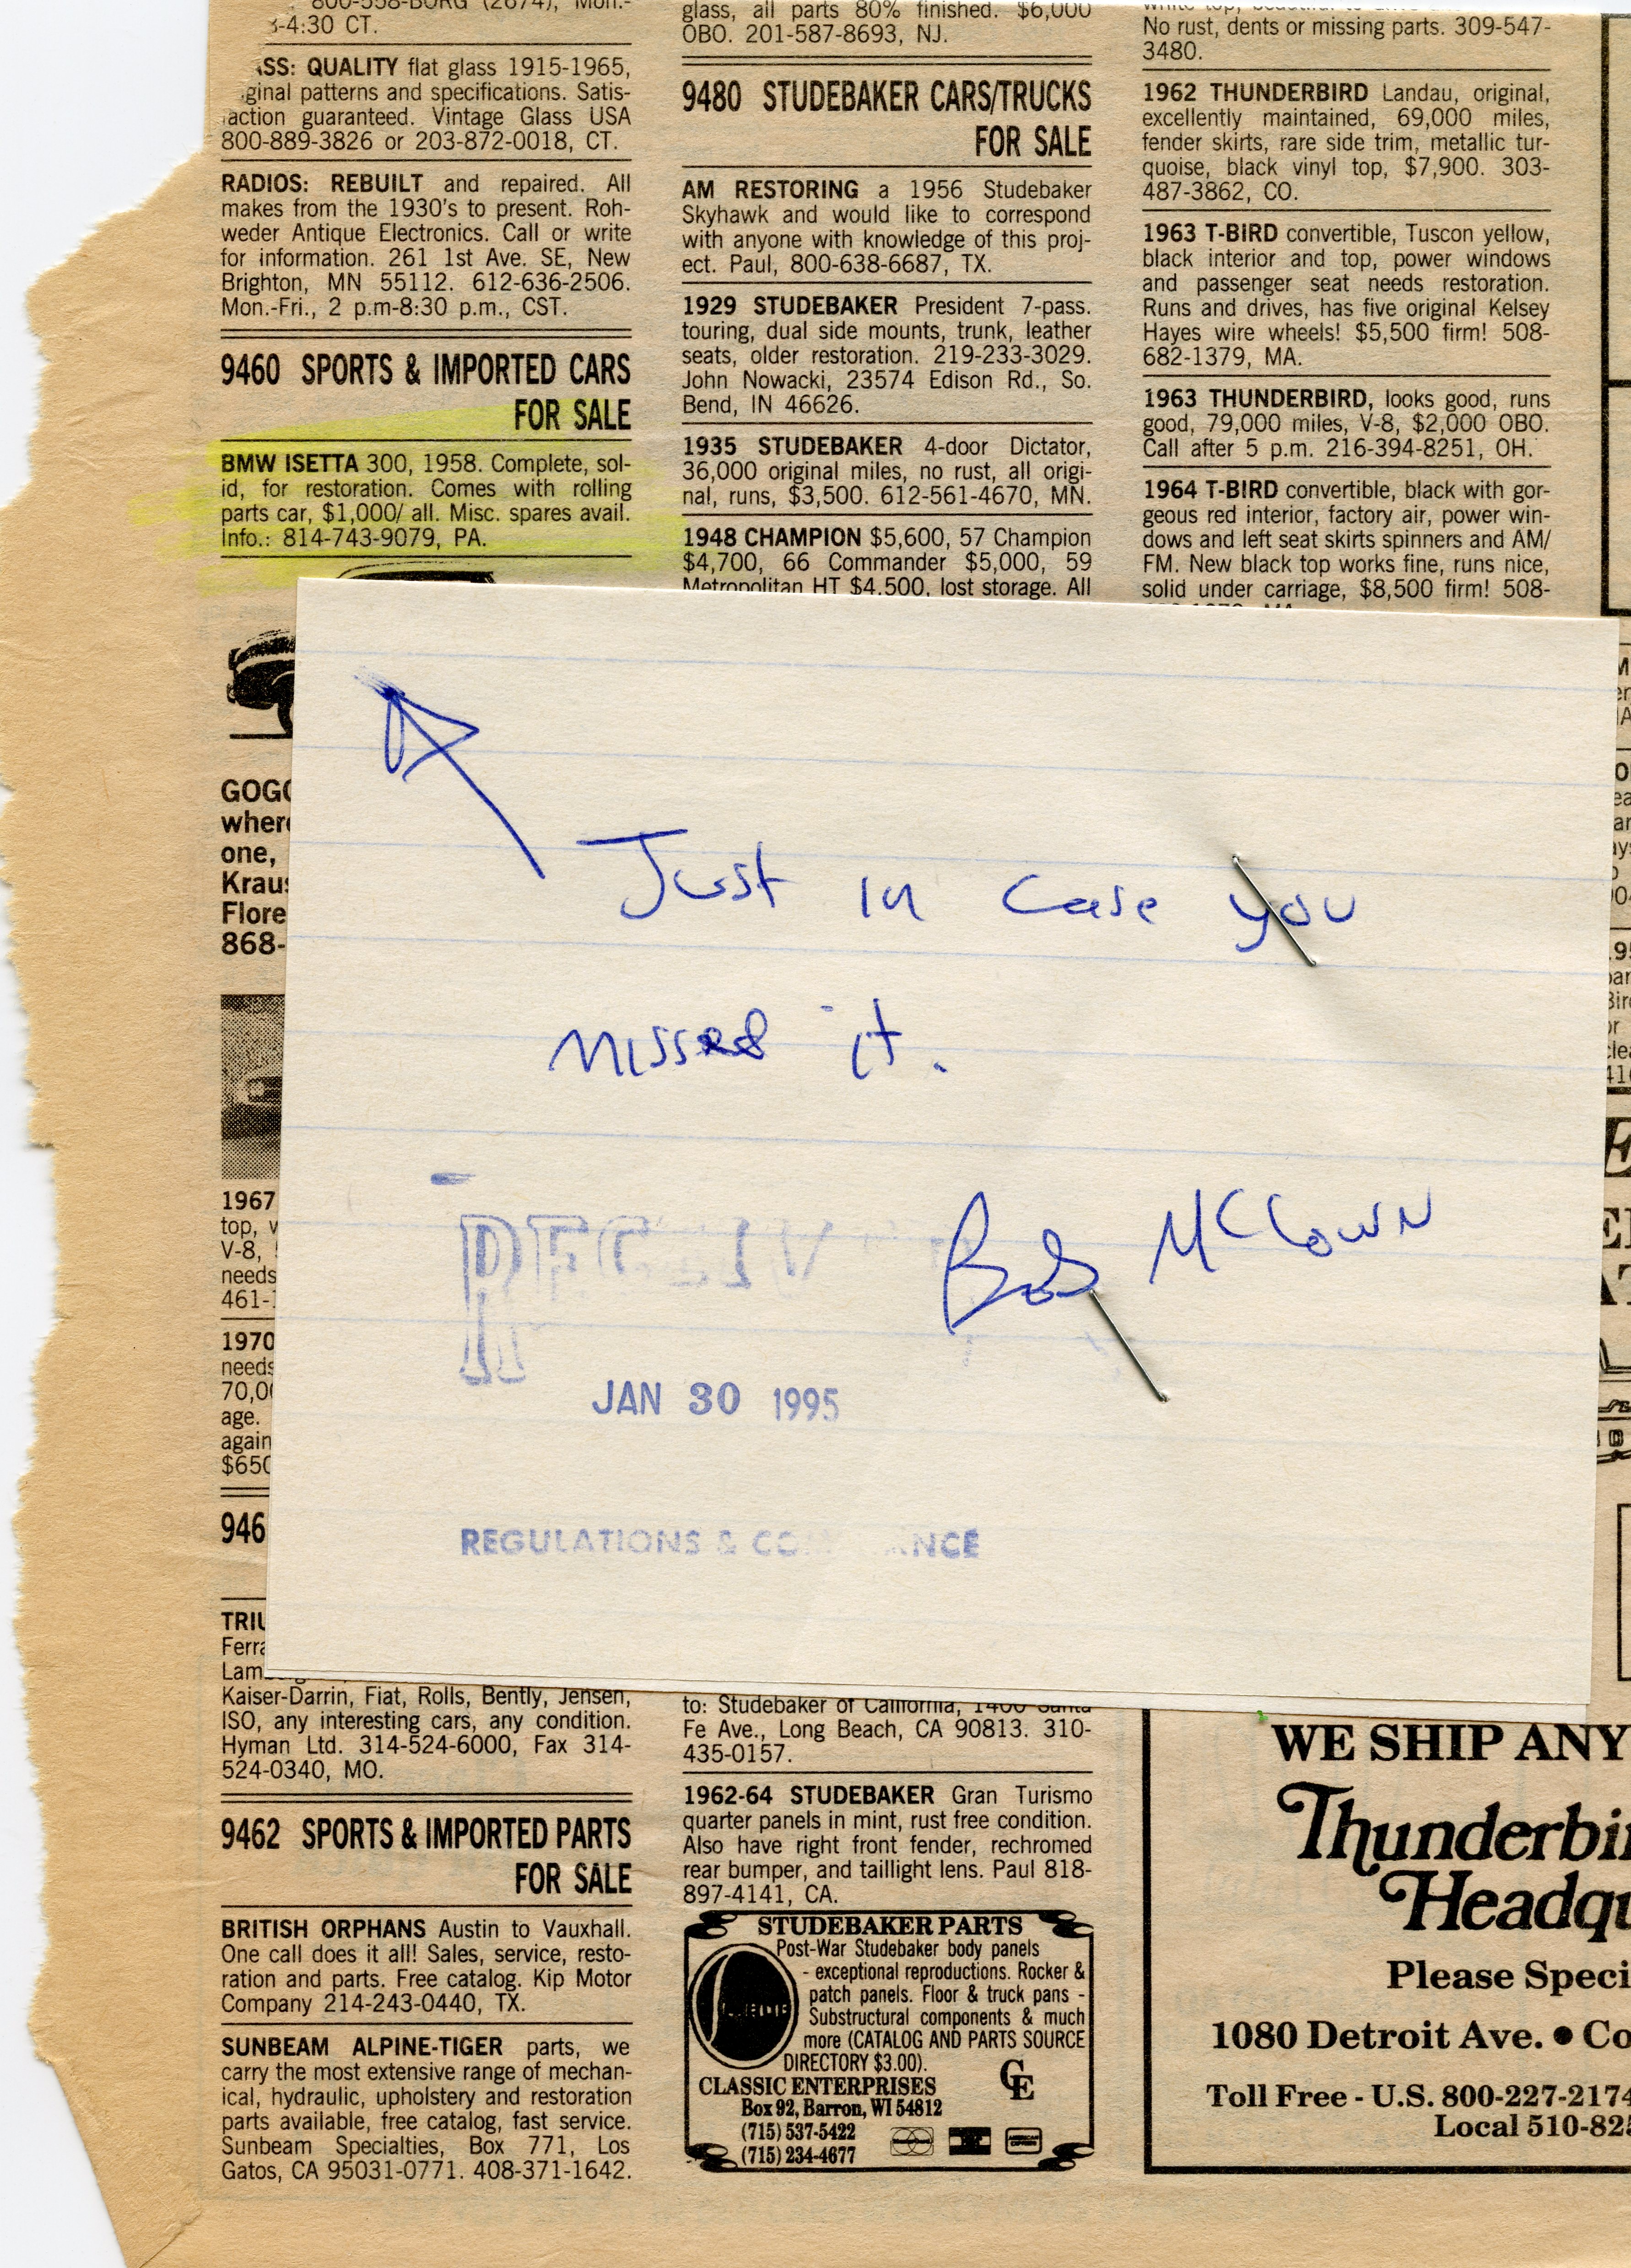
The Old Cars Weekly ad, complete with note from Bob
The solution to Challenge #1 came to me via interoffice mail. A fellow-fanatic colleague, Bob McCown, sent me a clipping from Old Cars Weekly magazine. Either I no longer subscribed, or I had missed the ad. Someone in Pennsylvania had a “complete, solid” Isetta PLUS a rolling parts car, for $1,000. I called the number, and the conversation went something like this:
ME: Hi. About the complete car you’re selling, what would it take for it to run?
SELLER: A battery.
ME: And the rolling parts car, is it complete?
SELLER: It has no drivetrain, but the rest of it is there.
This sounded like a deal to me. The plan was already decided: I’d buy both cars, strip them, keep what I needed, and sell off what I didn’t. What the heck, I’d been doing exactly that for the past 5 years!
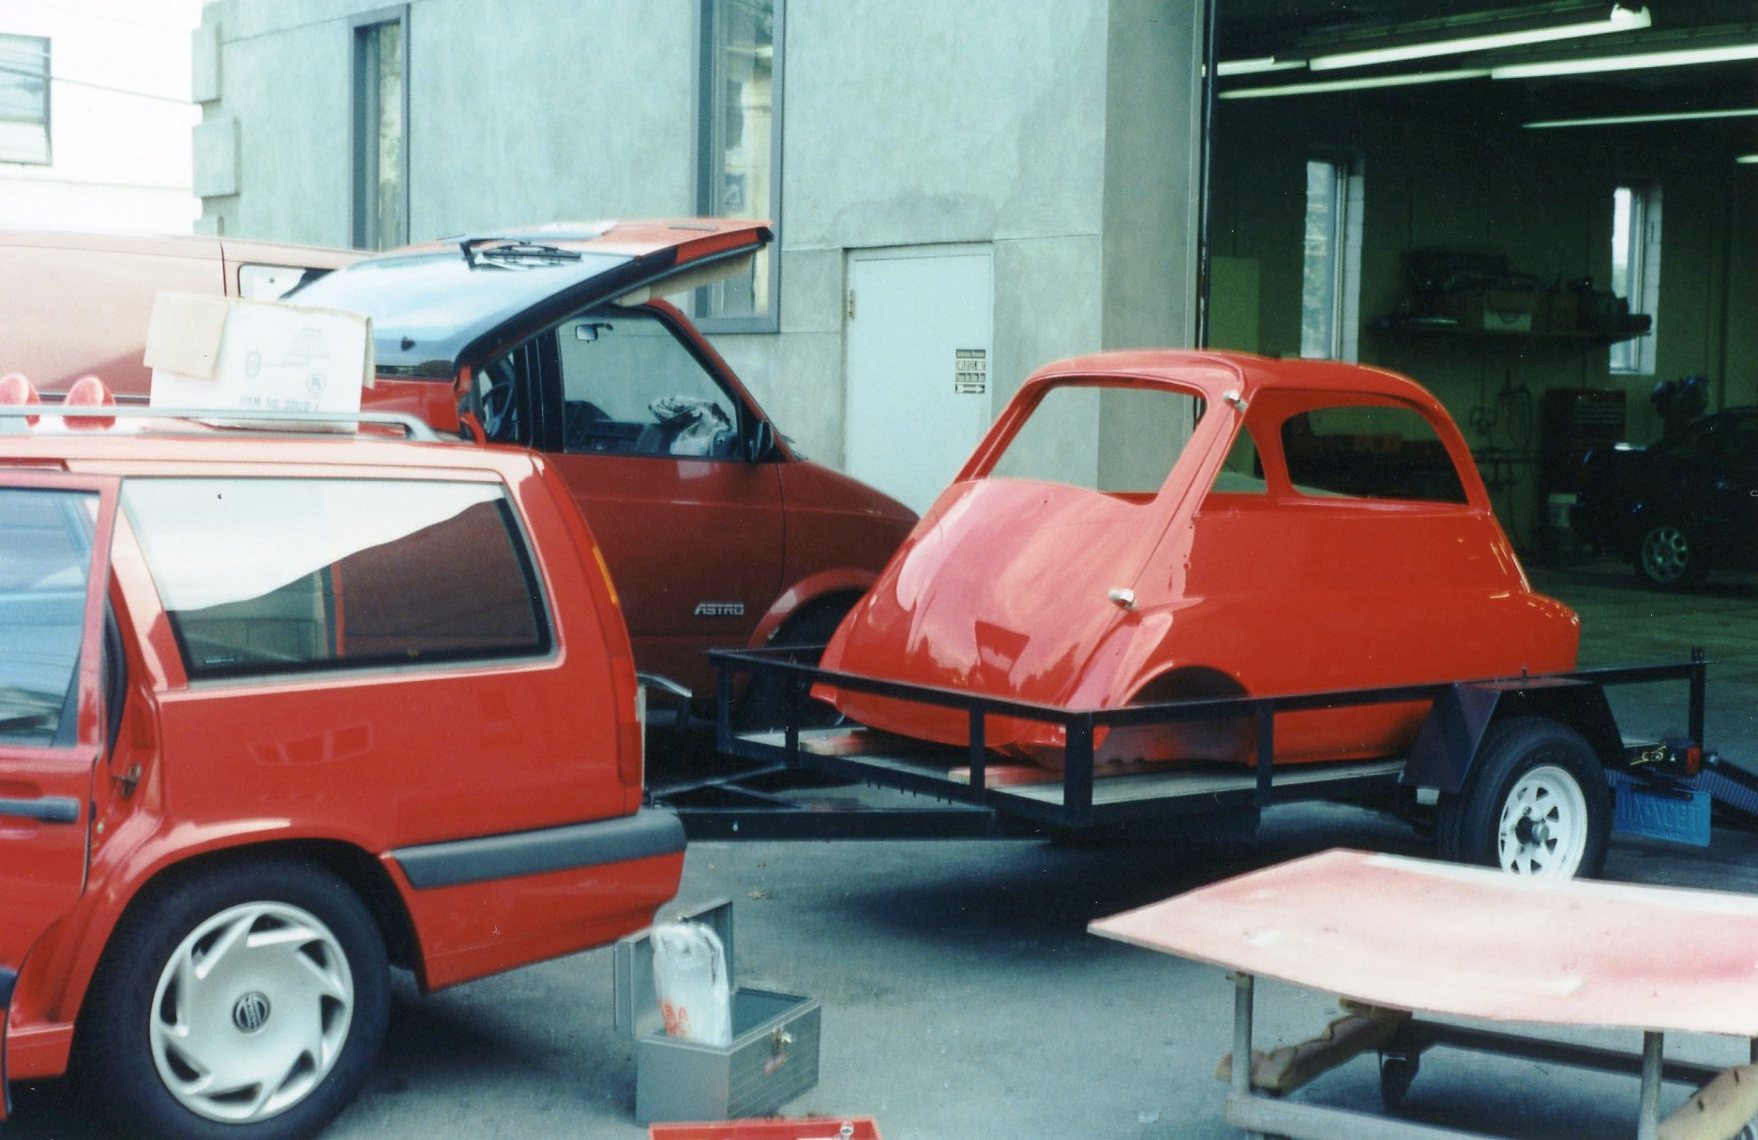
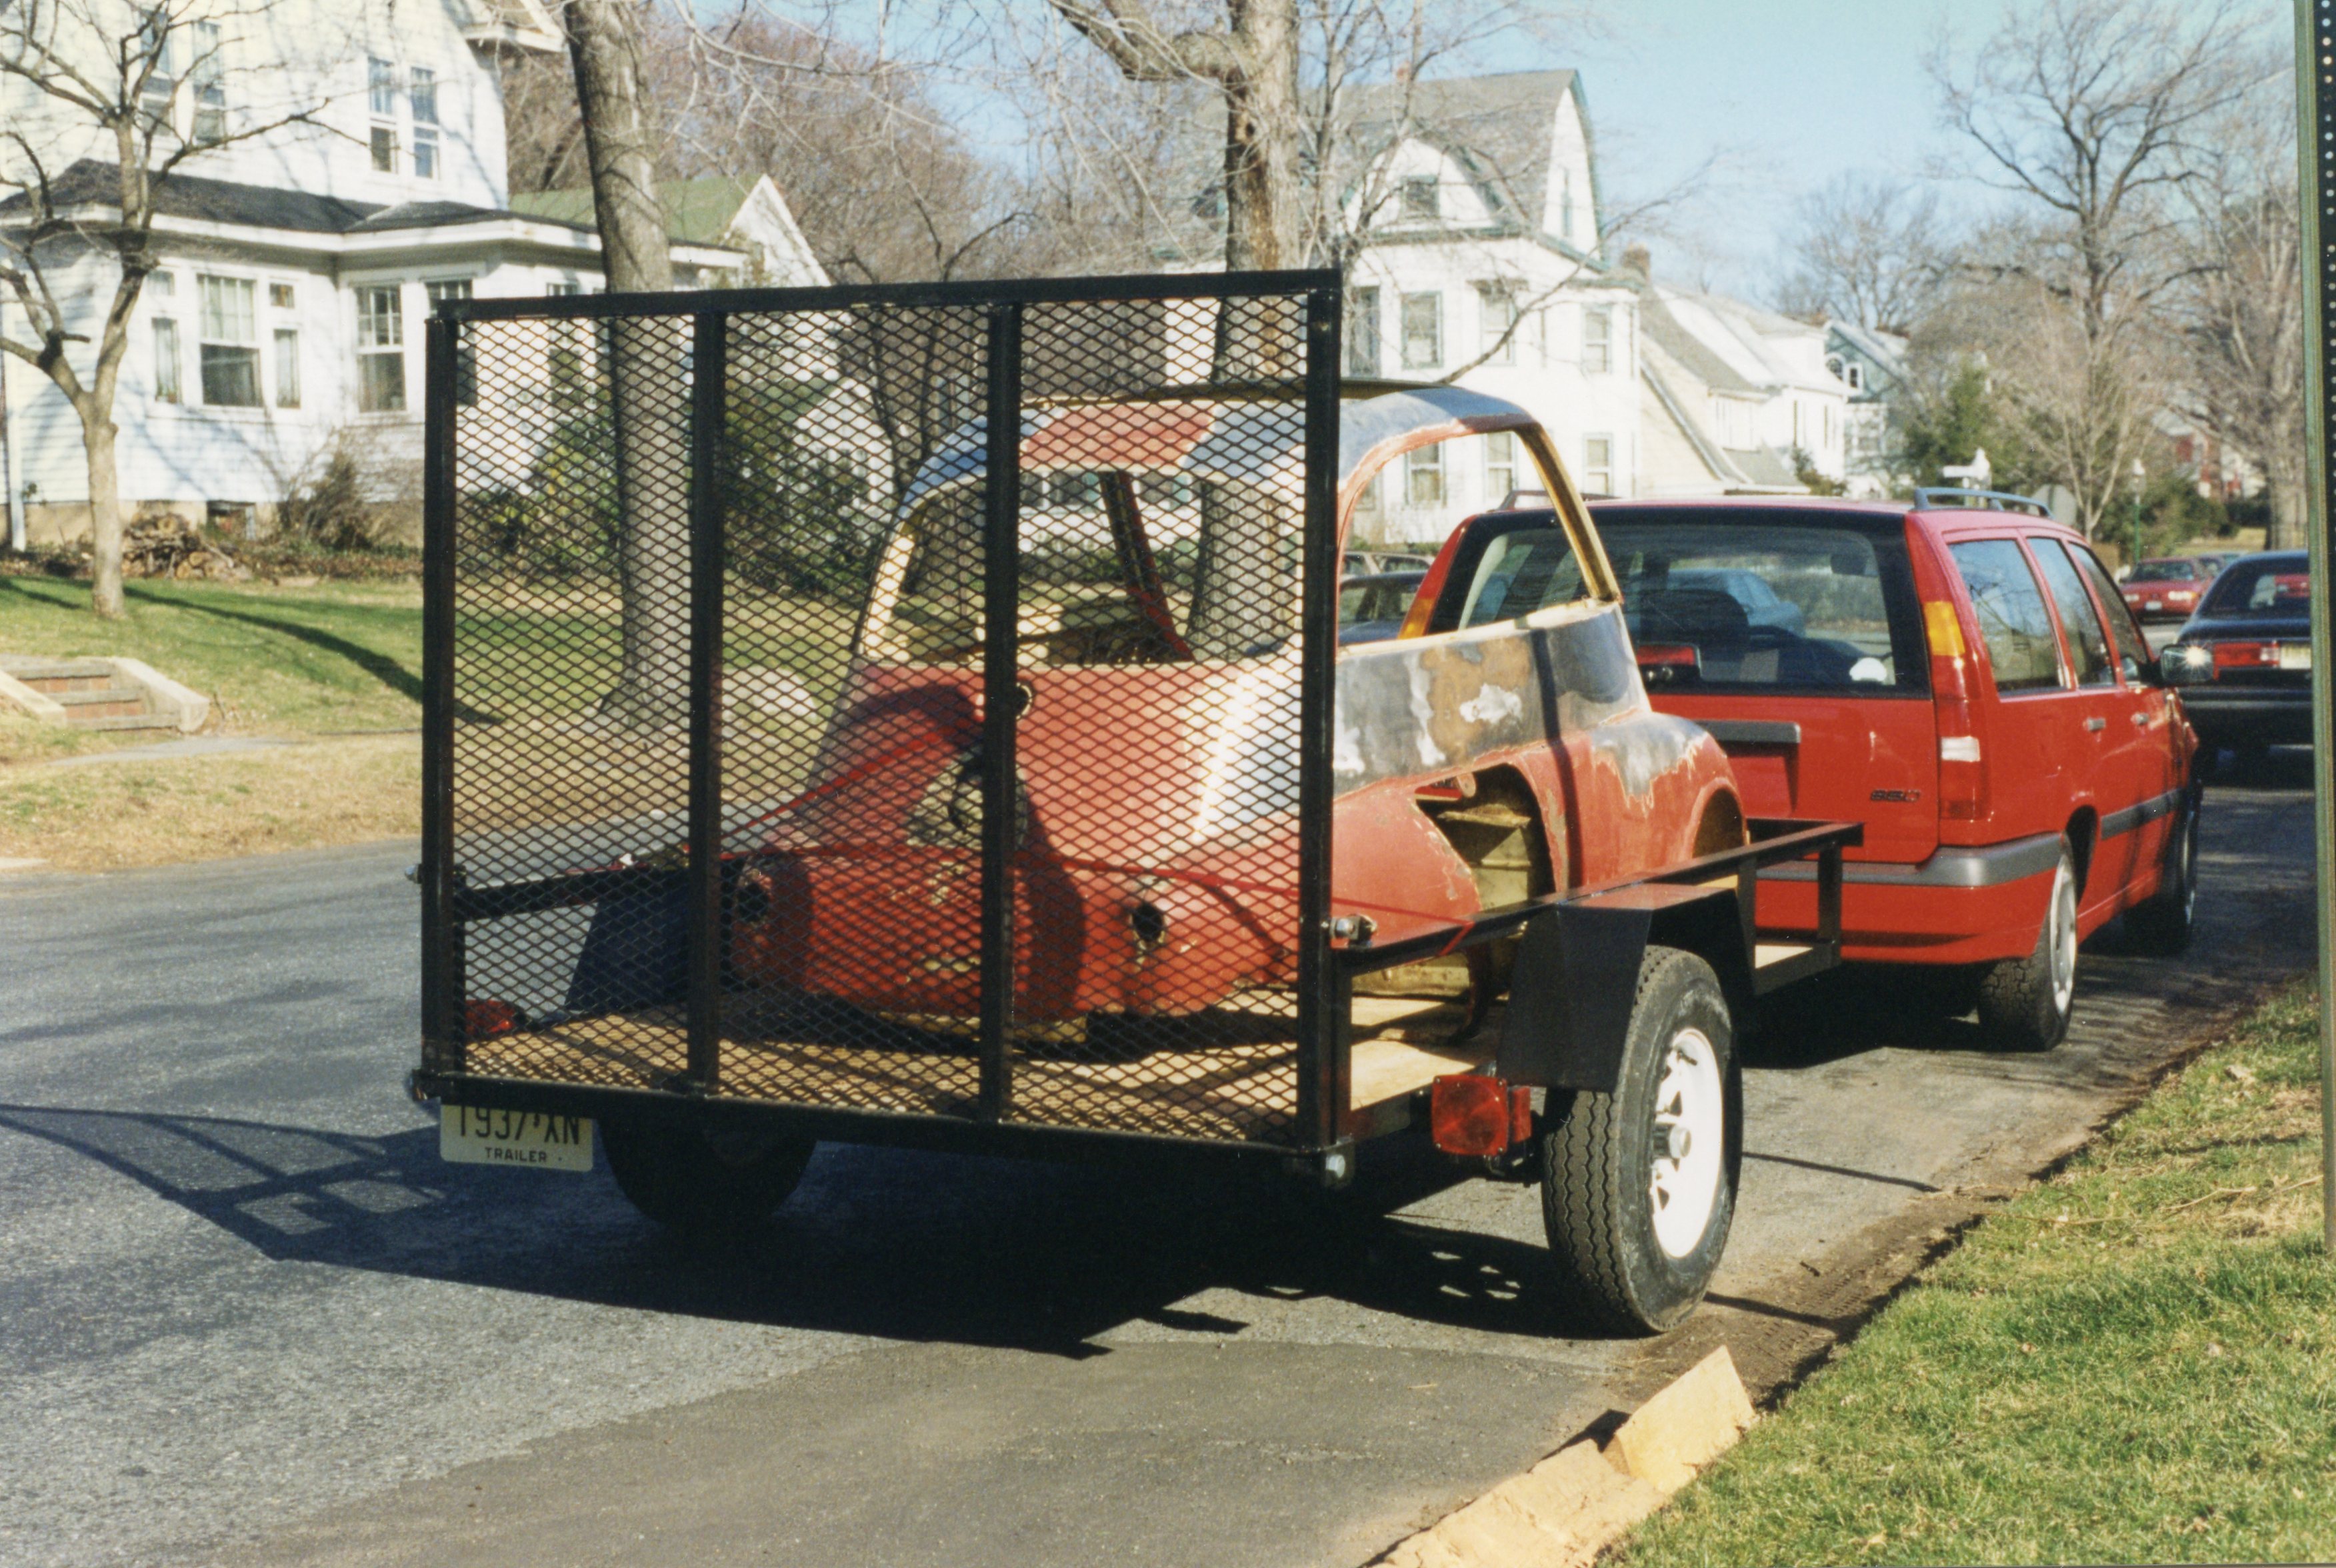
I called my good friend Steve M, who was always up for an adventure. Checking a map (no, not Google Maps, that hadn’t been invented yet), I found the town outside Pittsburgh, about a 6 hour drive one-way. Steve and I agreed to a Saturday 6 a.m. departure from my house. I hooked up the open landscape trailer (a recent purchase made for express purpose of moving Isetta bodies) to my Volvo 850 wagon, and we were off.
Car & trailer (here with body in tow) made 12-hour round trip to PA
Steve said: “You know, showing up with an empty trailer is bad. He’ll conclude that you’re buying his cars no matter what. I suggest that you find a spot about a mile from his house and park the trailer.” I would have none of it. I retorted “Look, as excited as I am about these cars, if I don’t want them, I’m not buying them.”
We arrived at the seller’s house around noon. The property was a large farm, with numerous outbuildings. About 50 yards away I spotted a canvas cover draped over the unmistakable silhouette of an Isetta. We didn’t see a soul, so we headed toward it. Peeking under the cover, the Isetta was quite rough. “This must be the rolling parts car” I told myself.
“John” the seller emerged from one of the buildings. Spotting the NJ plate, he correctly presumed that I was the guy who called.
ME: So this must be the rolling parts car.
JOHN: No, that’s the better of the two.
We peeled the cover completely back. The sunroof was missing. The interior was gutted. The engine was on the floor of the car.
ME: You told me on the phone that the better car only needed a battery to run.
JOHN: Well, that engine would run once it’s reinstalled. At least it’s there.
ME: Oh boy. Since we’re here, let’s look at the rolling parts car.
We followed him to another part of the farm. The roller was inside. The roller had been in a fire. Everything consumable was gone: paint, glass, plastic. There was sheetmetal, but it was impossible to tell what color the car had been. The roller was worth more as scrap metal.
I was too disappointed to be angry. There was no way I was purchasing these two Isettas from him. If he had offered them for free I would have declined, as neither car had the parts I needed. In a situation like this, the best way to get even is to walk away. I said to John, “I’m not buying these”, shook his hand, and we got back into my car. Steve and I had a nice dinner somewhere in PA. So much for that idea.
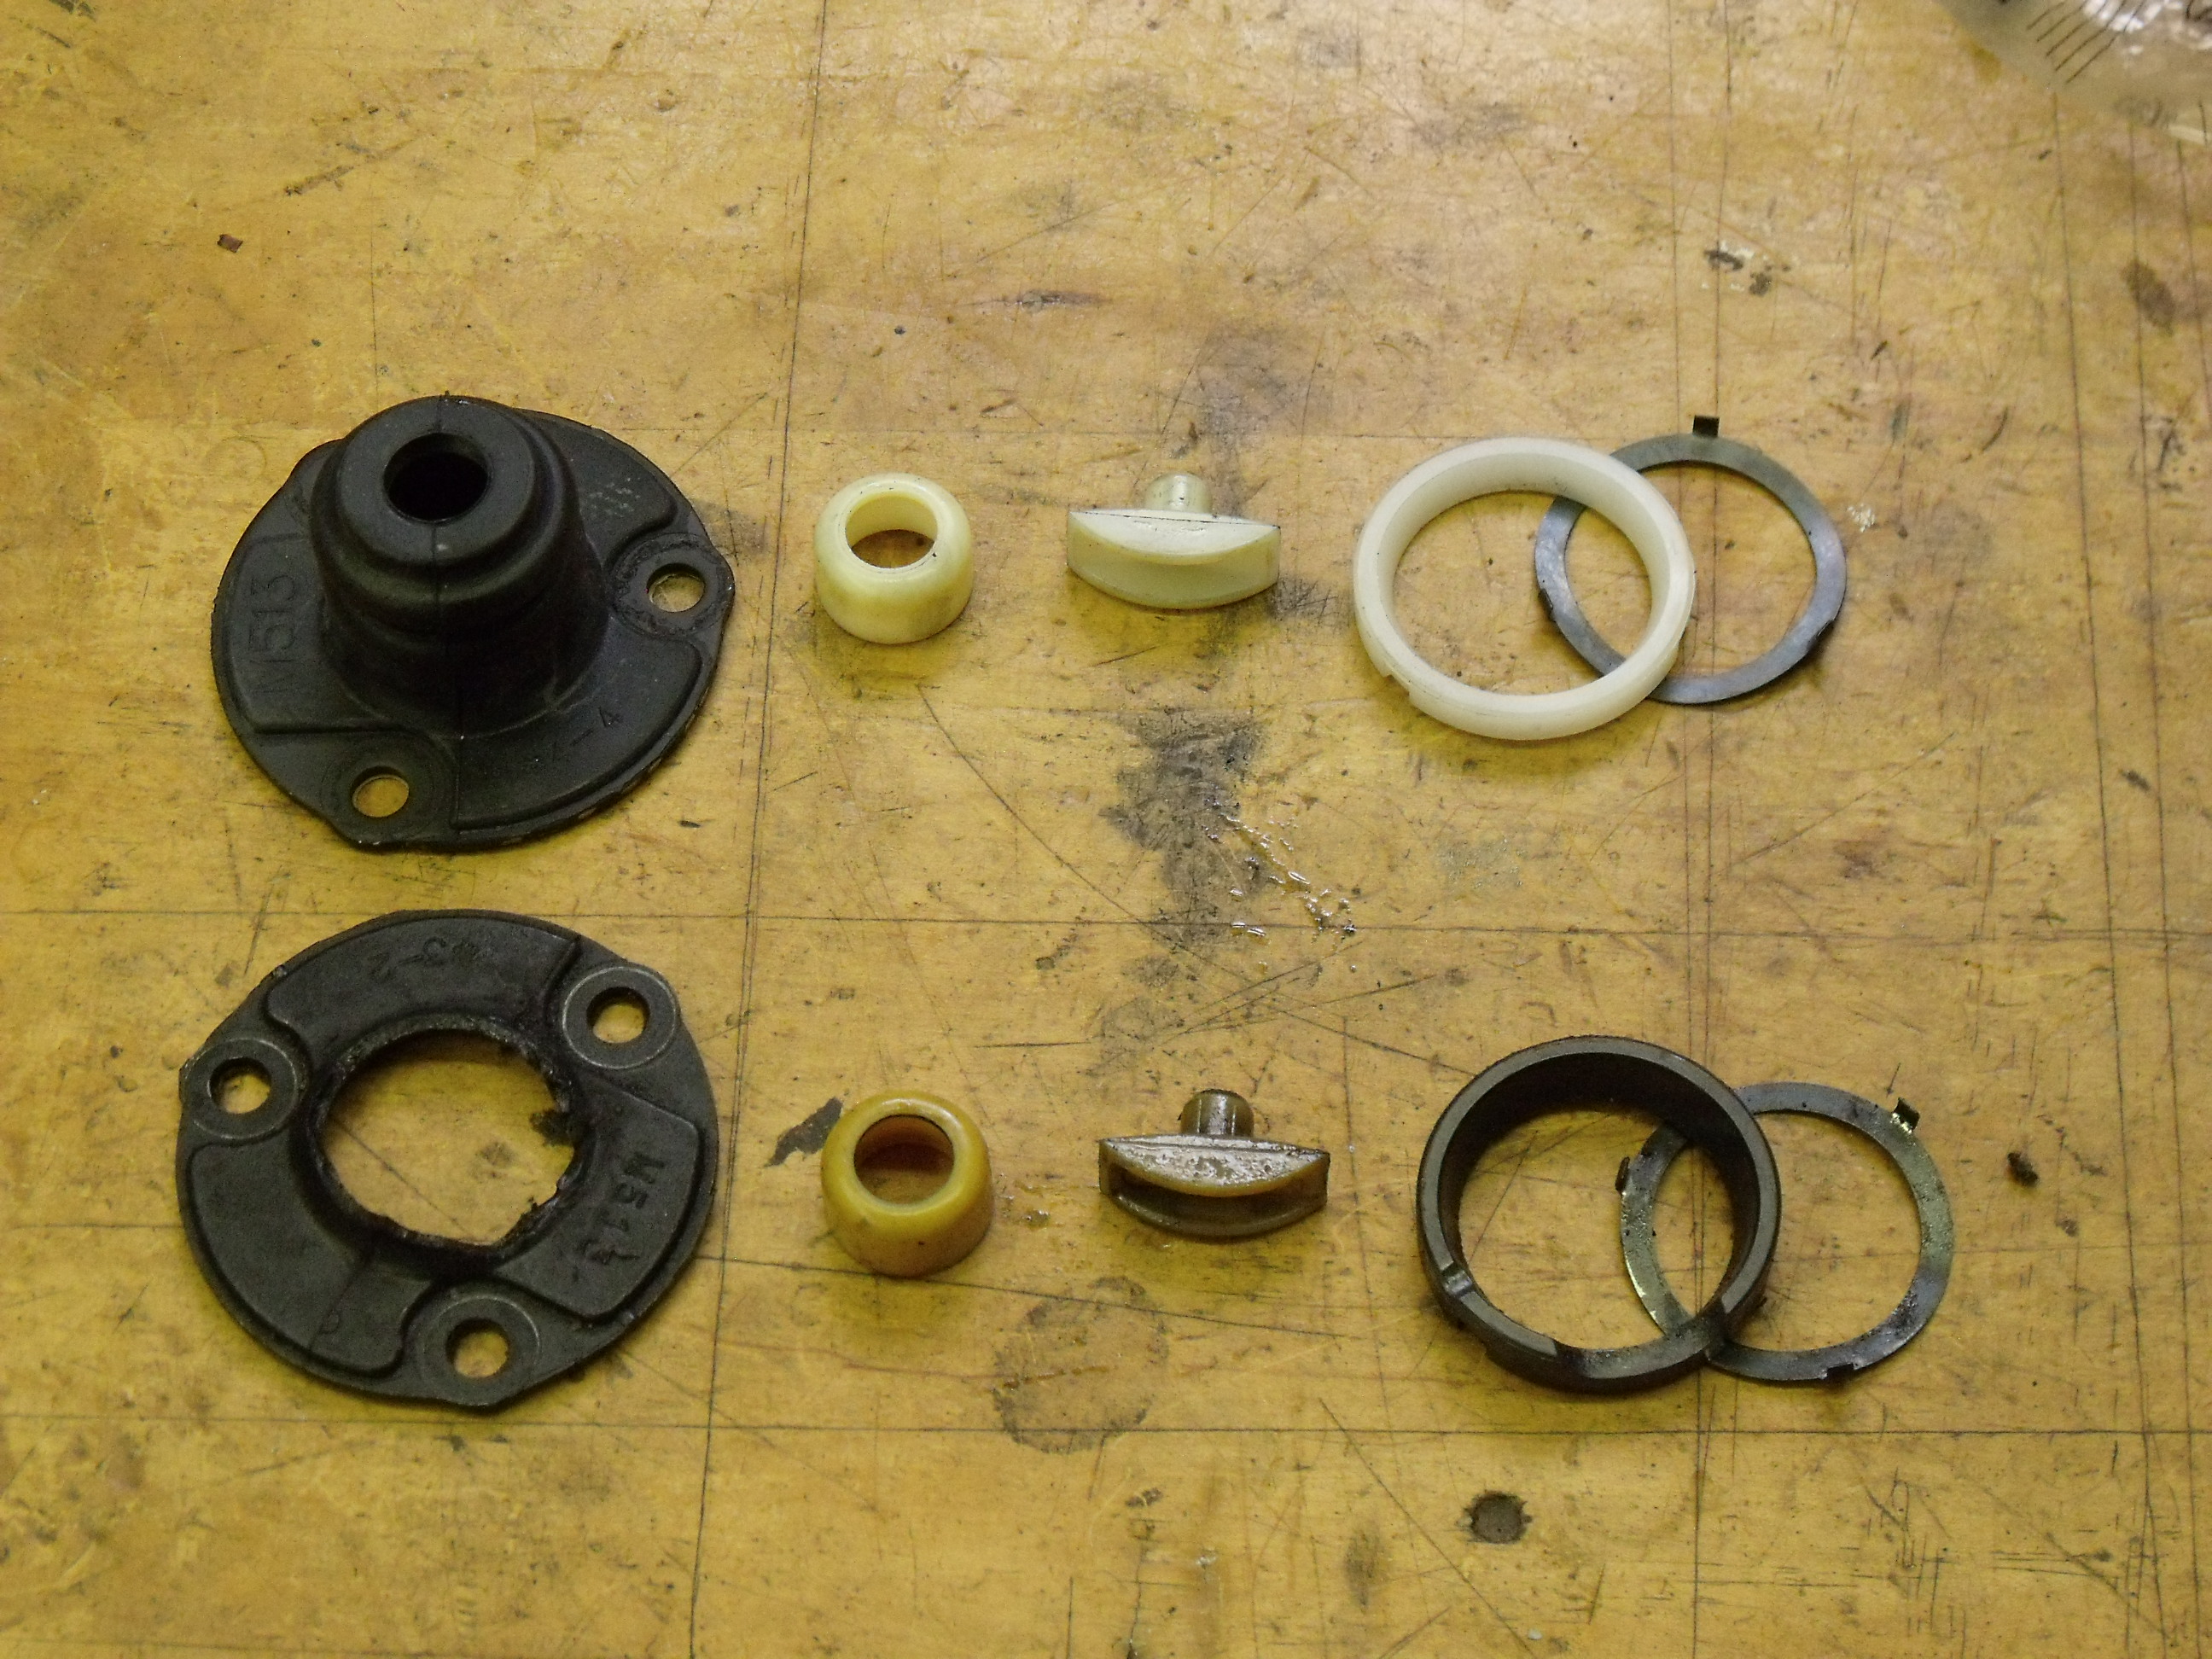
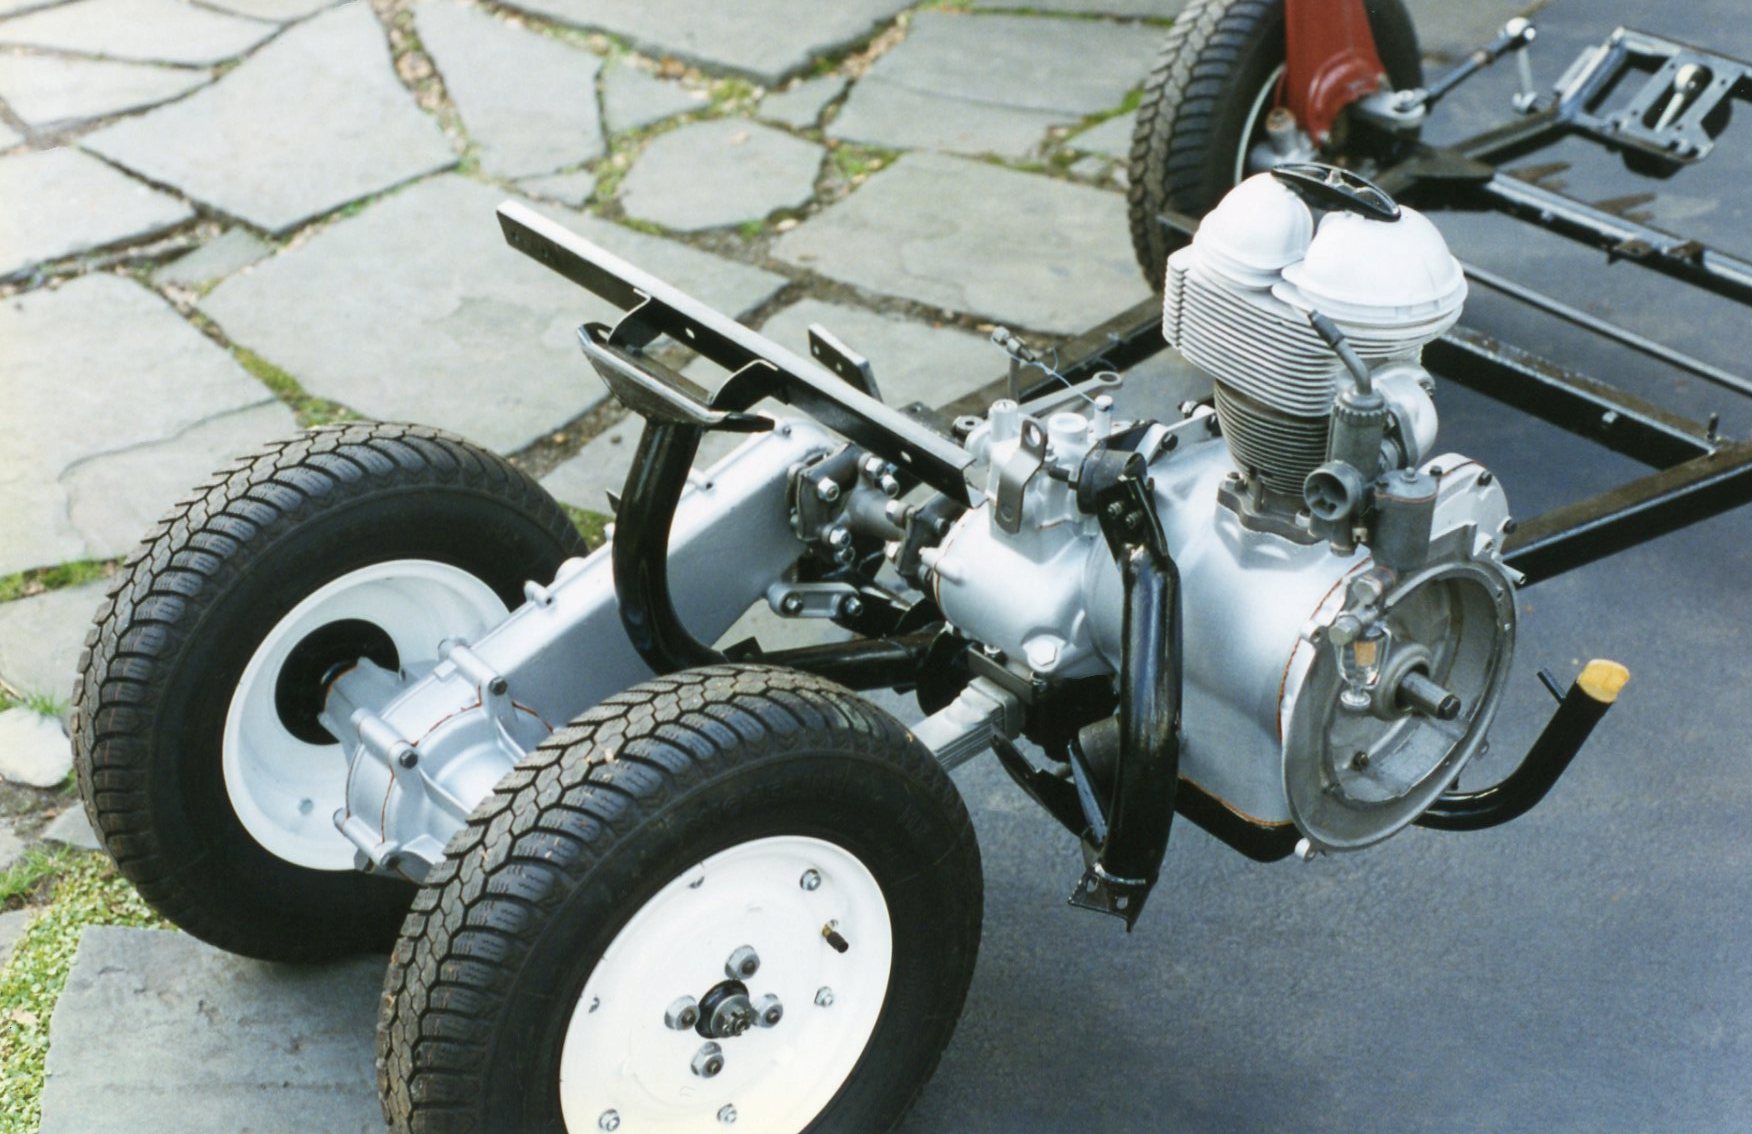
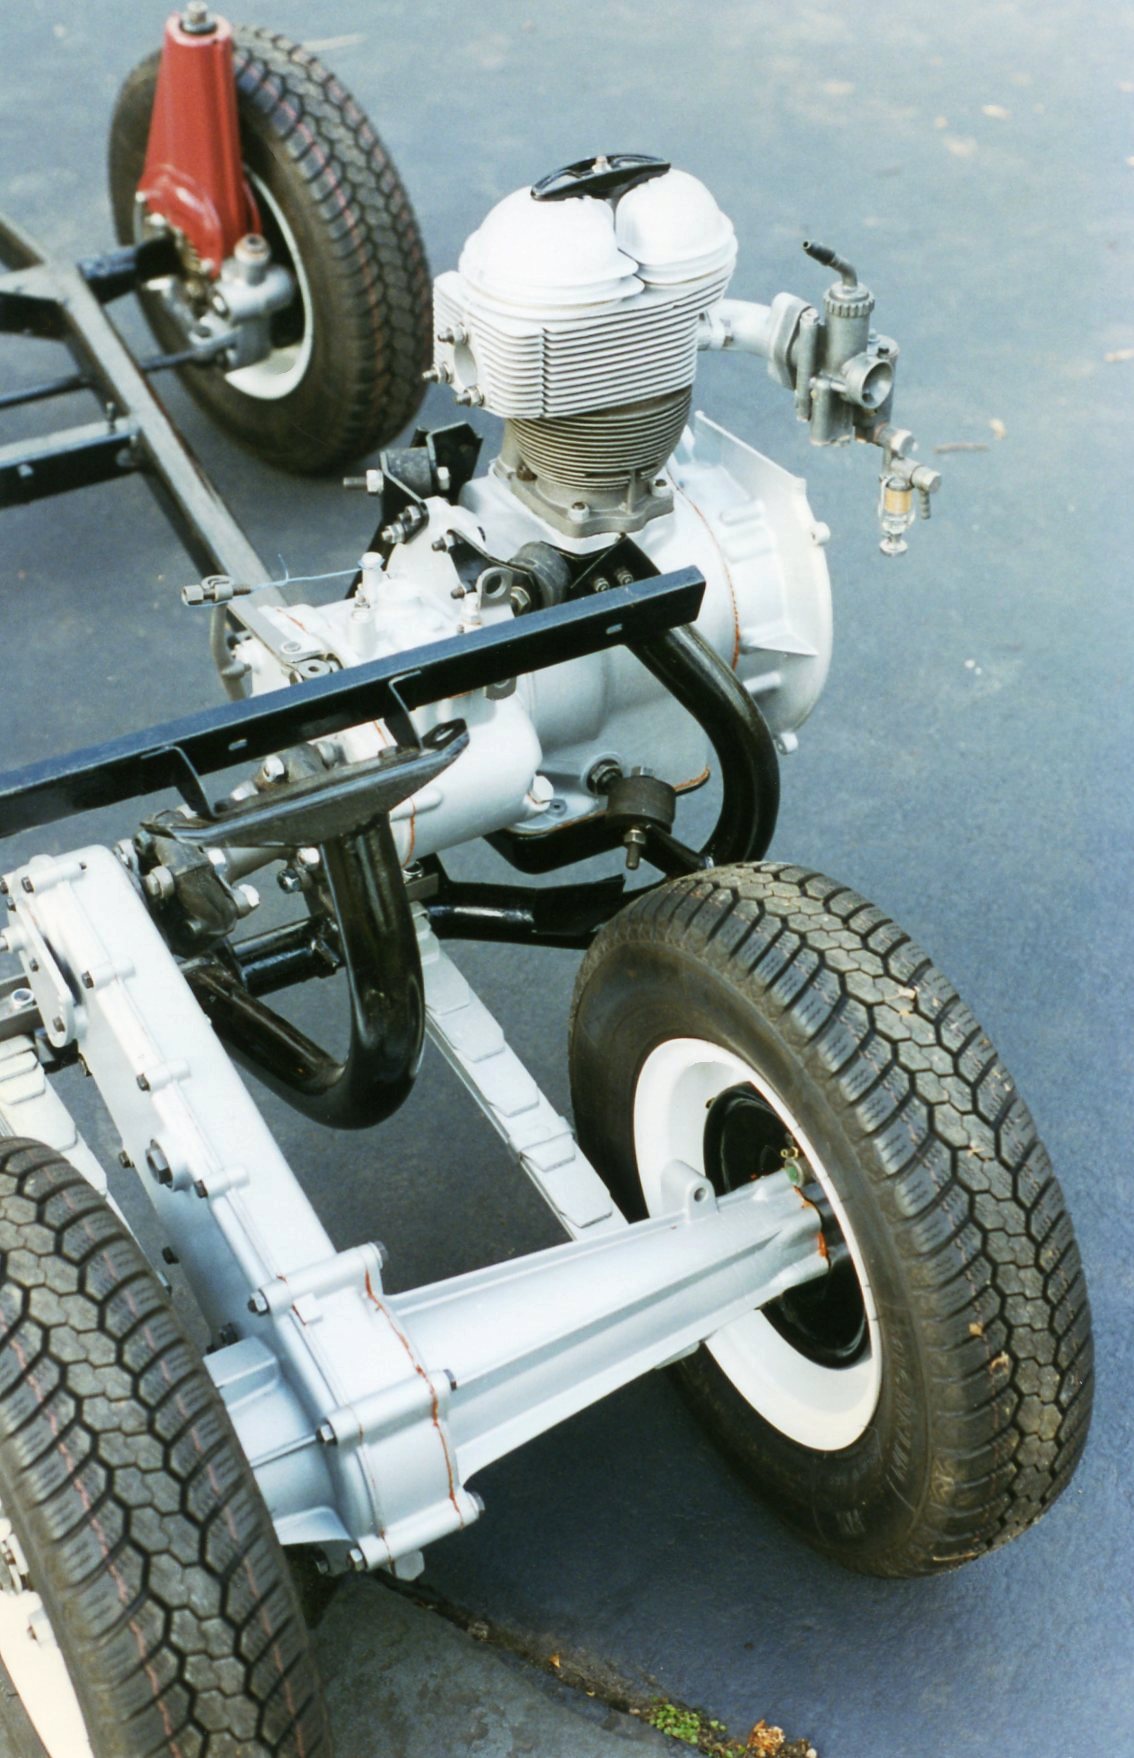
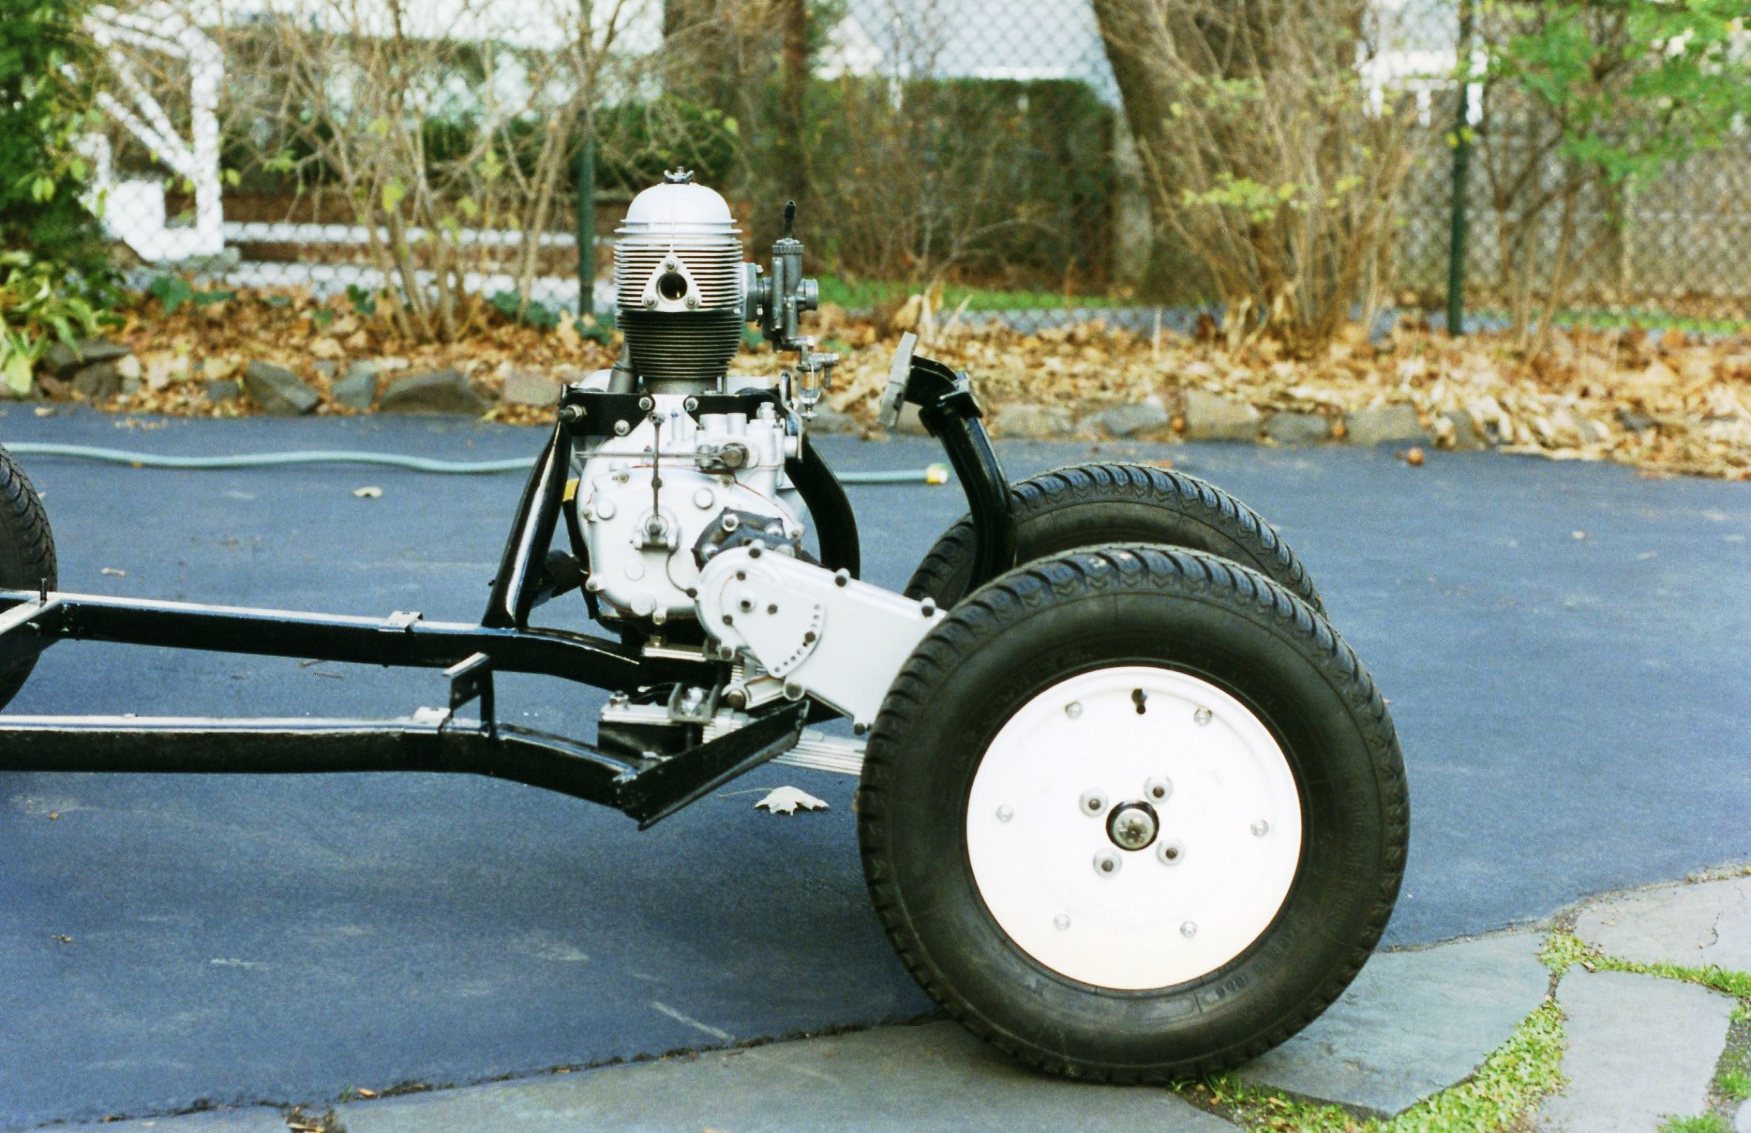
Challenge #2 was more within my control. Bolting major mechanical subassemblies to the chassis with the body removed was quite straightforward, except for the missing components. I had no motor mount brackets, and they weren’t being reproduced, so one of my local suppliers was able to fulfill an order for a pre-owned set. The engine, complete with cylinder head, carburetor, and clutch, went in first. Next, the transmission was installed.
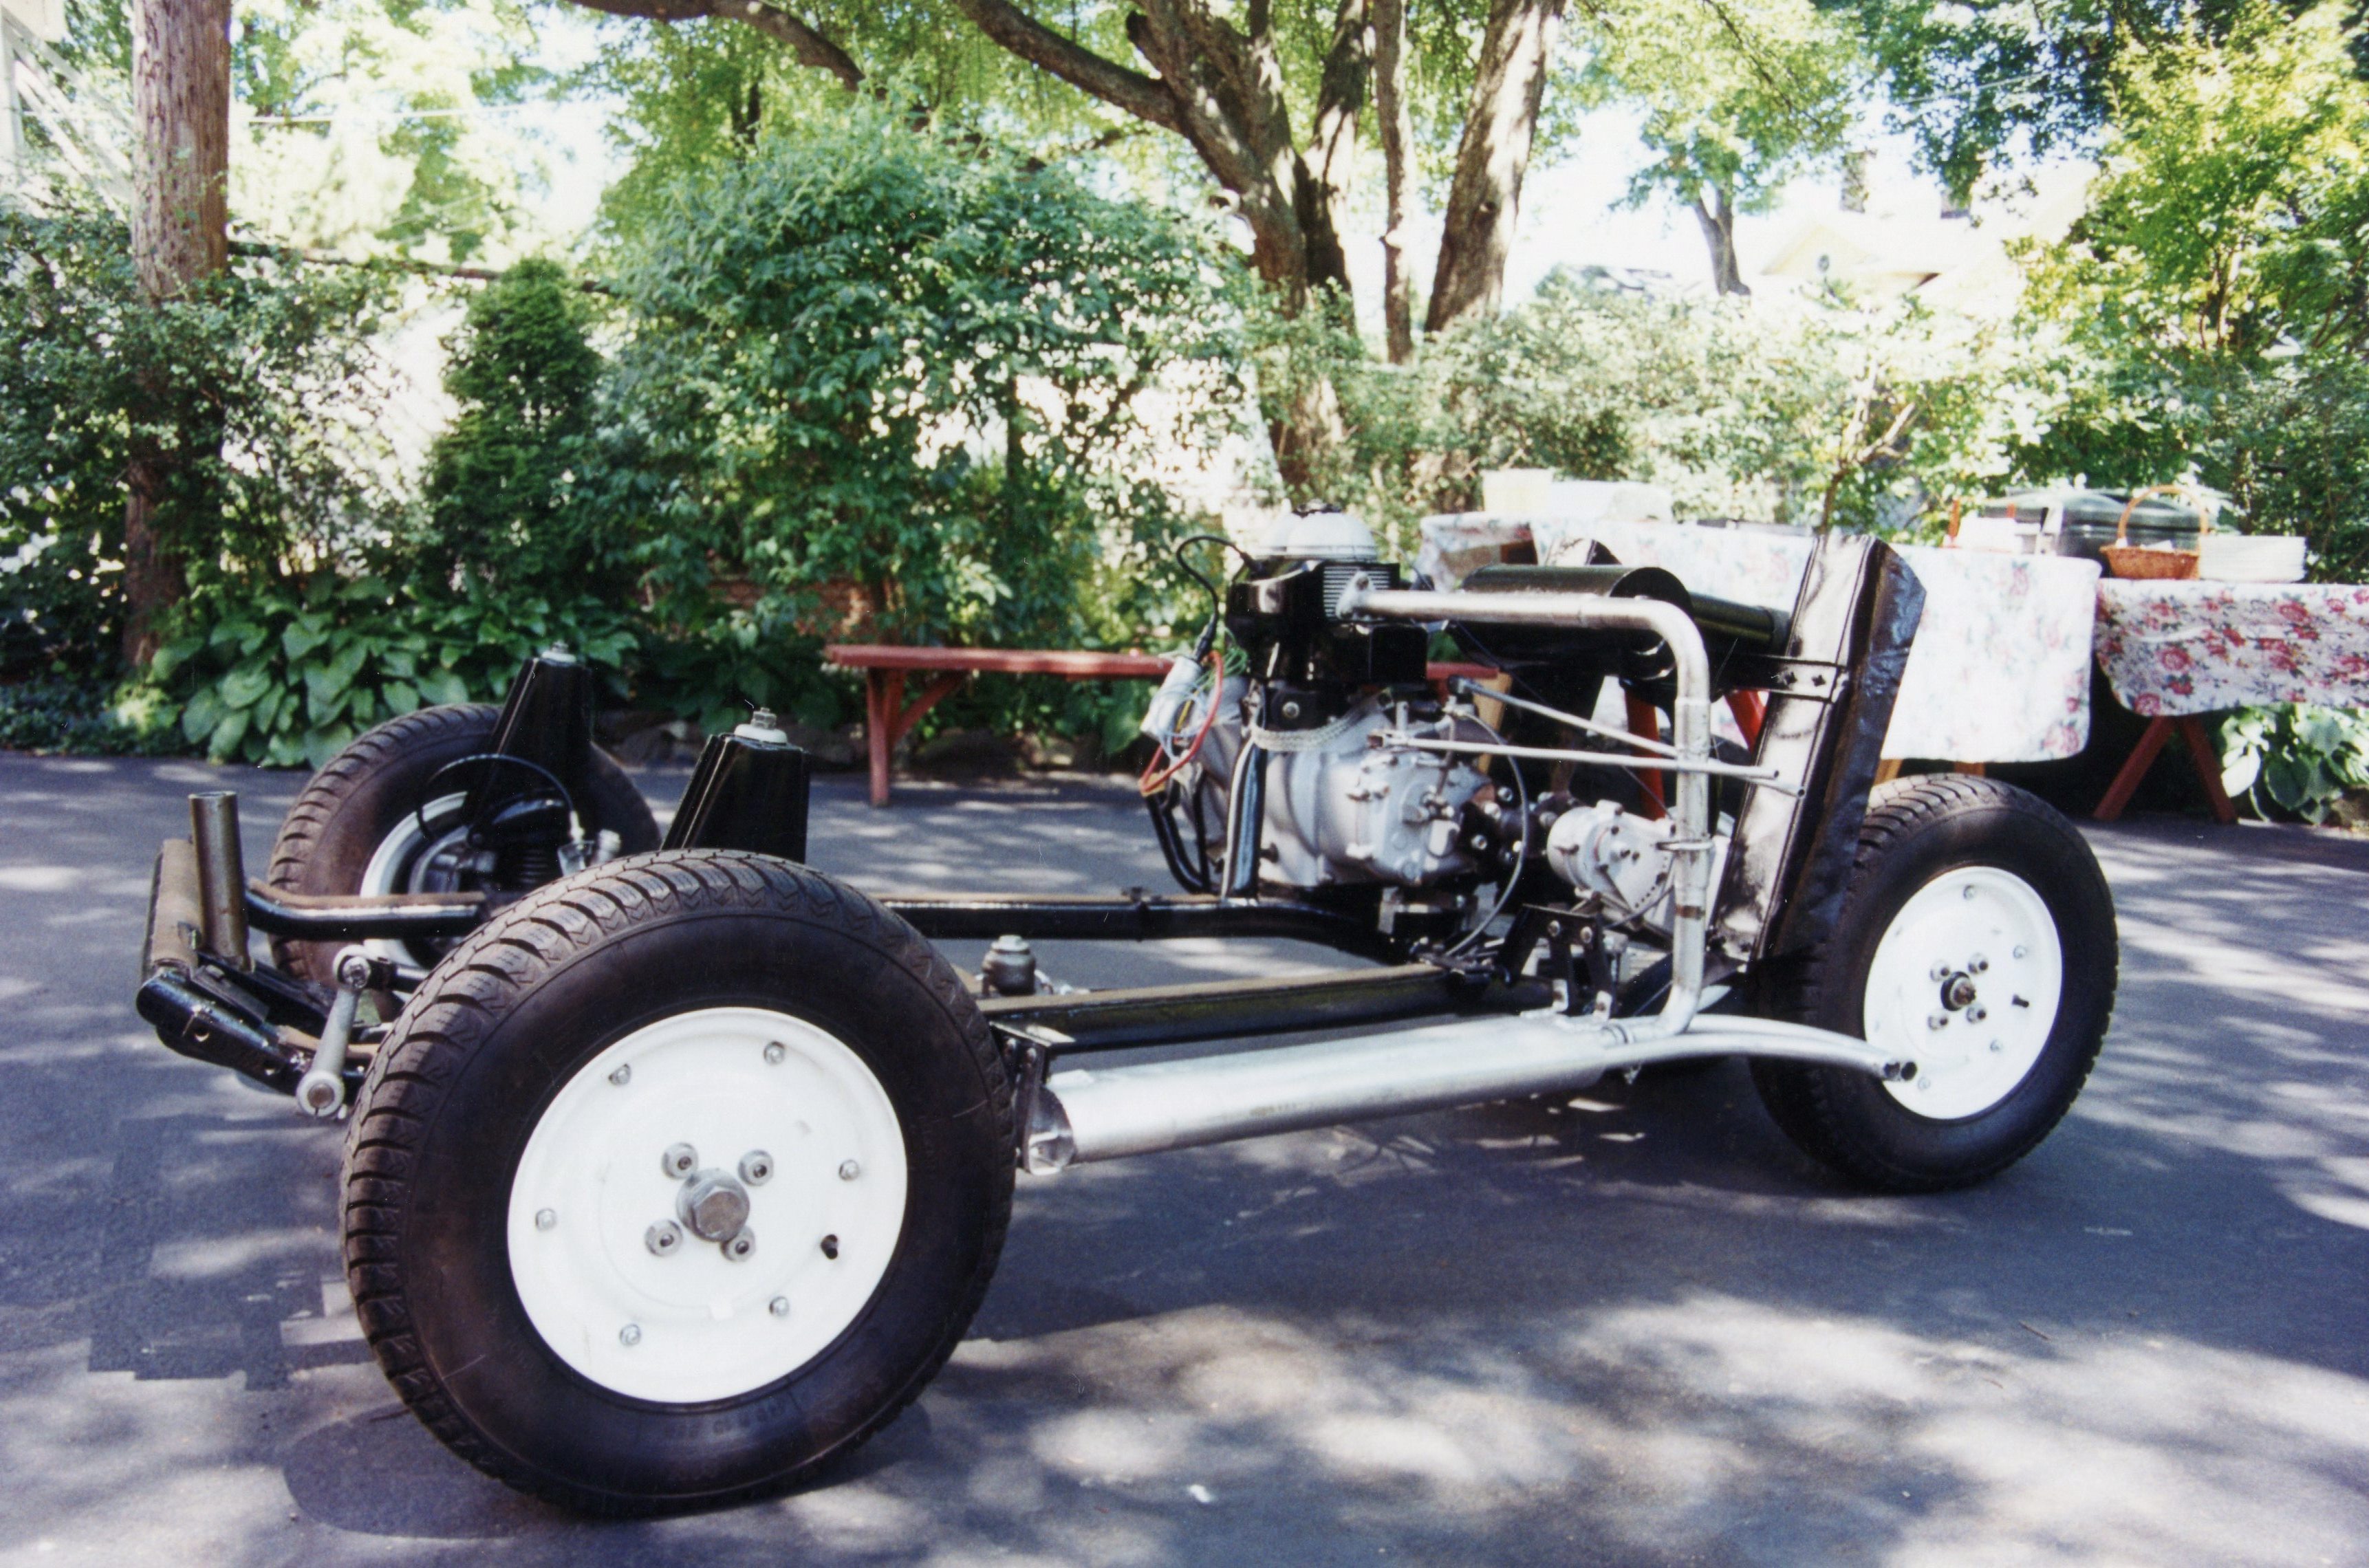
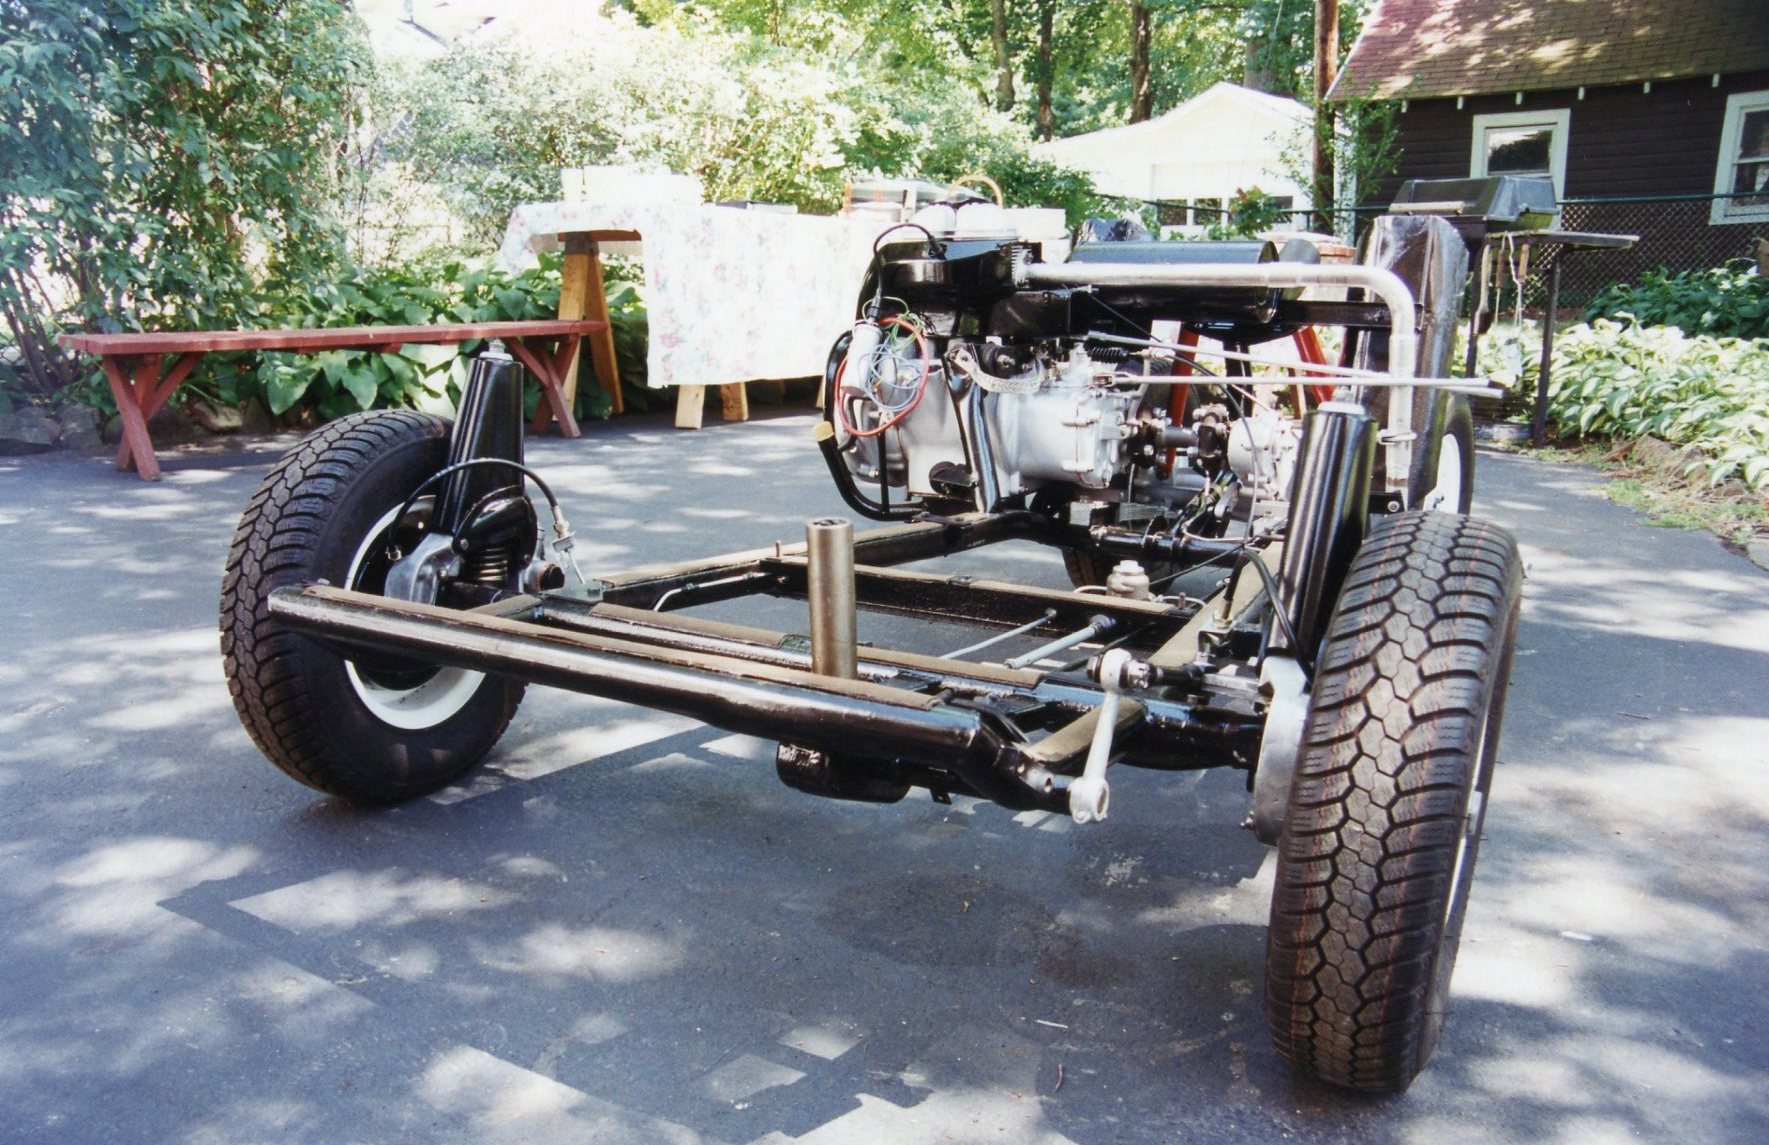
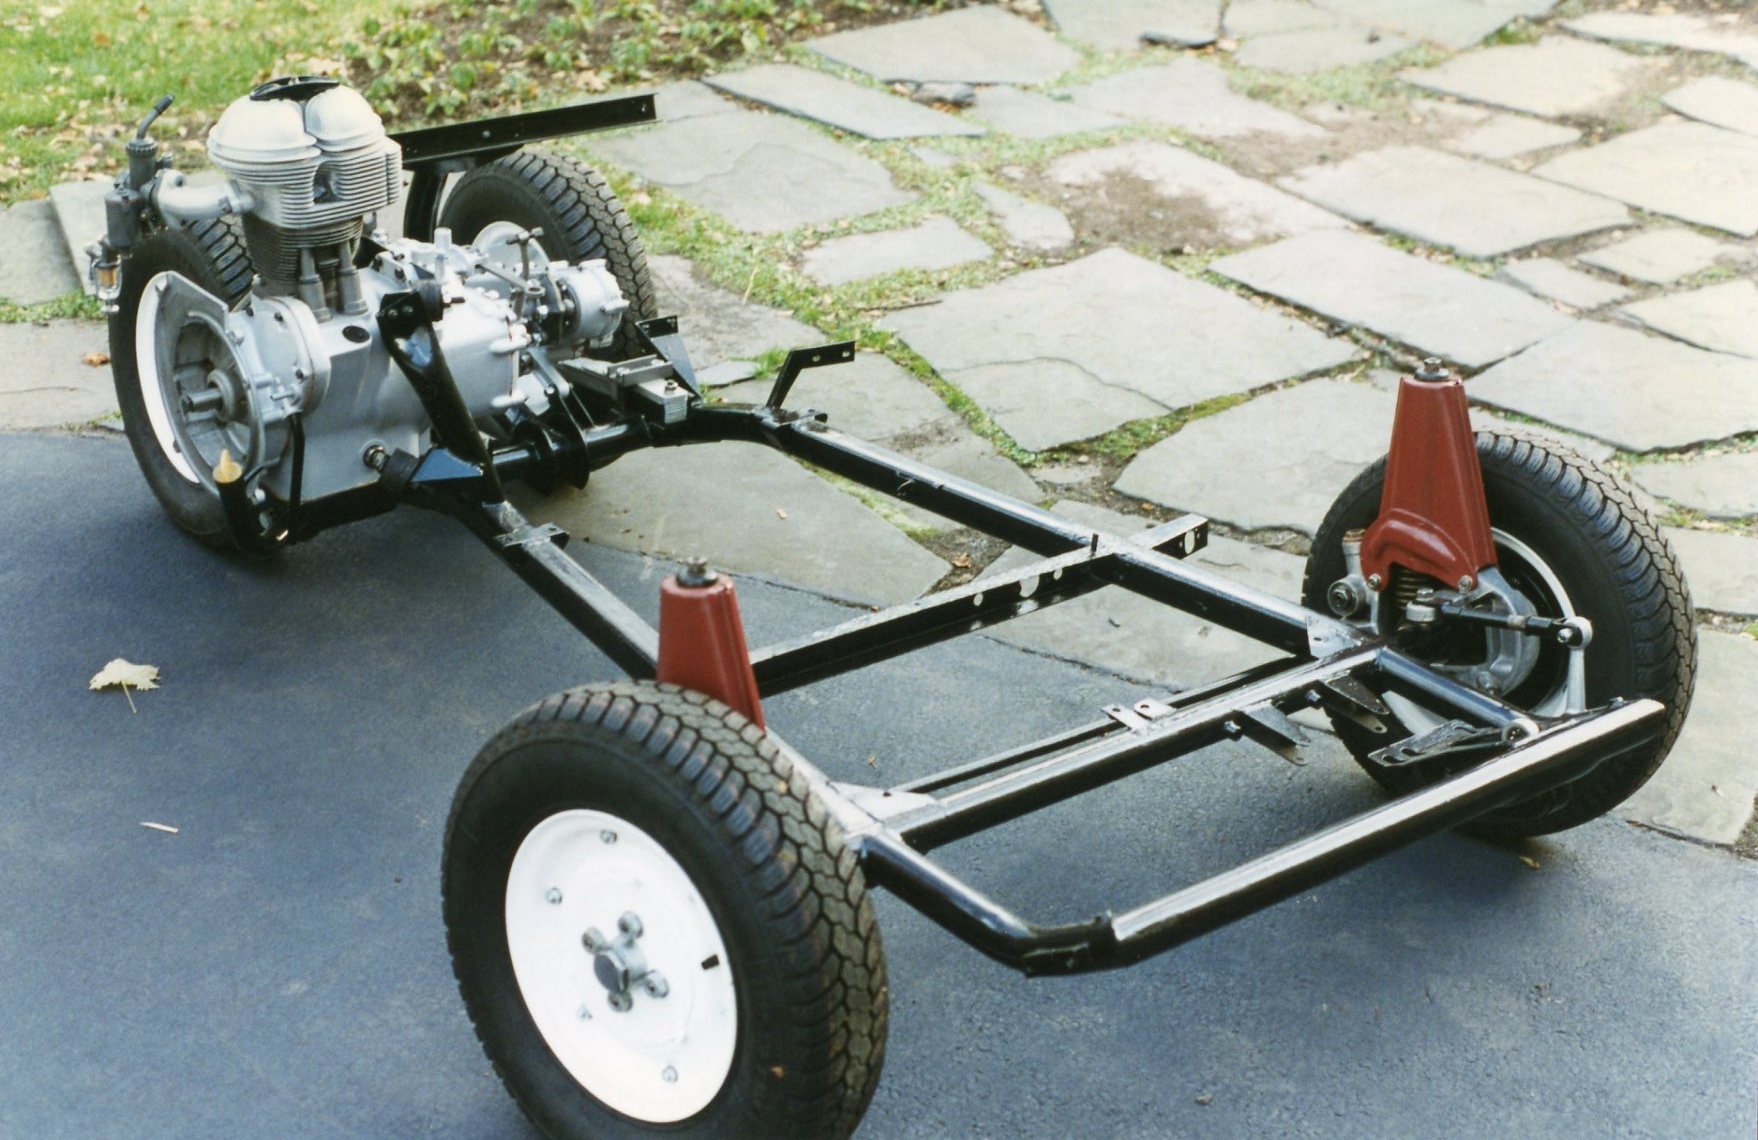
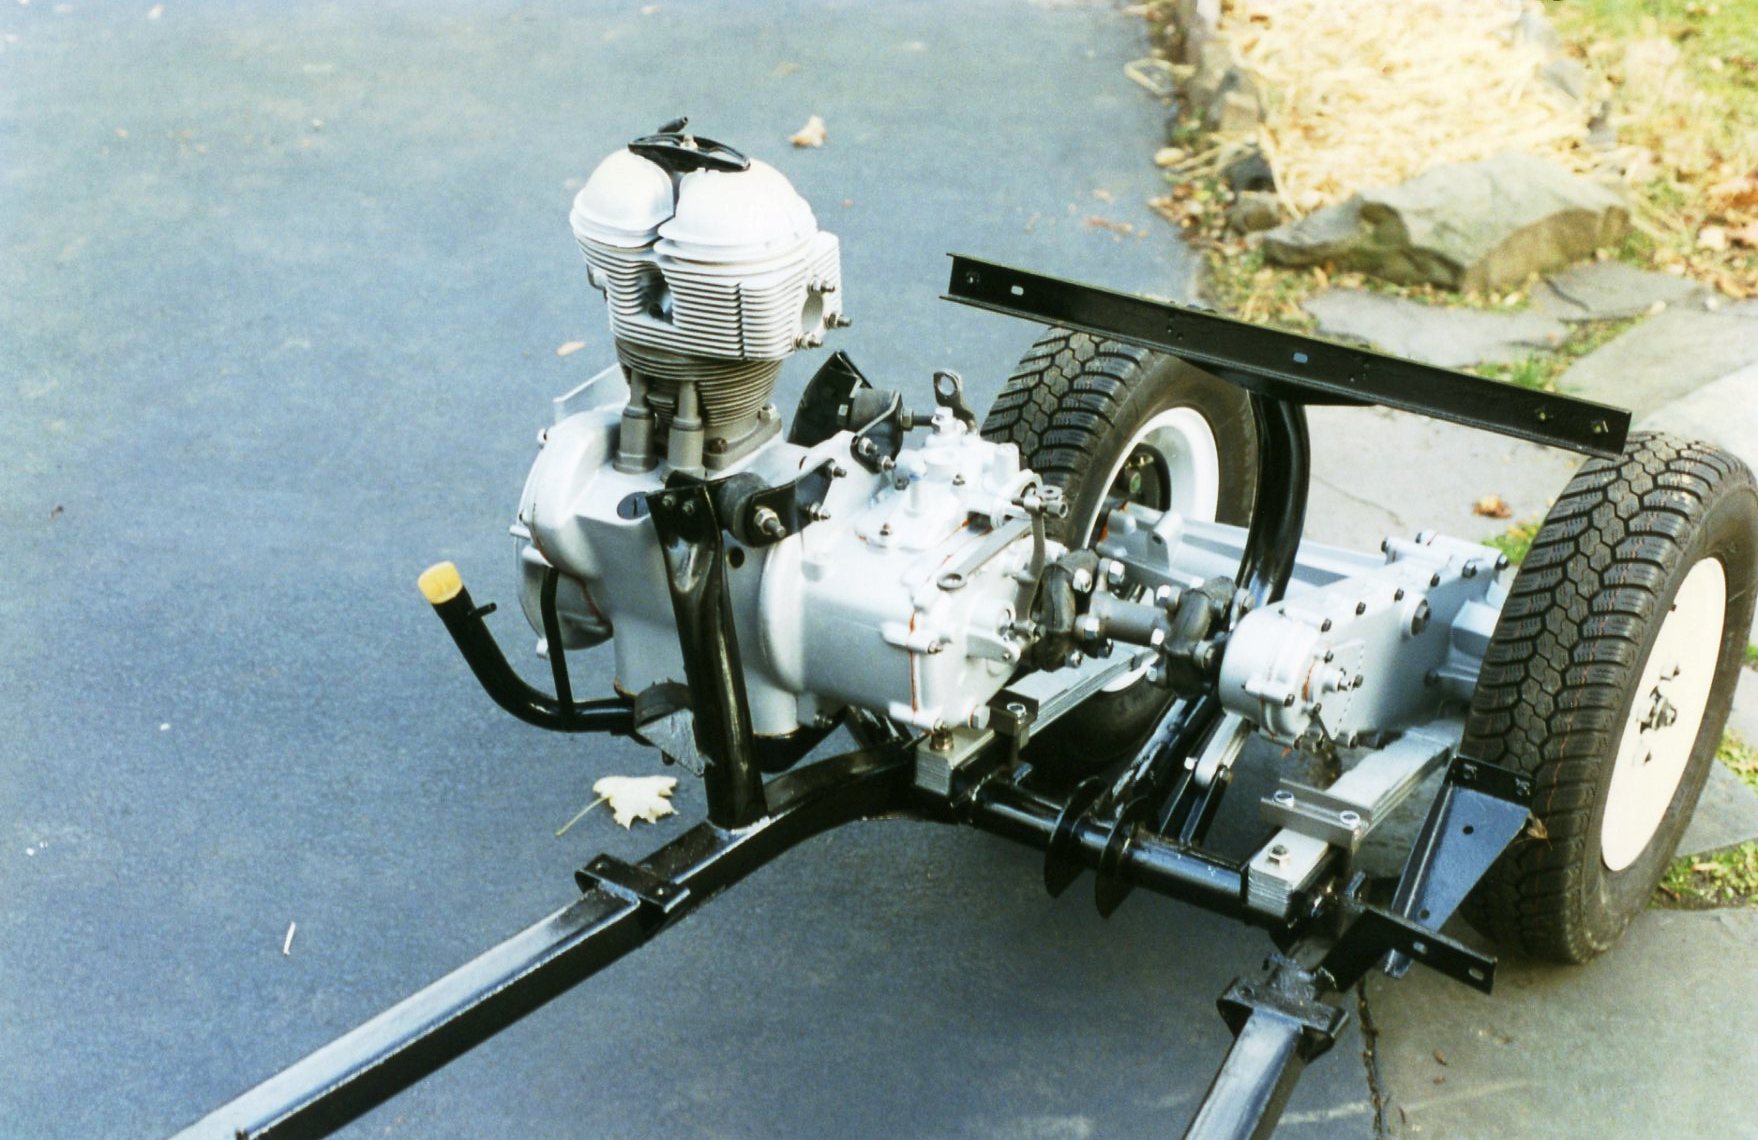
Chassis with engine and transmission in place
From left rear: both Giubos are visible, as is carb. Dynastart not yet reinstalled.
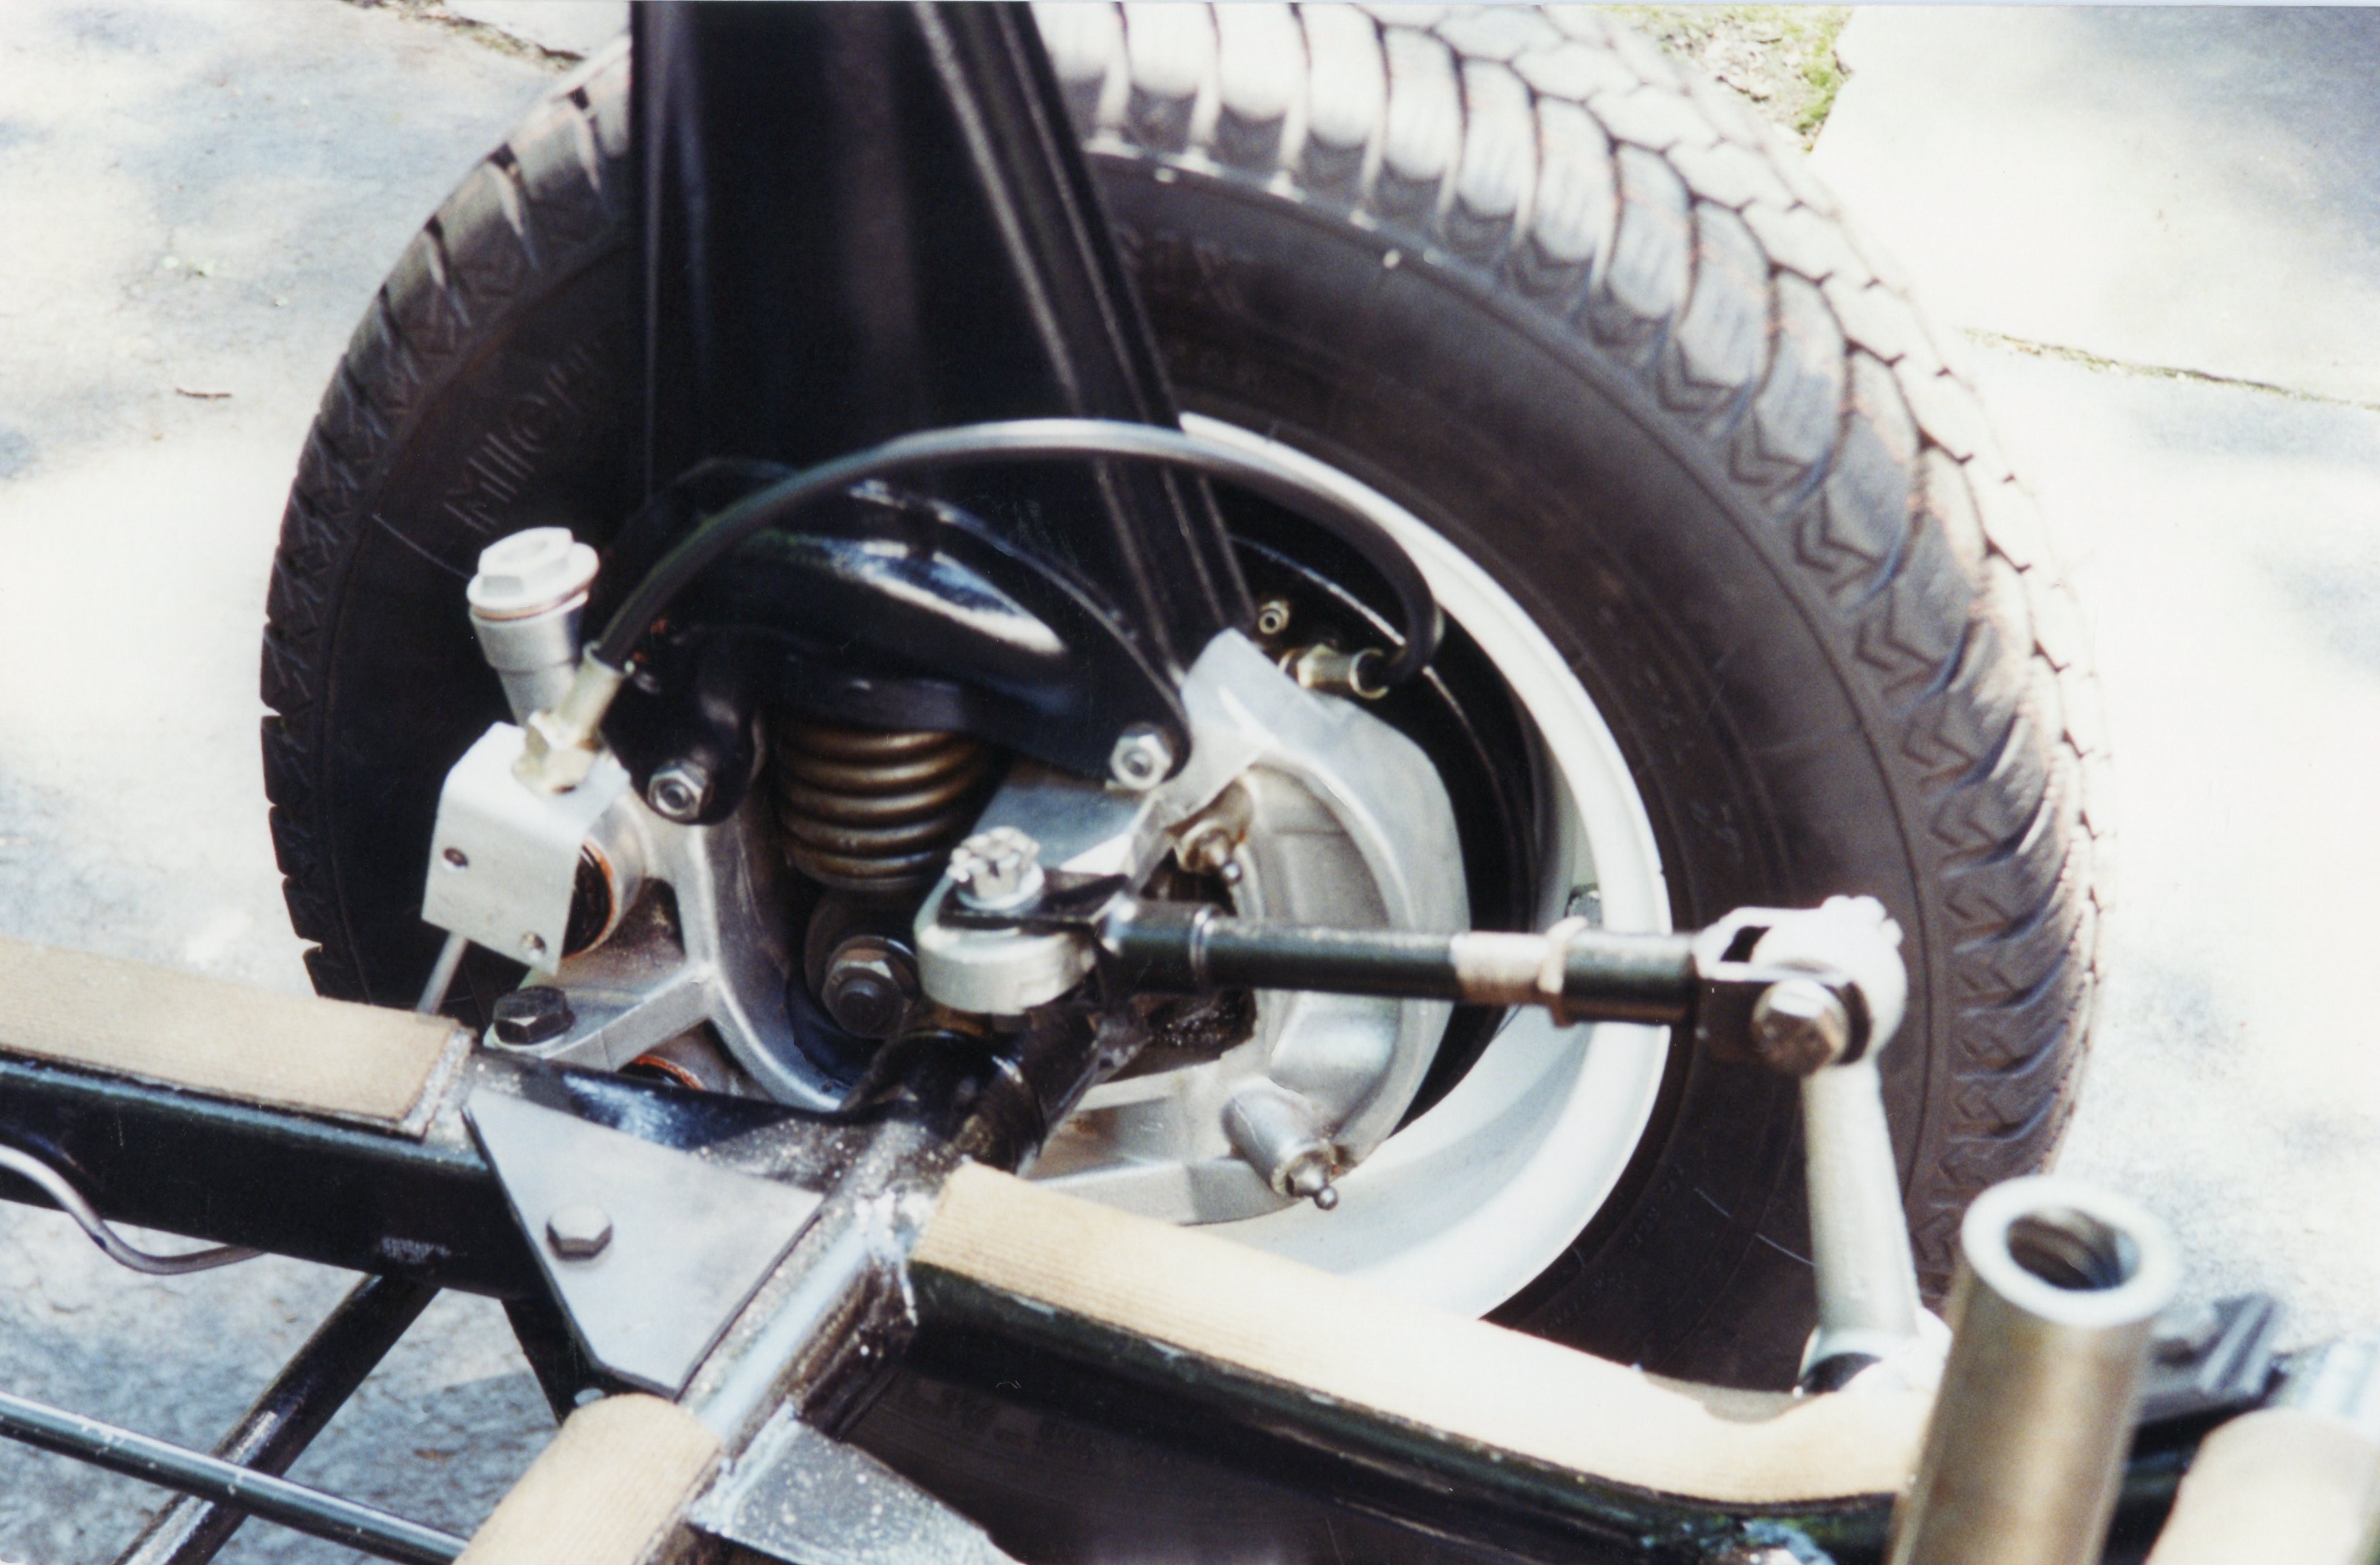
The world’s shortest driveshaft, freshly painted and with a Giubo at each end, was positioned between the trans output and rear axle input. Two issues here required focus:
One, the Giubo bolts were special items with very thin heads. The clearance between the bolt head and gearbox case was so small that standard-sized bolts would rub against the case, gouging it. This was written about repeatedly in the club newsletters.
Two, the flanges on either side of the driveshaft were not aligned, and again, newsletter articles warned novices NOT to align them. Something about the way the entire drivetrain moved required the flanges to be ever-so-slightly offset, with the flexible Giubos correcting the difference.
From left rear: note carb fuel bowl
From this angle: note oil filler tube, upper motor mounts, trans linkage. Left Giubo is quite twisted.
The drivetrain was installed. I resigned myself to being “nickel-and-dimed” from local suppliers for any further missing parts. Spring was on its way. Next, I would attempt to start the engine, then really get serious about finding a body shop.
Exhaust manifold not installed yet. Adjustable plate on final drive takes up chain slack.
Did I mention that I didn’t have a title to the car?
Next time in the Isetta Saga: As taught in class, an engine only needs 3 things to run: air, fuel, and spark. Is that still true if you only have one cylinder?
Giubo joints have their own Wikipedia page. The name “Giubo” (pronounced JOO-boh) is derived from the first three letters of “giunto” (Italian for “joint”) and the first two letters of the inventor’s last name, Antonio Boschi. “Giubo” is frequently misspelled as “guibo”, and then mispronounced as “guEE-bo”. The coupling was first used on the Alfa Romeo 1900 of the early 1950s, and was used on many BMW cars throughout the second half of the 20th century.