A while back, my good friend Larry mentioned to me, almost in passing, that his uncle owned a 1963 Mercury. Larry went on to say that the car actually had belonged to his aunt who passed away a few years ago, and with his uncle getting on in years, the uncle wanted to give the car to Larry.
Larry, in his understated way, made it sound like the Mercury was “nothing special” even if it was purportedly a one-family, low-mileage car. The implication was that the car was a true barn-find: left in a garage for years, unkempt, uncared-for, and likely in need of some deferred maintenance.


His uncle wanted Larry to keep the car. The problem is that Larry is like many of us in the hobby: there were already more cars than available garage spaces at his house. Over a period of time, Larry and his uncle came to an agreement that Larry would sell the car on the family’s behalf. He decided to list the car with Mecum Auctions, scheduled to cross the block at their Harrisburg PA event in late July.

This is where your scribe enters the picture: Larry wanted to dedicate an upcoming Saturday to get the car primped and primed, and requested that I be the official photographer for the submissions needed by Mecum. I also offered to assist in the primping/priming. On a sunny and warm Saturday in early May, we did just that.

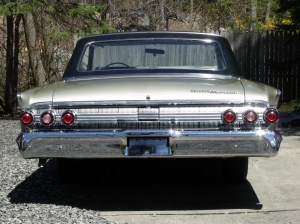
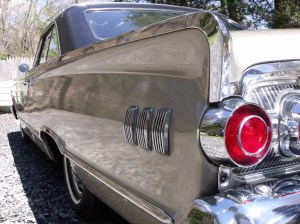
Upon first seeing the car, I was pleasantly surprised to learn that this was no ordinary 1963 Merc: in fact it is the 2-door fastback “Marauder” model, with a 390 cubic inch V8 and automatic transmission. The car is metallic beige with a black vinyl roof and black vinyl interior. It started right up, and Larry backed it out of the driveway so we could give it a bath. That is when I saw just how preserved an original car this is.


Everything on the car appears as it did from the factory. There are no signs of any paint work anywhere; sighting down each side of the car shows not a ripple. The vinyl roof and interior are in similarly unblemished condition. The carpet on the driver’s side shows some entry/exit wear, only because the full-size floor mats did not extend to the door sill. All 4 full-size wheel covers are in place. Underhood, with the exception of some service items like hoses and clamps, the engine compartment is likewise original. All of the factory decals and labels are there (as is the trunk label). A really neat discovery was the “390 W” crayon marking on the firewall.


The glove box was a treasure’s trove of discoveries. A brown-paper bag with various small bits of hardware threw me for a loop until Larry identified it as the unused license plate hardware! We also found an almost-unbroken string of insurance cards going back to the 1980s to help support the one-family-ownership claim.


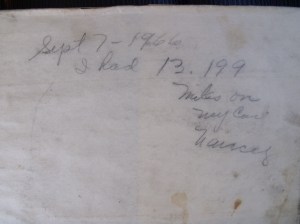
With an odometer reading just over 45,000 miles, we scoured the car in search of supporting evidence.

This is some of what we found:
• Owner’s manual shows 12k service done on 10/1/65 at 9,993 miles
• Hand-written note: on 9/7/66, car had 13,199 miles
• 11/25/79: lube sticker shows mileage of 40,055.0


After a wash and wipe, with a really thorough cleaning given to all the glass, vinyl and chrome, we were both surprisingly shocked how great the Marauder looked. The photos do bring out that the car has survived, and survived well. For Larry, if I can make this statement on his behalf, this is bittersweet: on one hand, he would love to keep the car as it was his aunt’s; on the other hand, he knows that he does not have the space or time needed to keep the vehicle, and moving it to the next owner is in many respects the best thing to do. His uncle reluctantly agrees.


The car will cross the block in Harrisburg on Thursday July 30. A link to the car’s listing on the Mecum website is here:
https://www.mecum.com/lot-detail/PA0715-216423/0/1963-Mercury-Marauder/
All photographs copyright © 2015 Richard A. Reina. Photos may not be copied or reproduced without express written permission.