As you read in “Alfa Romeo Valve Adjustment, Part 1” (or if you skipped your reading assignment, you can find it here), the valve gaps on my 1300 engine were out of whack, especially on the intake side. With cams temporarily removed, I measured all the existing shims, did the algebra to calculate the sizes of the needed shims, and placed my order with Classic Alfa in the UK. I was not the least bit surprised when the order I placed at 10 p.m. on a Saturday night landed on my front stoop before I got home from work on Tuesday. (I need to email them and enquire what happens after Brexit, presuming that Brexit happens.)
This magnet was very helpful in encouraging the slippery follower to come out
The following weekend, all the old shims came out, and the new shims went in, again following the “one cylinder at a time” rule I established so as not to cross-install the followers which must remain with their original cylinders. When reinstalling the cams, I could not get the timing marks between the cams and front bearing caps to line up. It made me nervous enough that I removed and reinstalled the cams a second time (remember that the timing chain remained attached to the sprockets). I finally convinced myself that once I released the bolt holding back the spring tension in the timing chain tensioner, all would return to sync, and that is exactly what happened. With the tensioner pressing against the chain, I rotated the crank and cams through two complete revolutions, and then tightened the bolt in the spring tensioner. The marks were still aligned, thankfully.
Valve stem without shim
and with shim in place
I double-checked and wrote down all the new valve clearances, and all seemed good (but read on). Since I had the spark plugs out, a new set of NGK B7ES plugs, which are in stock at my local Advance Auto Parts store, went in. With plug wires, intake plenum, and air filter hose back in place, it was time to attempt to start this baby, remembering that the engine had not been run since the car went to sleep the previous autumn. The engine started on the second try, however, there was an unhealthy miss at idle. I shut it down, and made plans for a complete tune-up, which was next on the Alfa’s to-do list anyway.
Never-seize coating on plug threads
Postscript: I jotted down all the “new” valve clearances, and really didn’t give them a second glance, undoubtedly presuming that everything was done correctly. Today, while composing this blog post, I noticed that my spec for intake valve #3, .450mm, was unchanged from its original measurement, yet I have no doubt that the 2.15mm shim which had been in there was replaced with a 2.10mm shim, which means that the new measurement should have been .500mm. For now, I’m leaving this alone for several reasons: valve #3 was the closest to spec of all the intake valves during the original check; testing the thicknesses of the new shims revealed that how tightly I cranked on my micrometer made a difference in the measurement (including the effect of residual oil on the shim); and I’m not yanking that cam again for 0.05mm!
The owner’s manual for my 1967 Alfa Romeo GT 1300 Junior calls for the engine valve clearances to be checked every 18,000 kilometers. According to Google Calculator (before Google Calculator I would have used my slide rule), that’s every 11,185 miles. Coincidentally, I’ve put almost exactly 11,000 miles on the Alfa since purchasing it in March 2013. So in part to prepare for what is anticipated to be a very busy 2019 driving season, and in part because I really don’t know when this was last done, I decided to check all 8 valve clearances (4-cylinder engine, 2 valves per cylinder equals 8 valves).
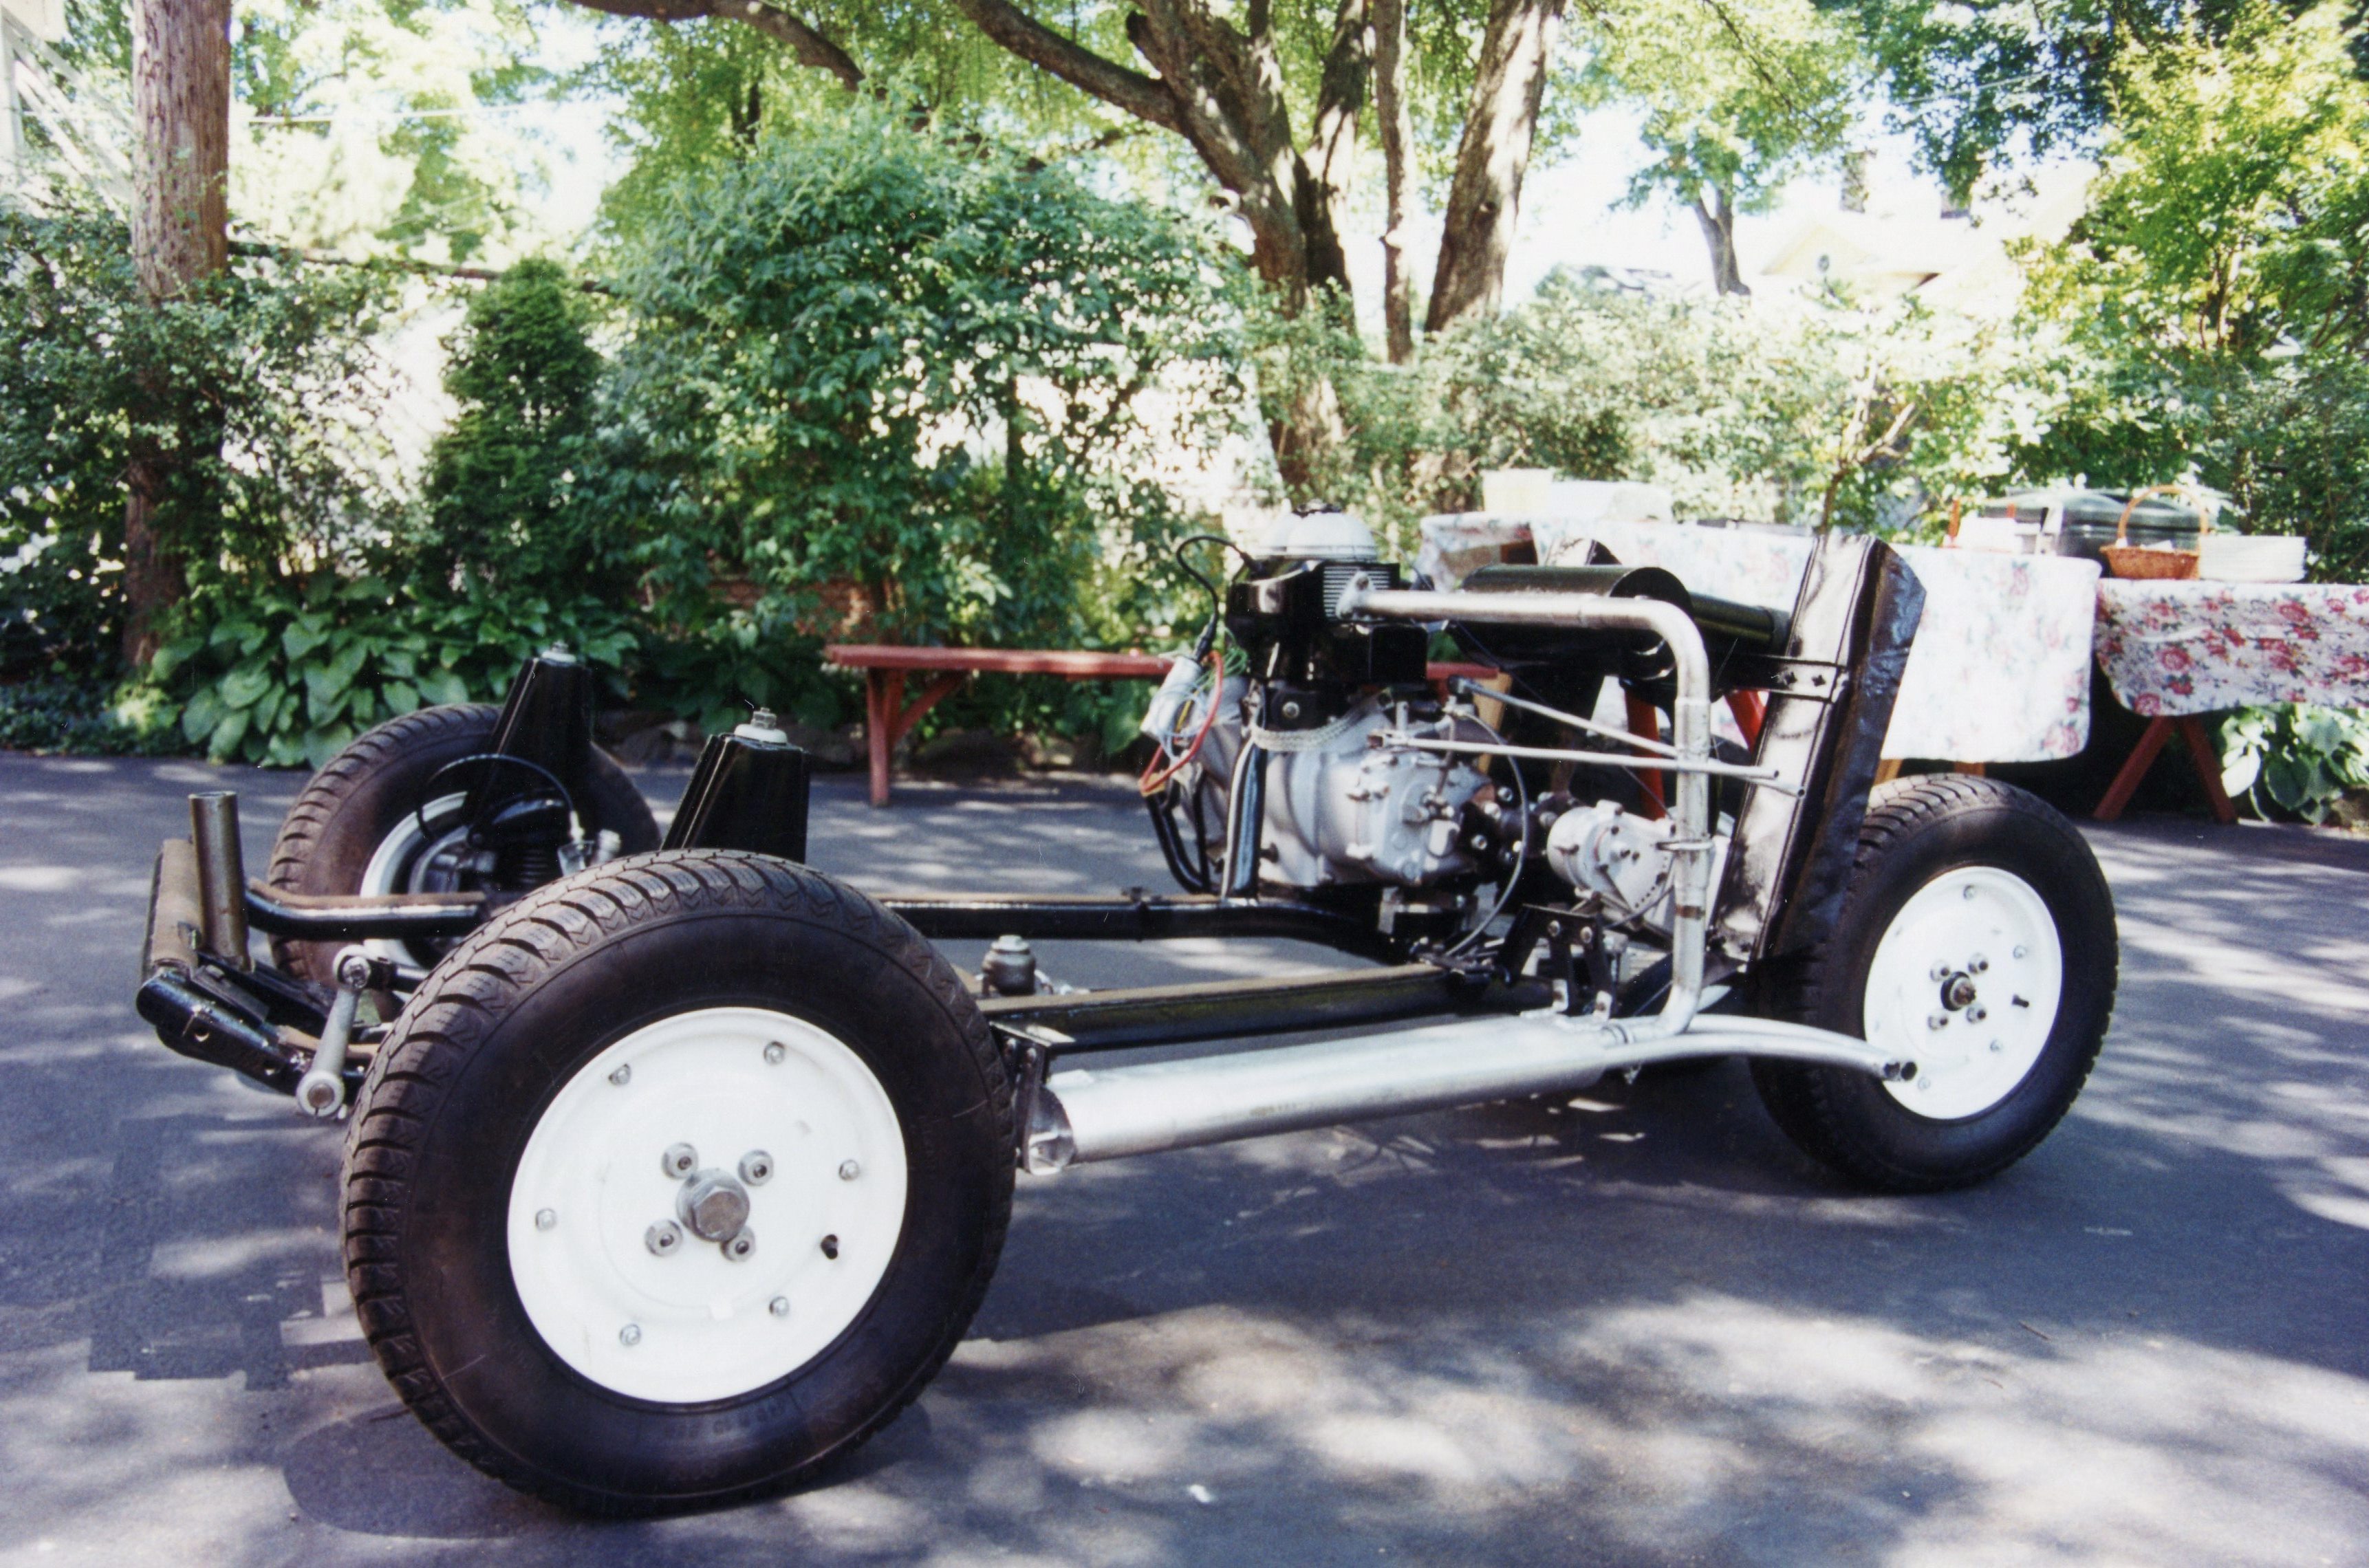
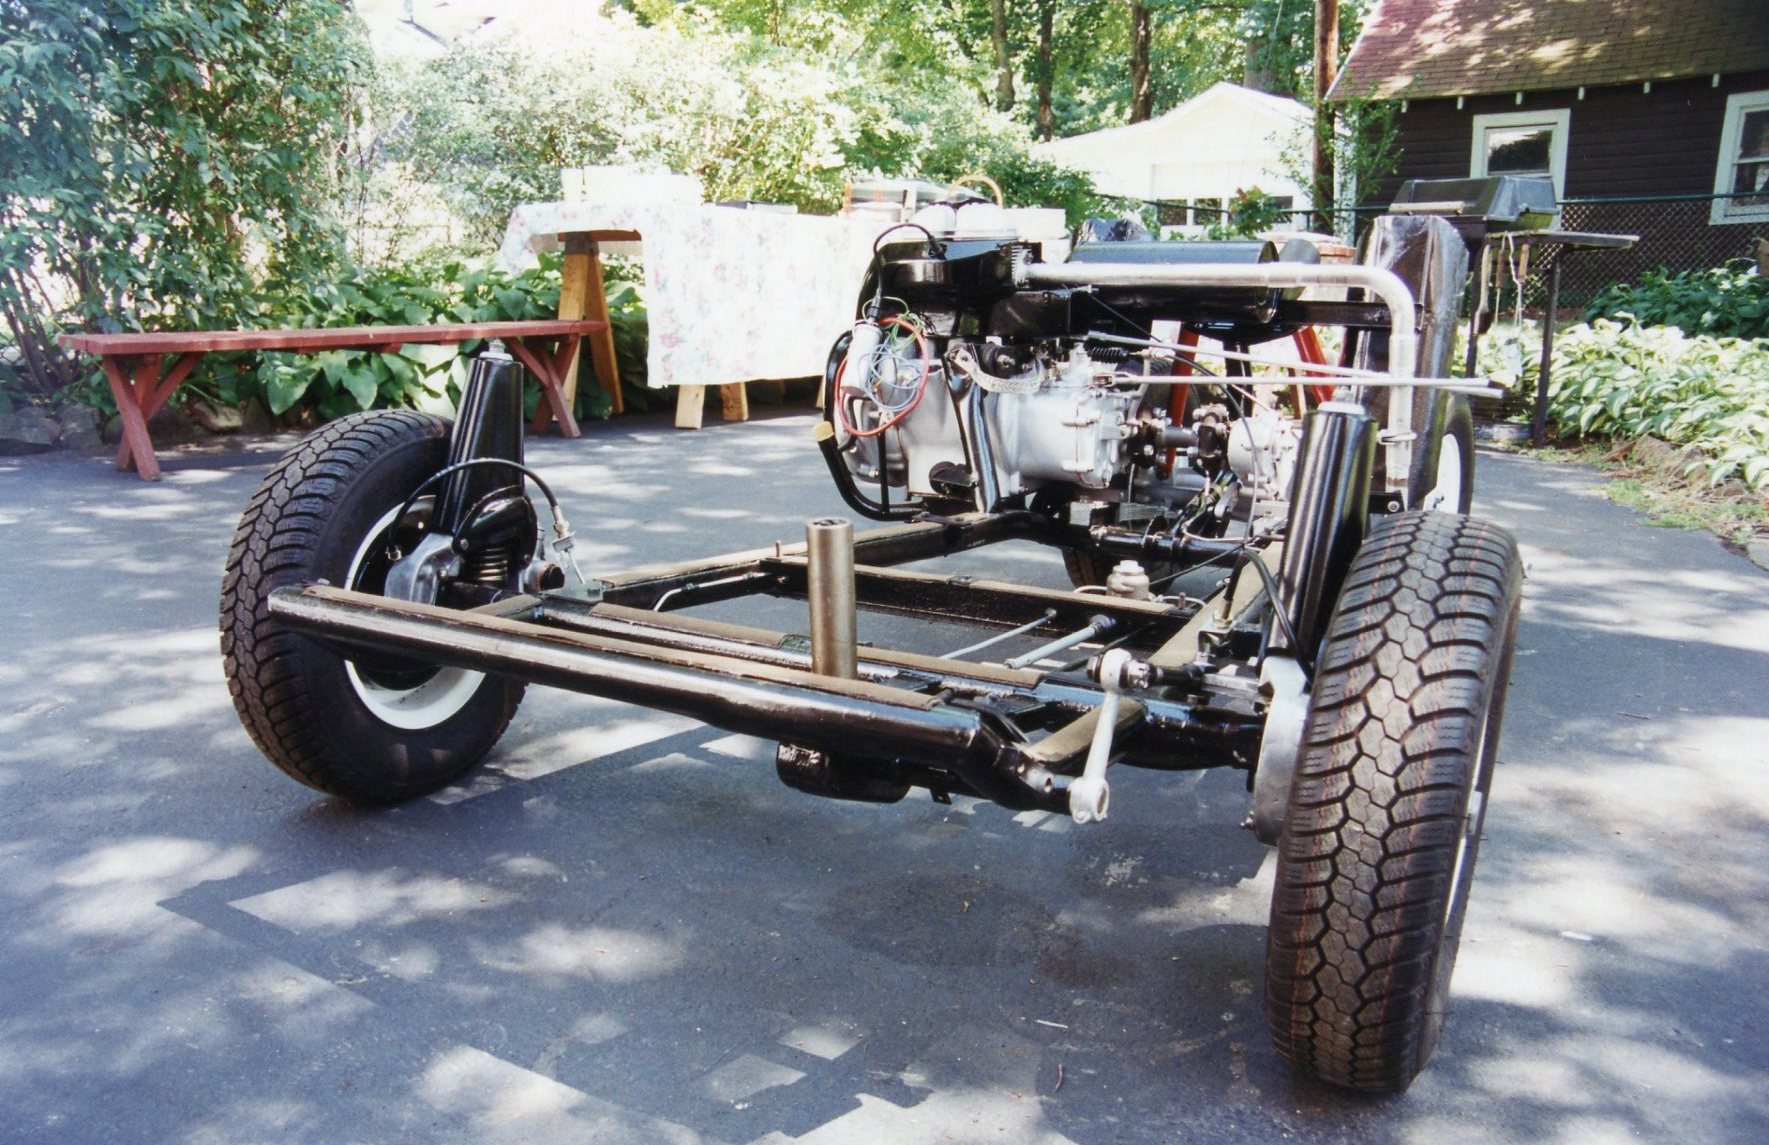
The Alfa engine, before any disassembly
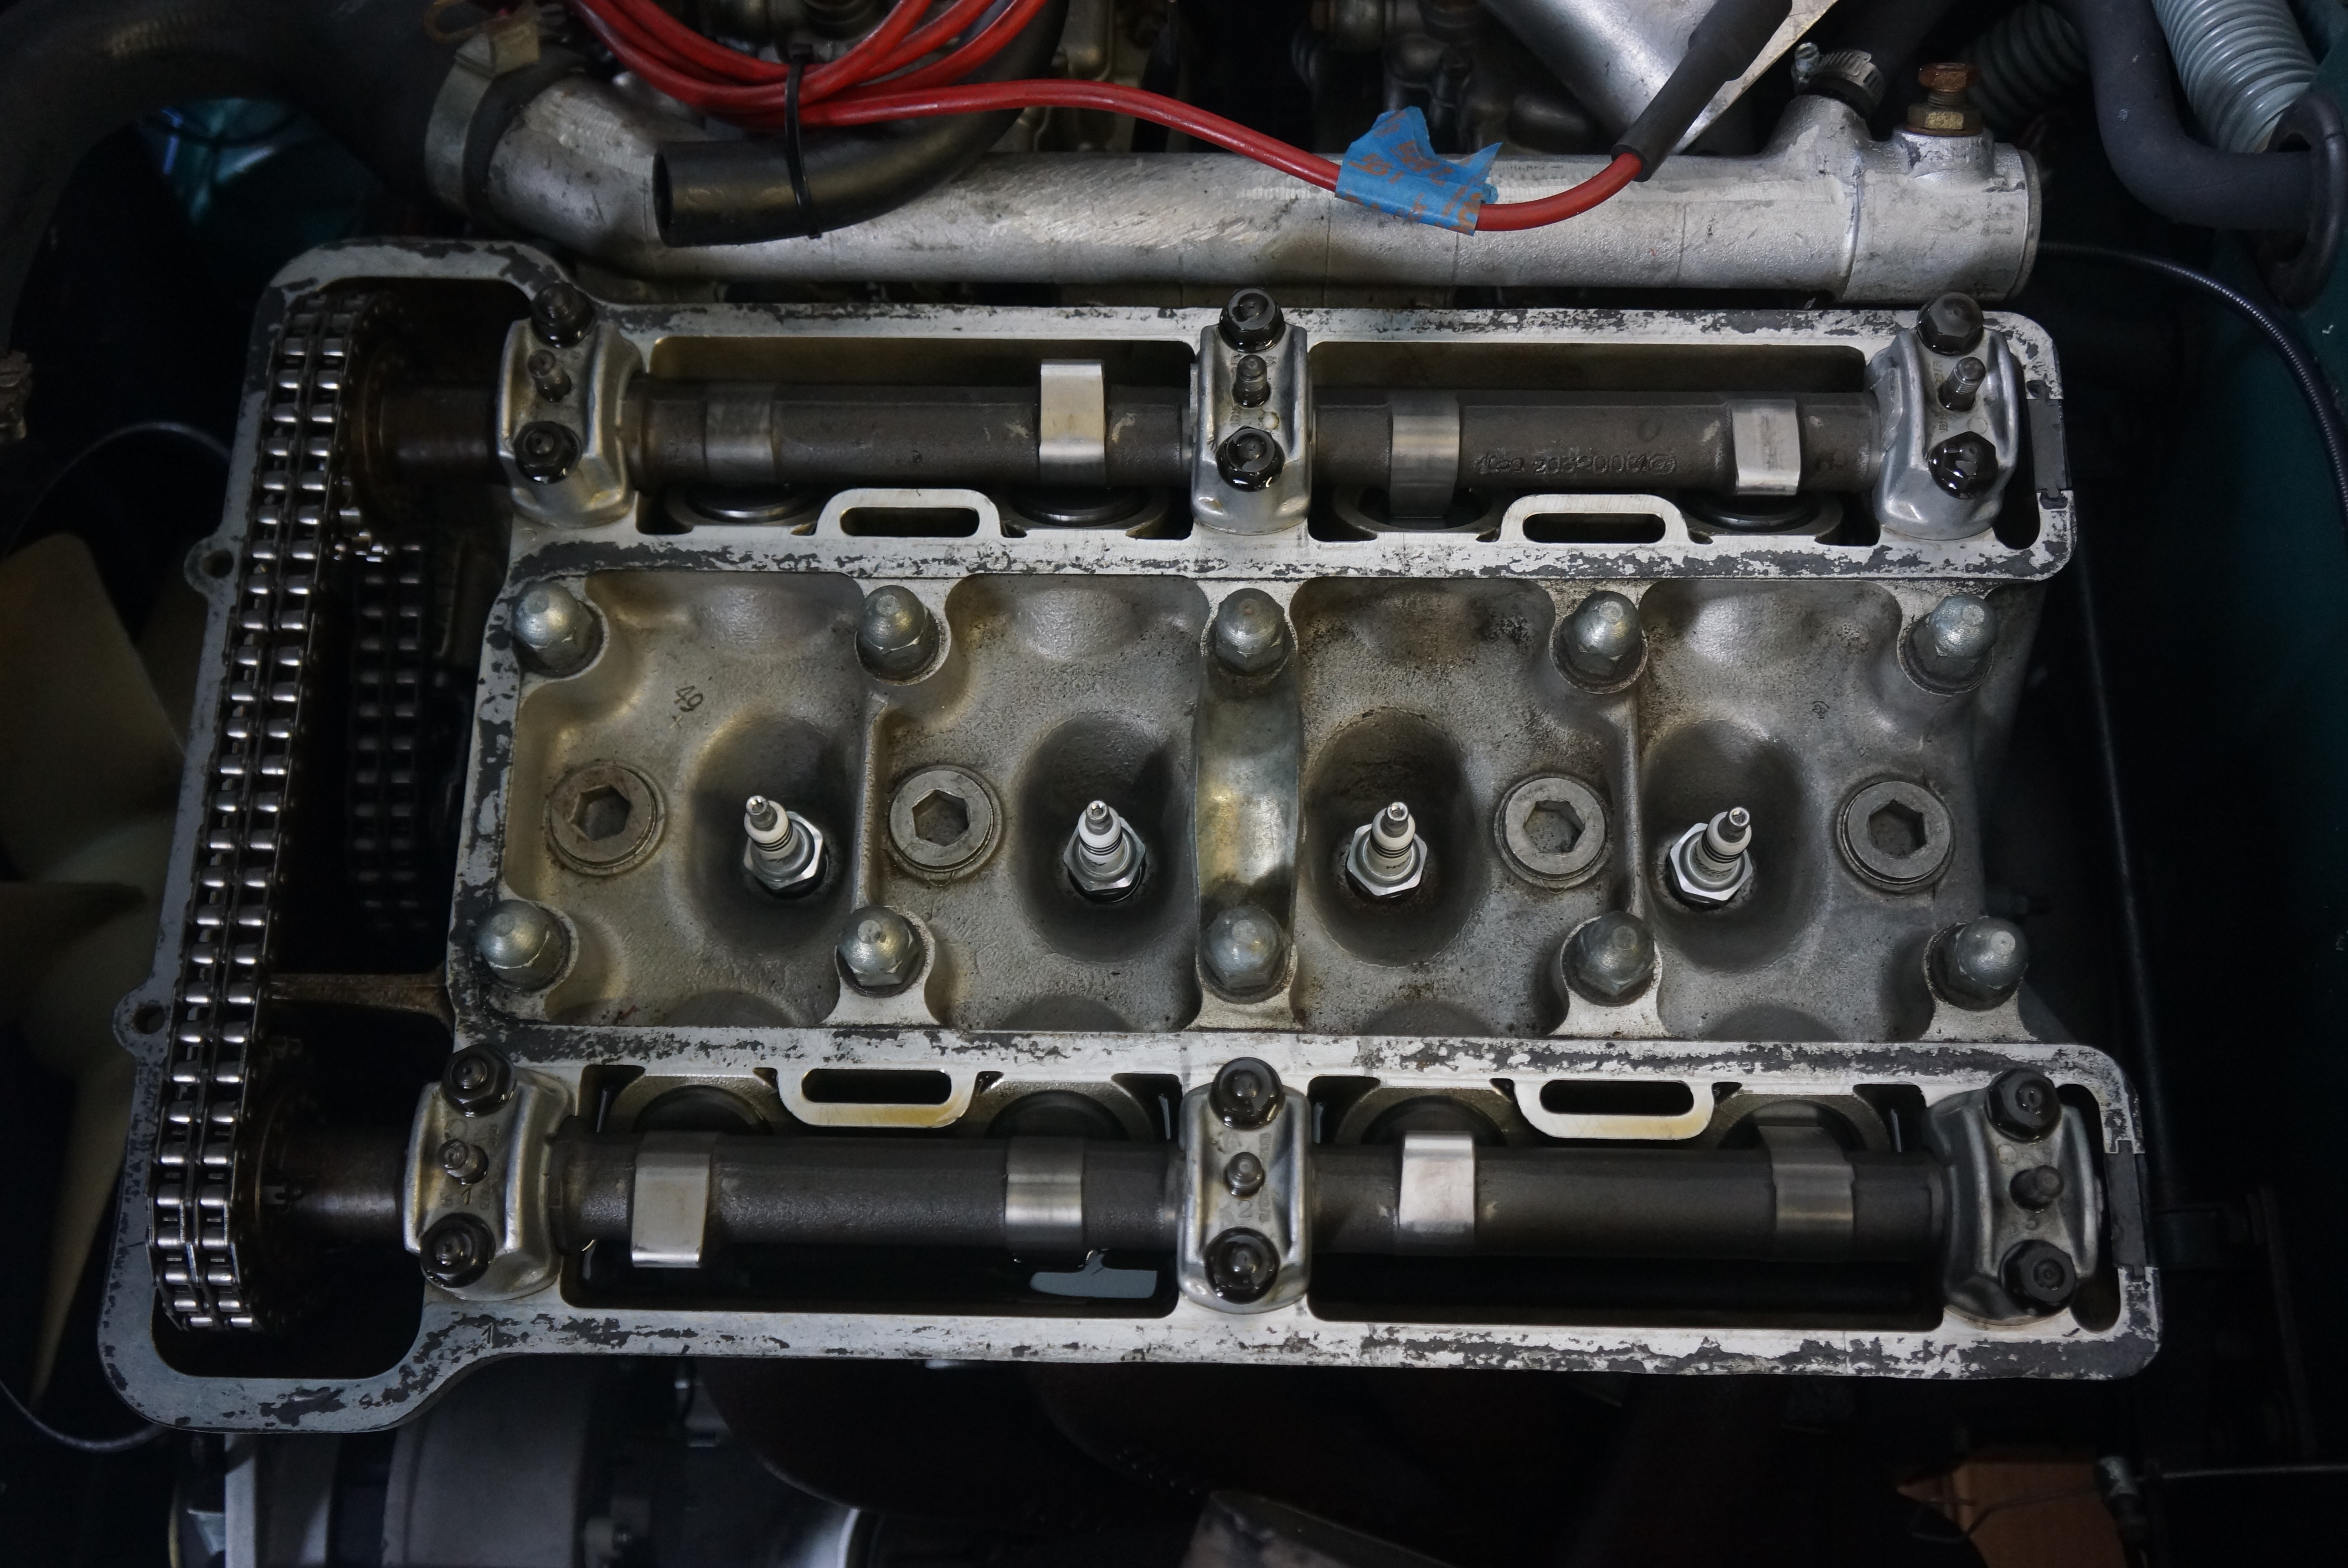
Accessing the valves and followers is the simple part. This overhead-cam engine has its two camshafts at the very top. The valve cover can be removed once the spark plug leads, air hose, and the top of the intake plenum are out of the way, which is a 10-minute affair. The valve cover is held in place by 6 large Allen screws along the top, and two bolts at the front. I had never had the valve cover off this engine before, and my first reaction was one of pleasant surprise at how clean the engine looked.
Valve cover removed
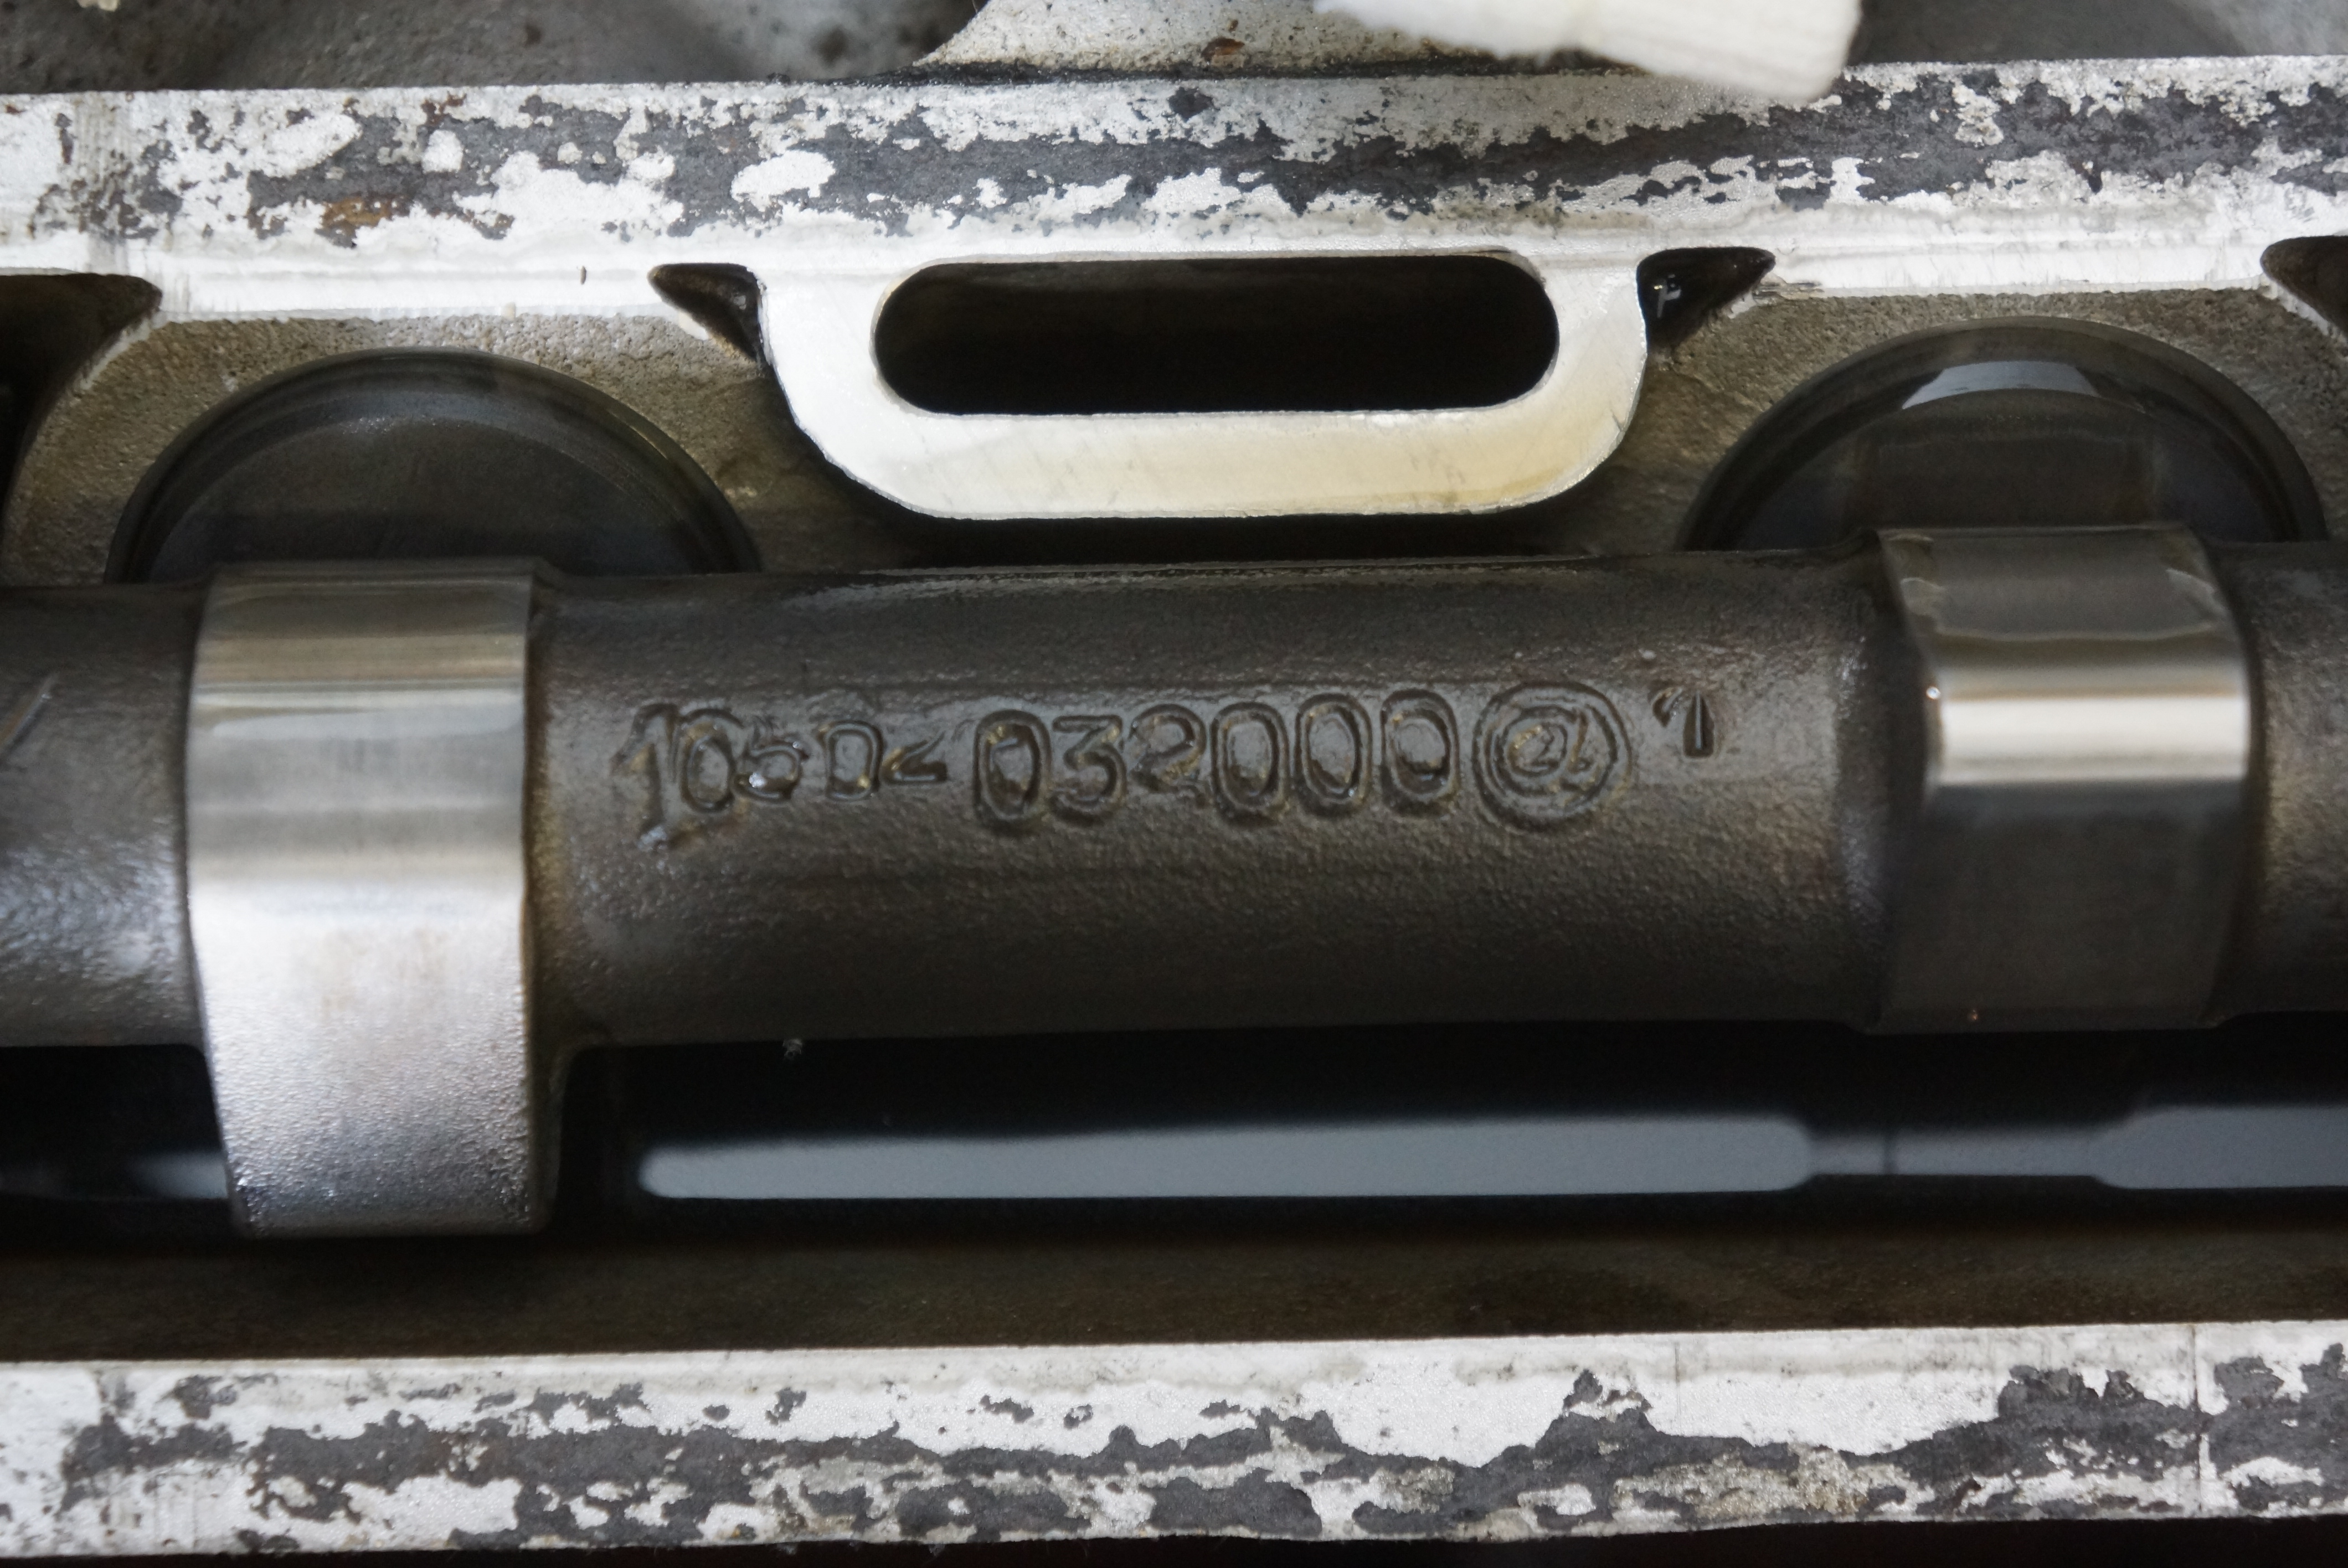
My first task was to find the camshaft part numbers, to verify that these were Alfa Romeo cams and not some hot aftermarket replacements (in which case the clearance specs would be different). A prior conversation with Pete, the family friend who sold me the car, revealed that he wasn’t sure what cams were in it. The part numbers of both cams were readily visible, and verifying them against my technical literature confirmed that these are indeed the factory cams.
This is the correct part number for a 105-platform 1300 Junior engine (105020320001)
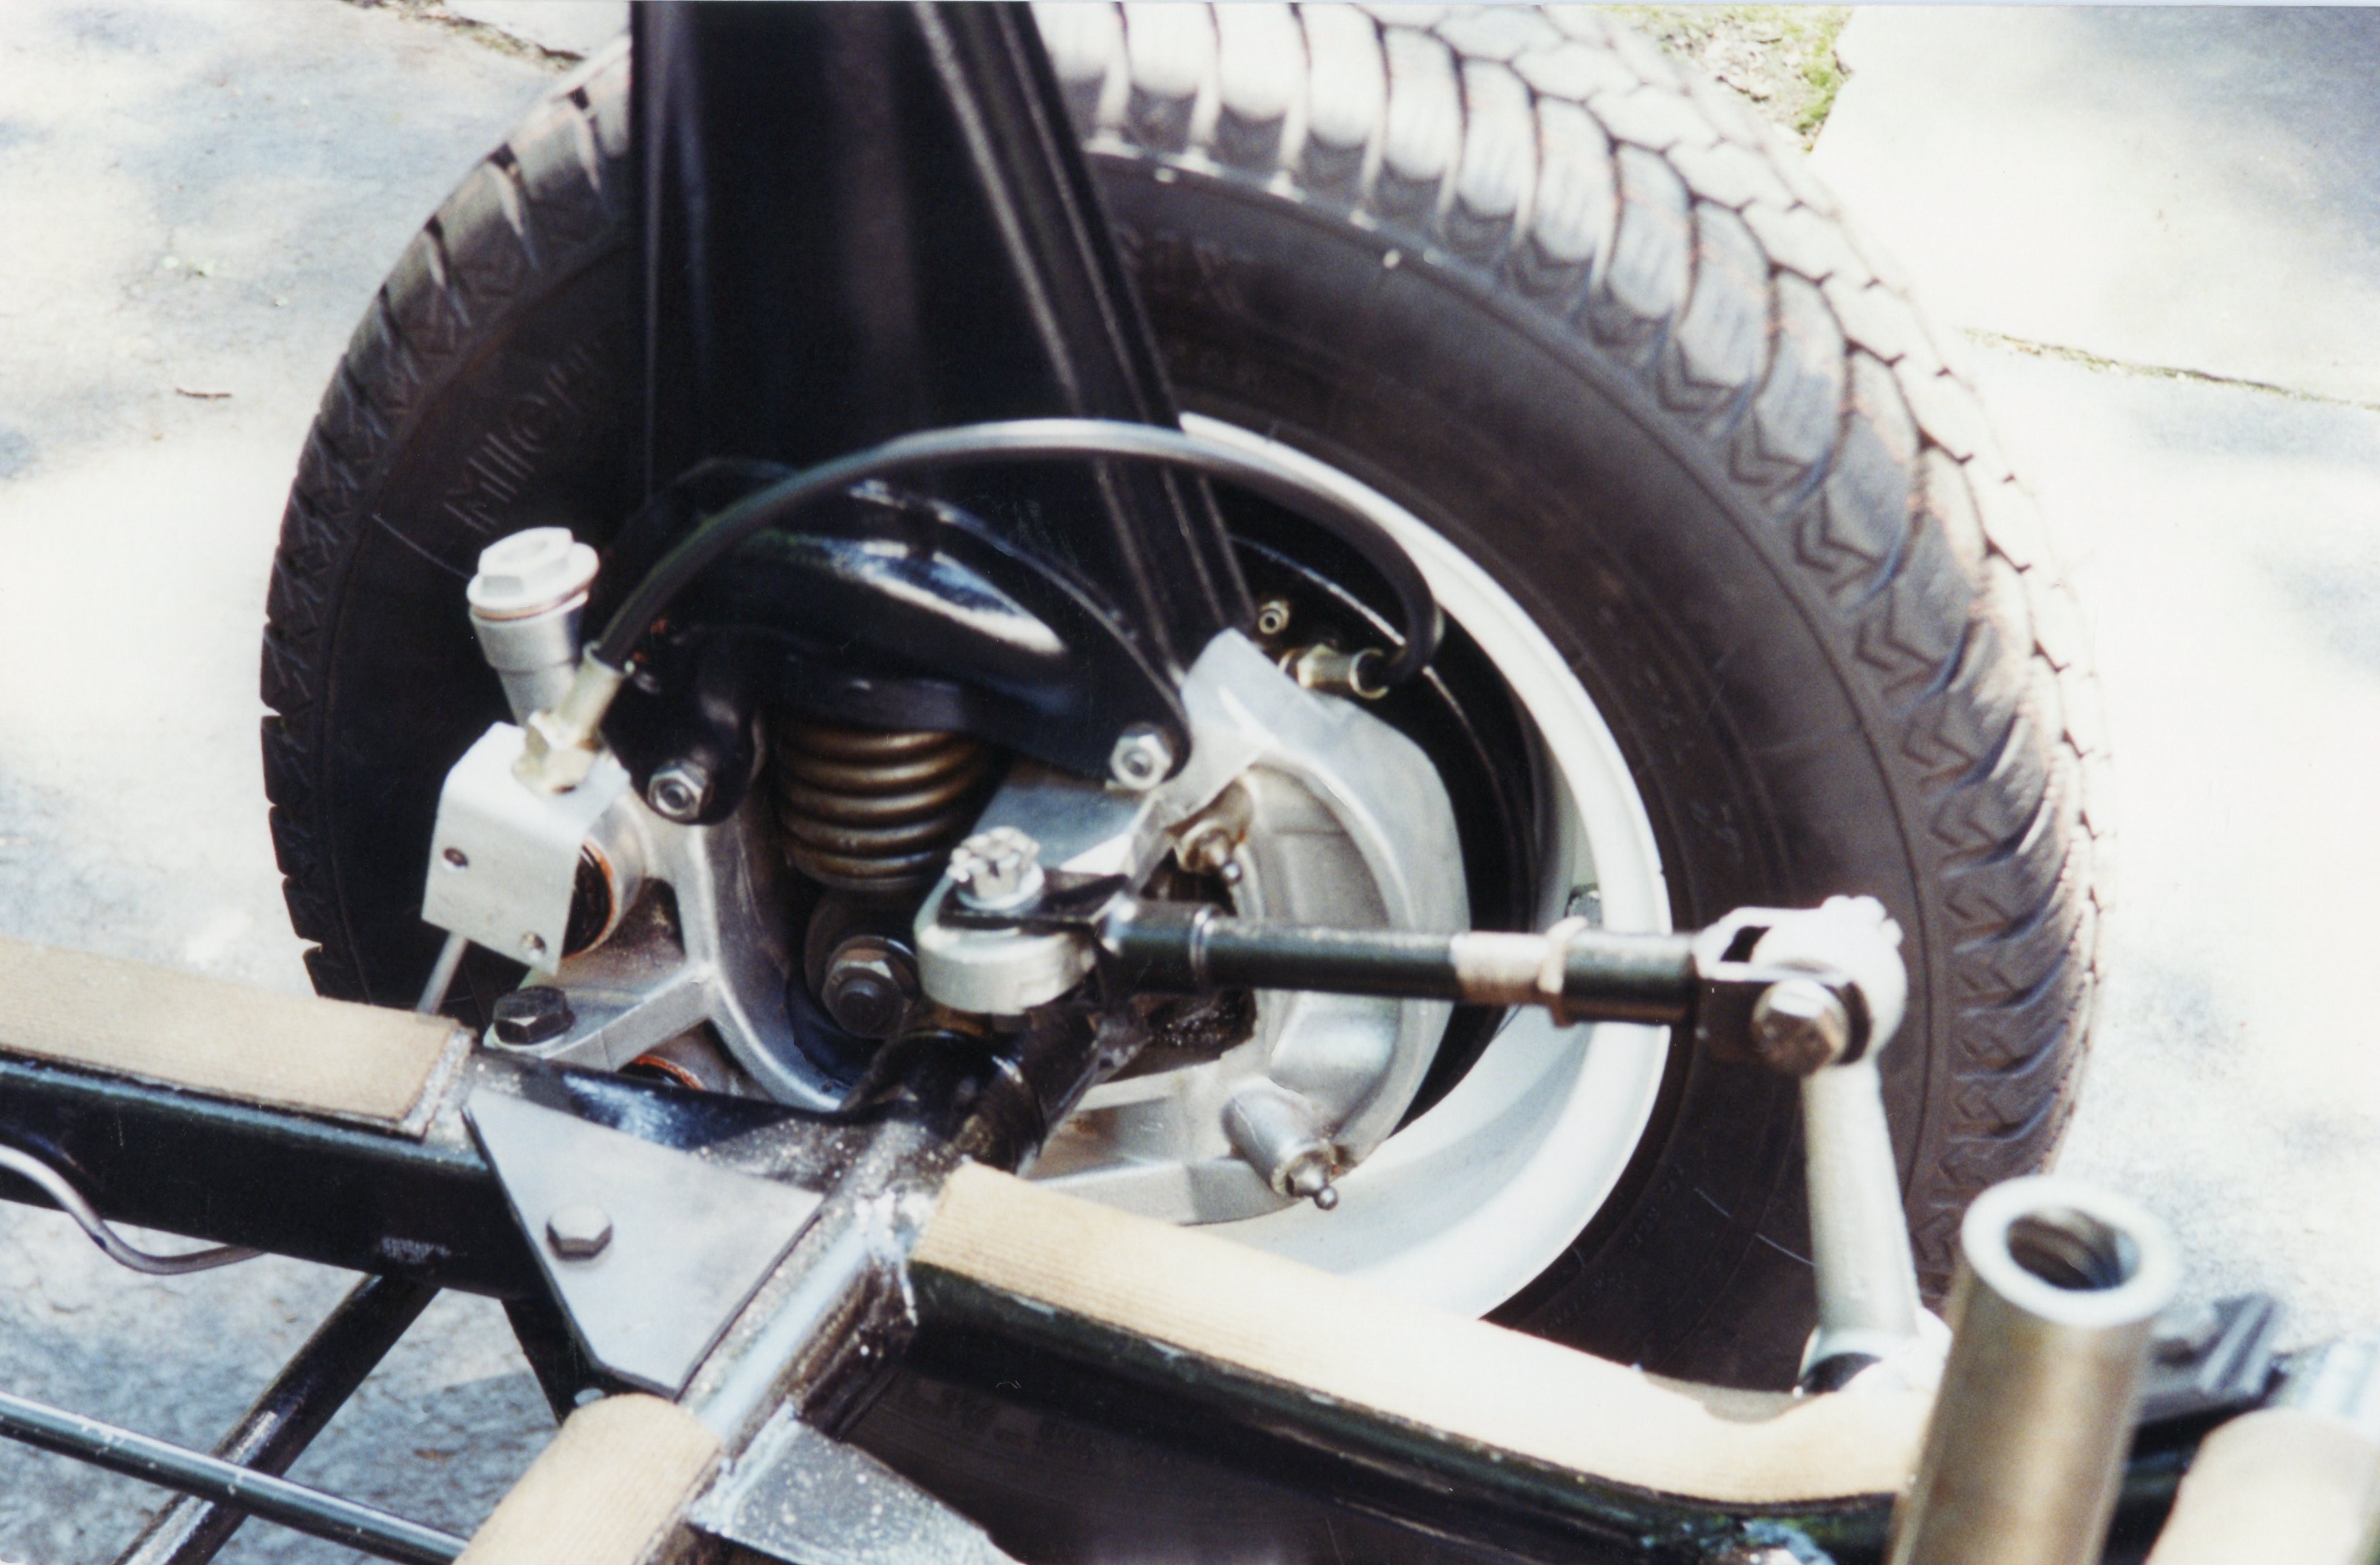
Now it was onto the actual clearances. To rotate the engine, I first tried getting a socket on the crank pulley bolt, but the fan shroud blocked that. The next-easiest way to spin the engine was via the nut on the front of the alternator. Popping out the plugs provided less compression resistance, and some moderate thumb pressure on the alternator belt was all that was needed to get the crank and cams to spin.
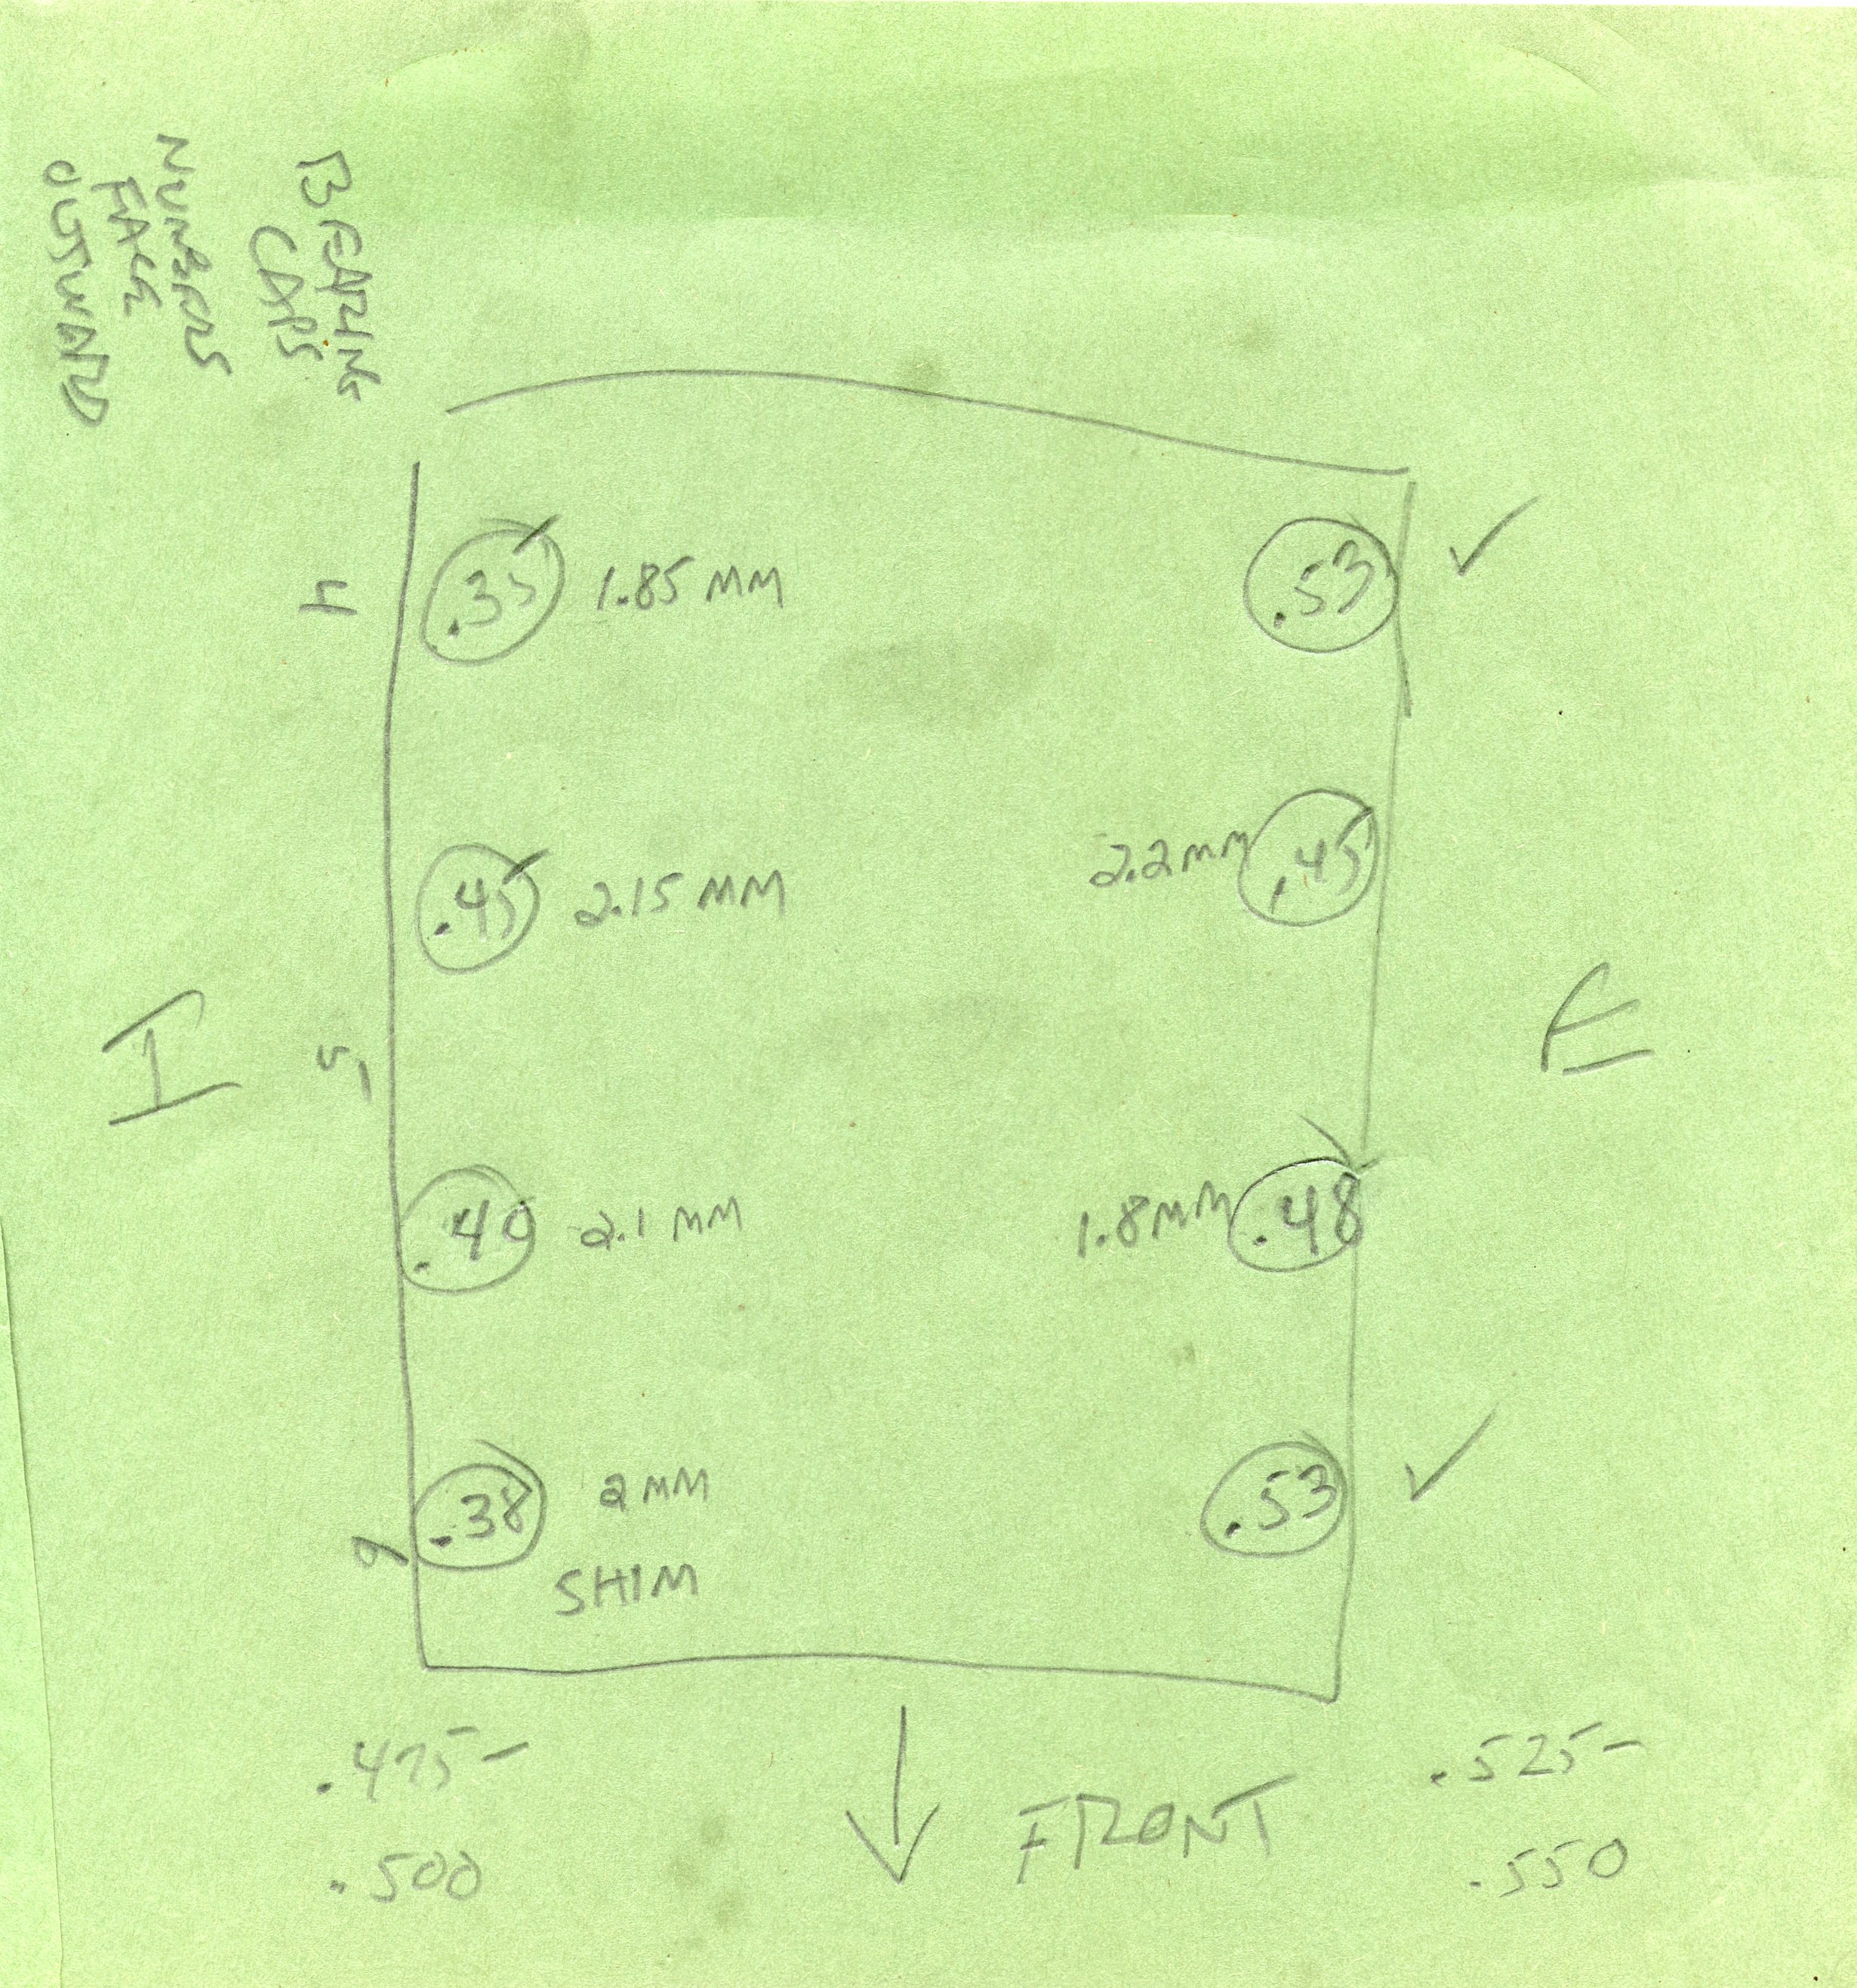
Paper and pencil at the ready, the valve clearances were checked in firing-order order (1-3-4-2) and recorded. While my owner’s manual provides specs in both millimeters and inches, I decided to stick with the metric measurements – I have metric feeler gauges, and the needed shims are sold in metric sizes.
The spec for the intake valves is 0.475-0.500 mm, and the exhaust spec is 0.525-0.550 mm. Six of the eight valves were out of spec: all 4 intakes and 2 exhausts, and, all 6 showed too little clearance, meaning the valves were not seating completely, subjecting them to less cooling since they were not making full contact with the valve seats.
The worst measurement was #4 intake: 0.350 mm, meaning it was 0.150 mm too tight compared to a correct outer range of 0.500 mm. Yes, we’re talking fractions of a millimeter, but specs are specs, and I felt that the clearances should be corrected.
Here is where it got interesting. My Alfa engine was originally designed in the early 1950s. It’s a very sophisticated layout, with not only overhead cams, but all-aluminum block, wet cylinder liners, hemispherical combustion chambers, etc. However, like most other OHC engines of its time, adjusting the valves requires removing the cams to allow access to the followers (buckets) and shims which are under the buckets. Most friends to whom I mentioned this procedure looked at me with a combination of horror and pity. “It’s really easier than it sounds” I would retort, which did nothing to alleviate their sympathy for me.
(As a complete aside, the first OHC engine to incorporate a valve design which allowed for adjustments with cams in place was the Fiat twin-cam engine, introduced in 1966. My 1970 Fiat 124 Coupe used this design, although I never did adjust those valves!)
The timing chain’s master link is to the left of center
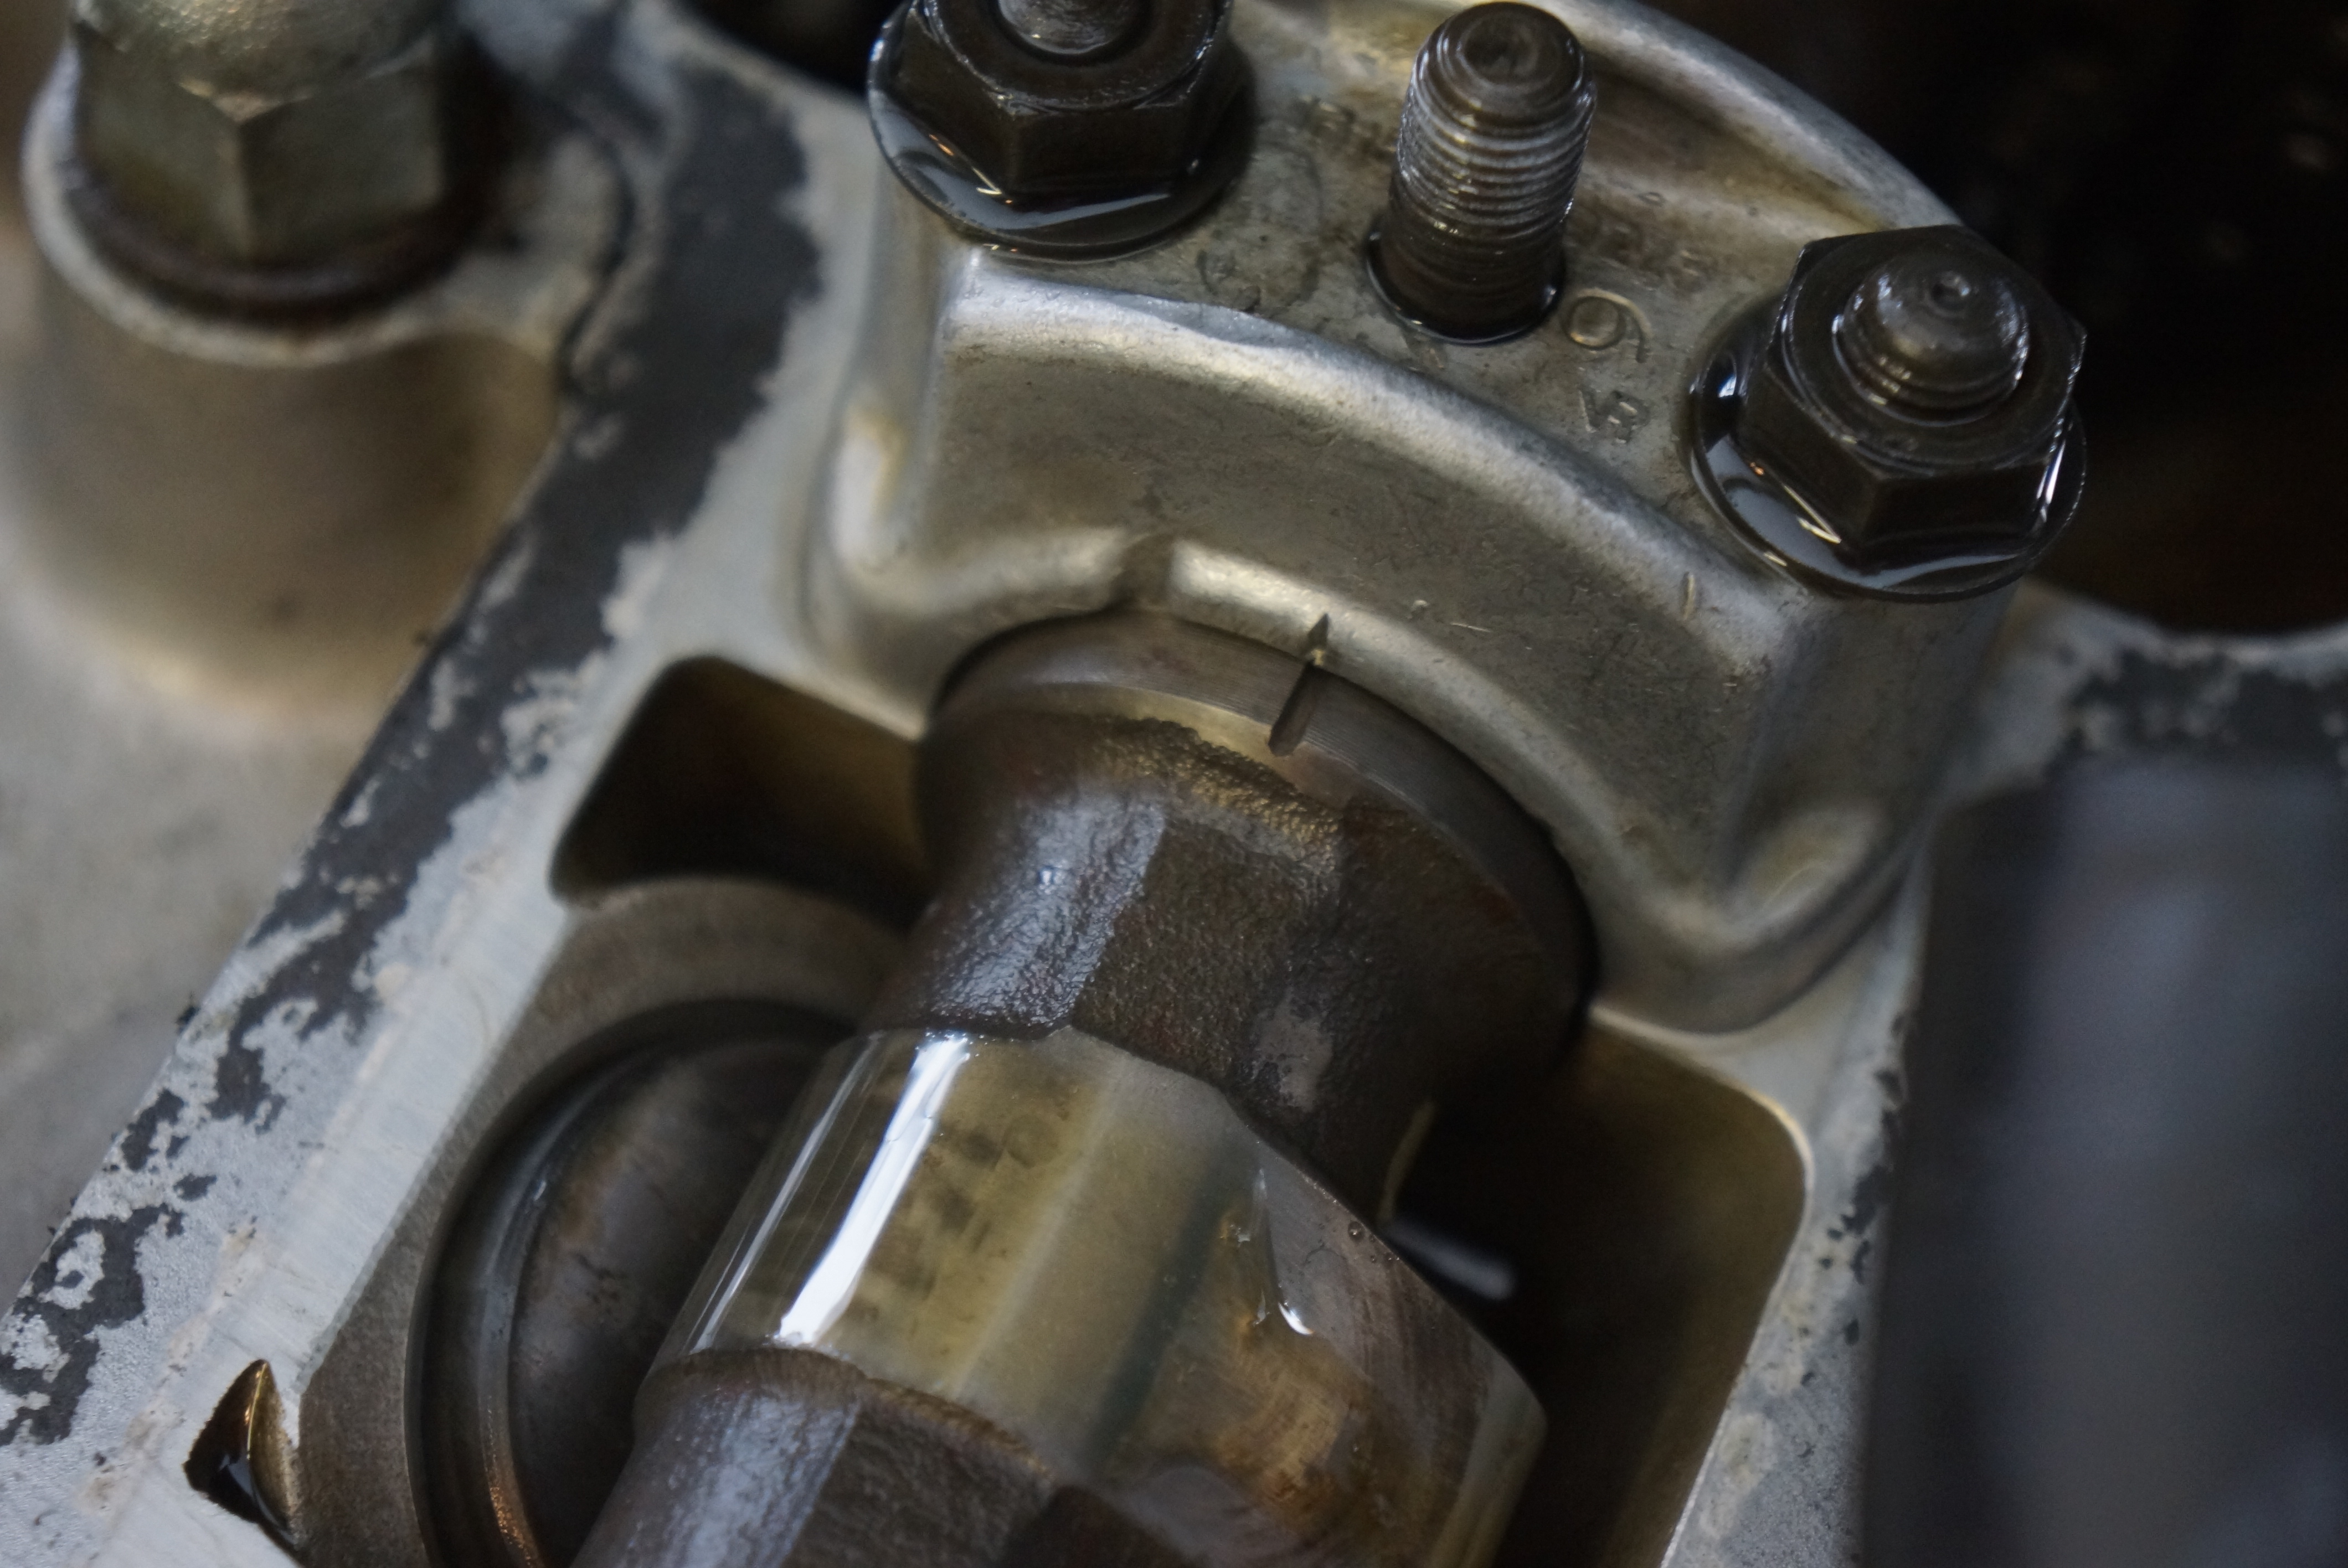
The official Alfa procedure calls for locating the timing chain’s master link, disconnecting it, and swinging the two chain ends out of the way. This method opens the possibility that the cam timing would need to be adjusted at reassembly. Of course, some very clever people have devised a work-around. One of the service books I own is the Alfa Romeo Owner’s Bible, written by the late Alfa expert Pat Braden. He describes a method that does not involve unhooking the chain. Instead, he suggests loosening the chain tensioner, pushing the tensioner all the way IN (making for a loose chain), locking the tensioner in this position, and then lifting the cams toward the center of the engine without disturbing the cam sprocket/chain connection. In this way, on reassembly, the cam timing does not change at all. Ideally, this is done with both cam timing marks lined up with the bearing cap marks.
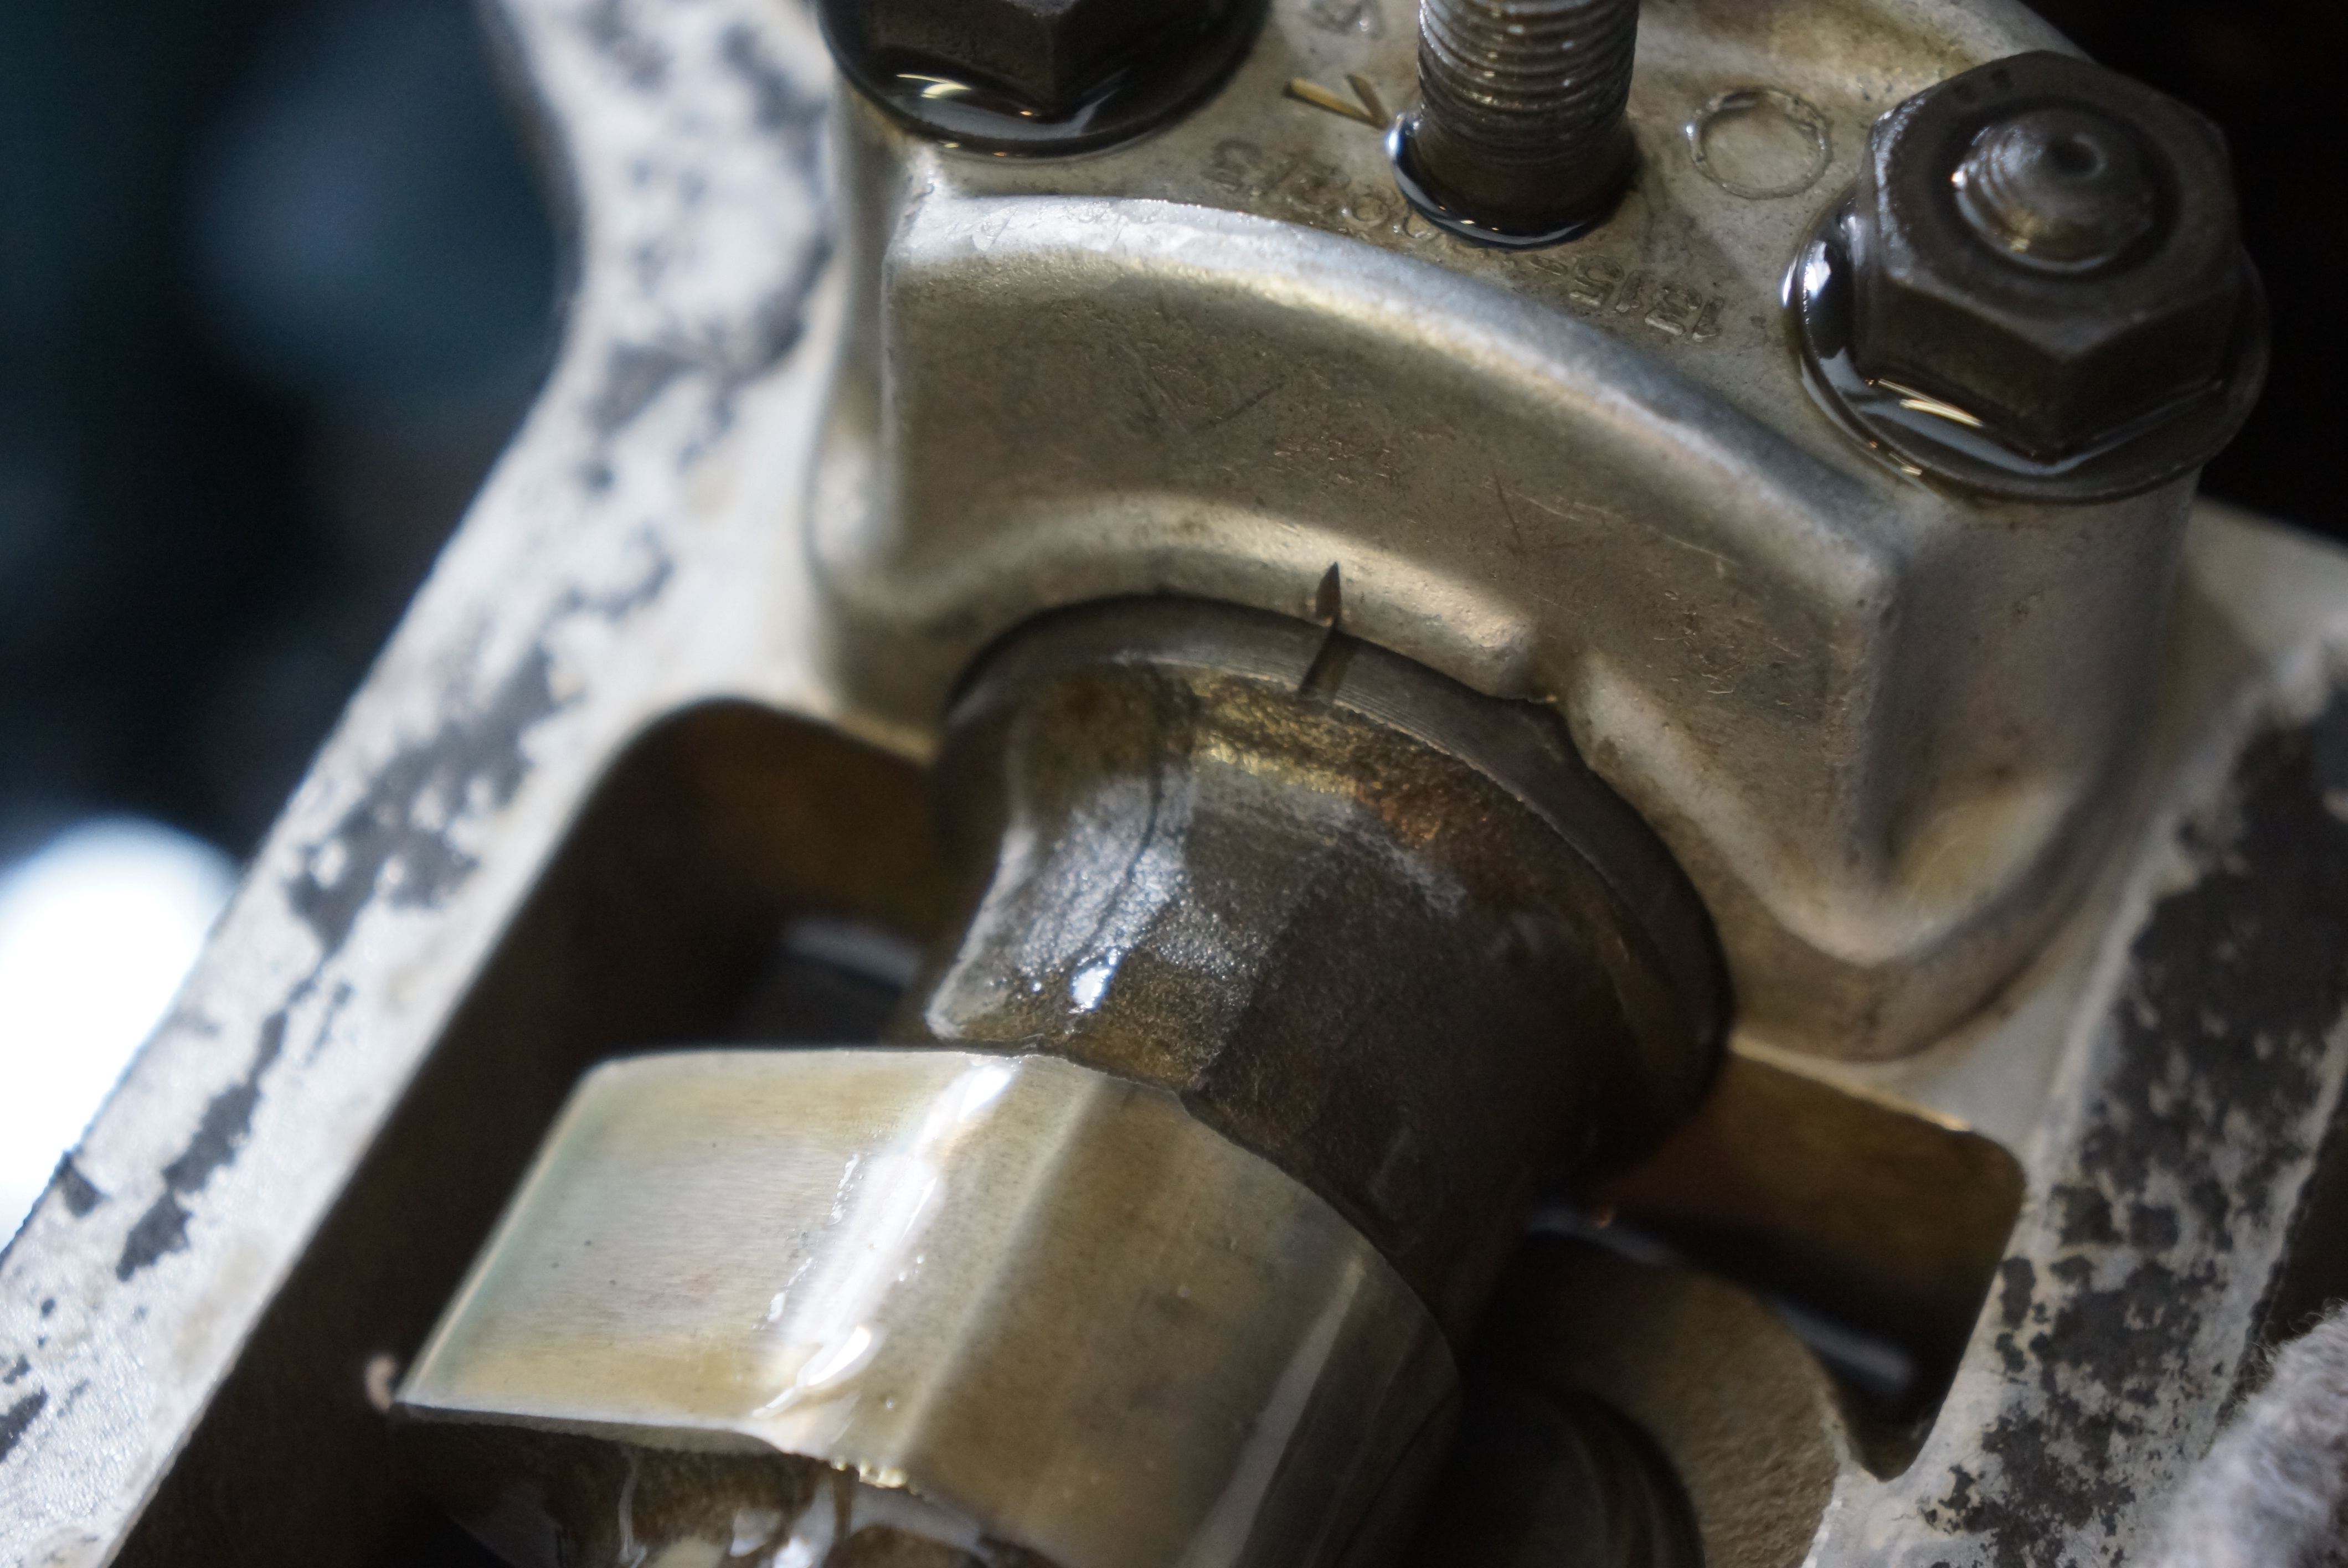
Exhaust cam timing mark
and intake cam mark
This is exactly what I did. With the tension off the timing chain, I started on the intake side and removed the 3 cam bearing caps (Alfa thoughtfully numbers the caps 1 through 6, and I documented everything with photos before turning the first nut). The intake cam was lifted and placed over the spark plug holes (which were protected with clean rags). The chain remained on the cam sprocket.
Cam bearing cap #3 – cap nuts were loosened gradually
Intake cam lying over spark plug holes- note timing chain still on cam sprocket
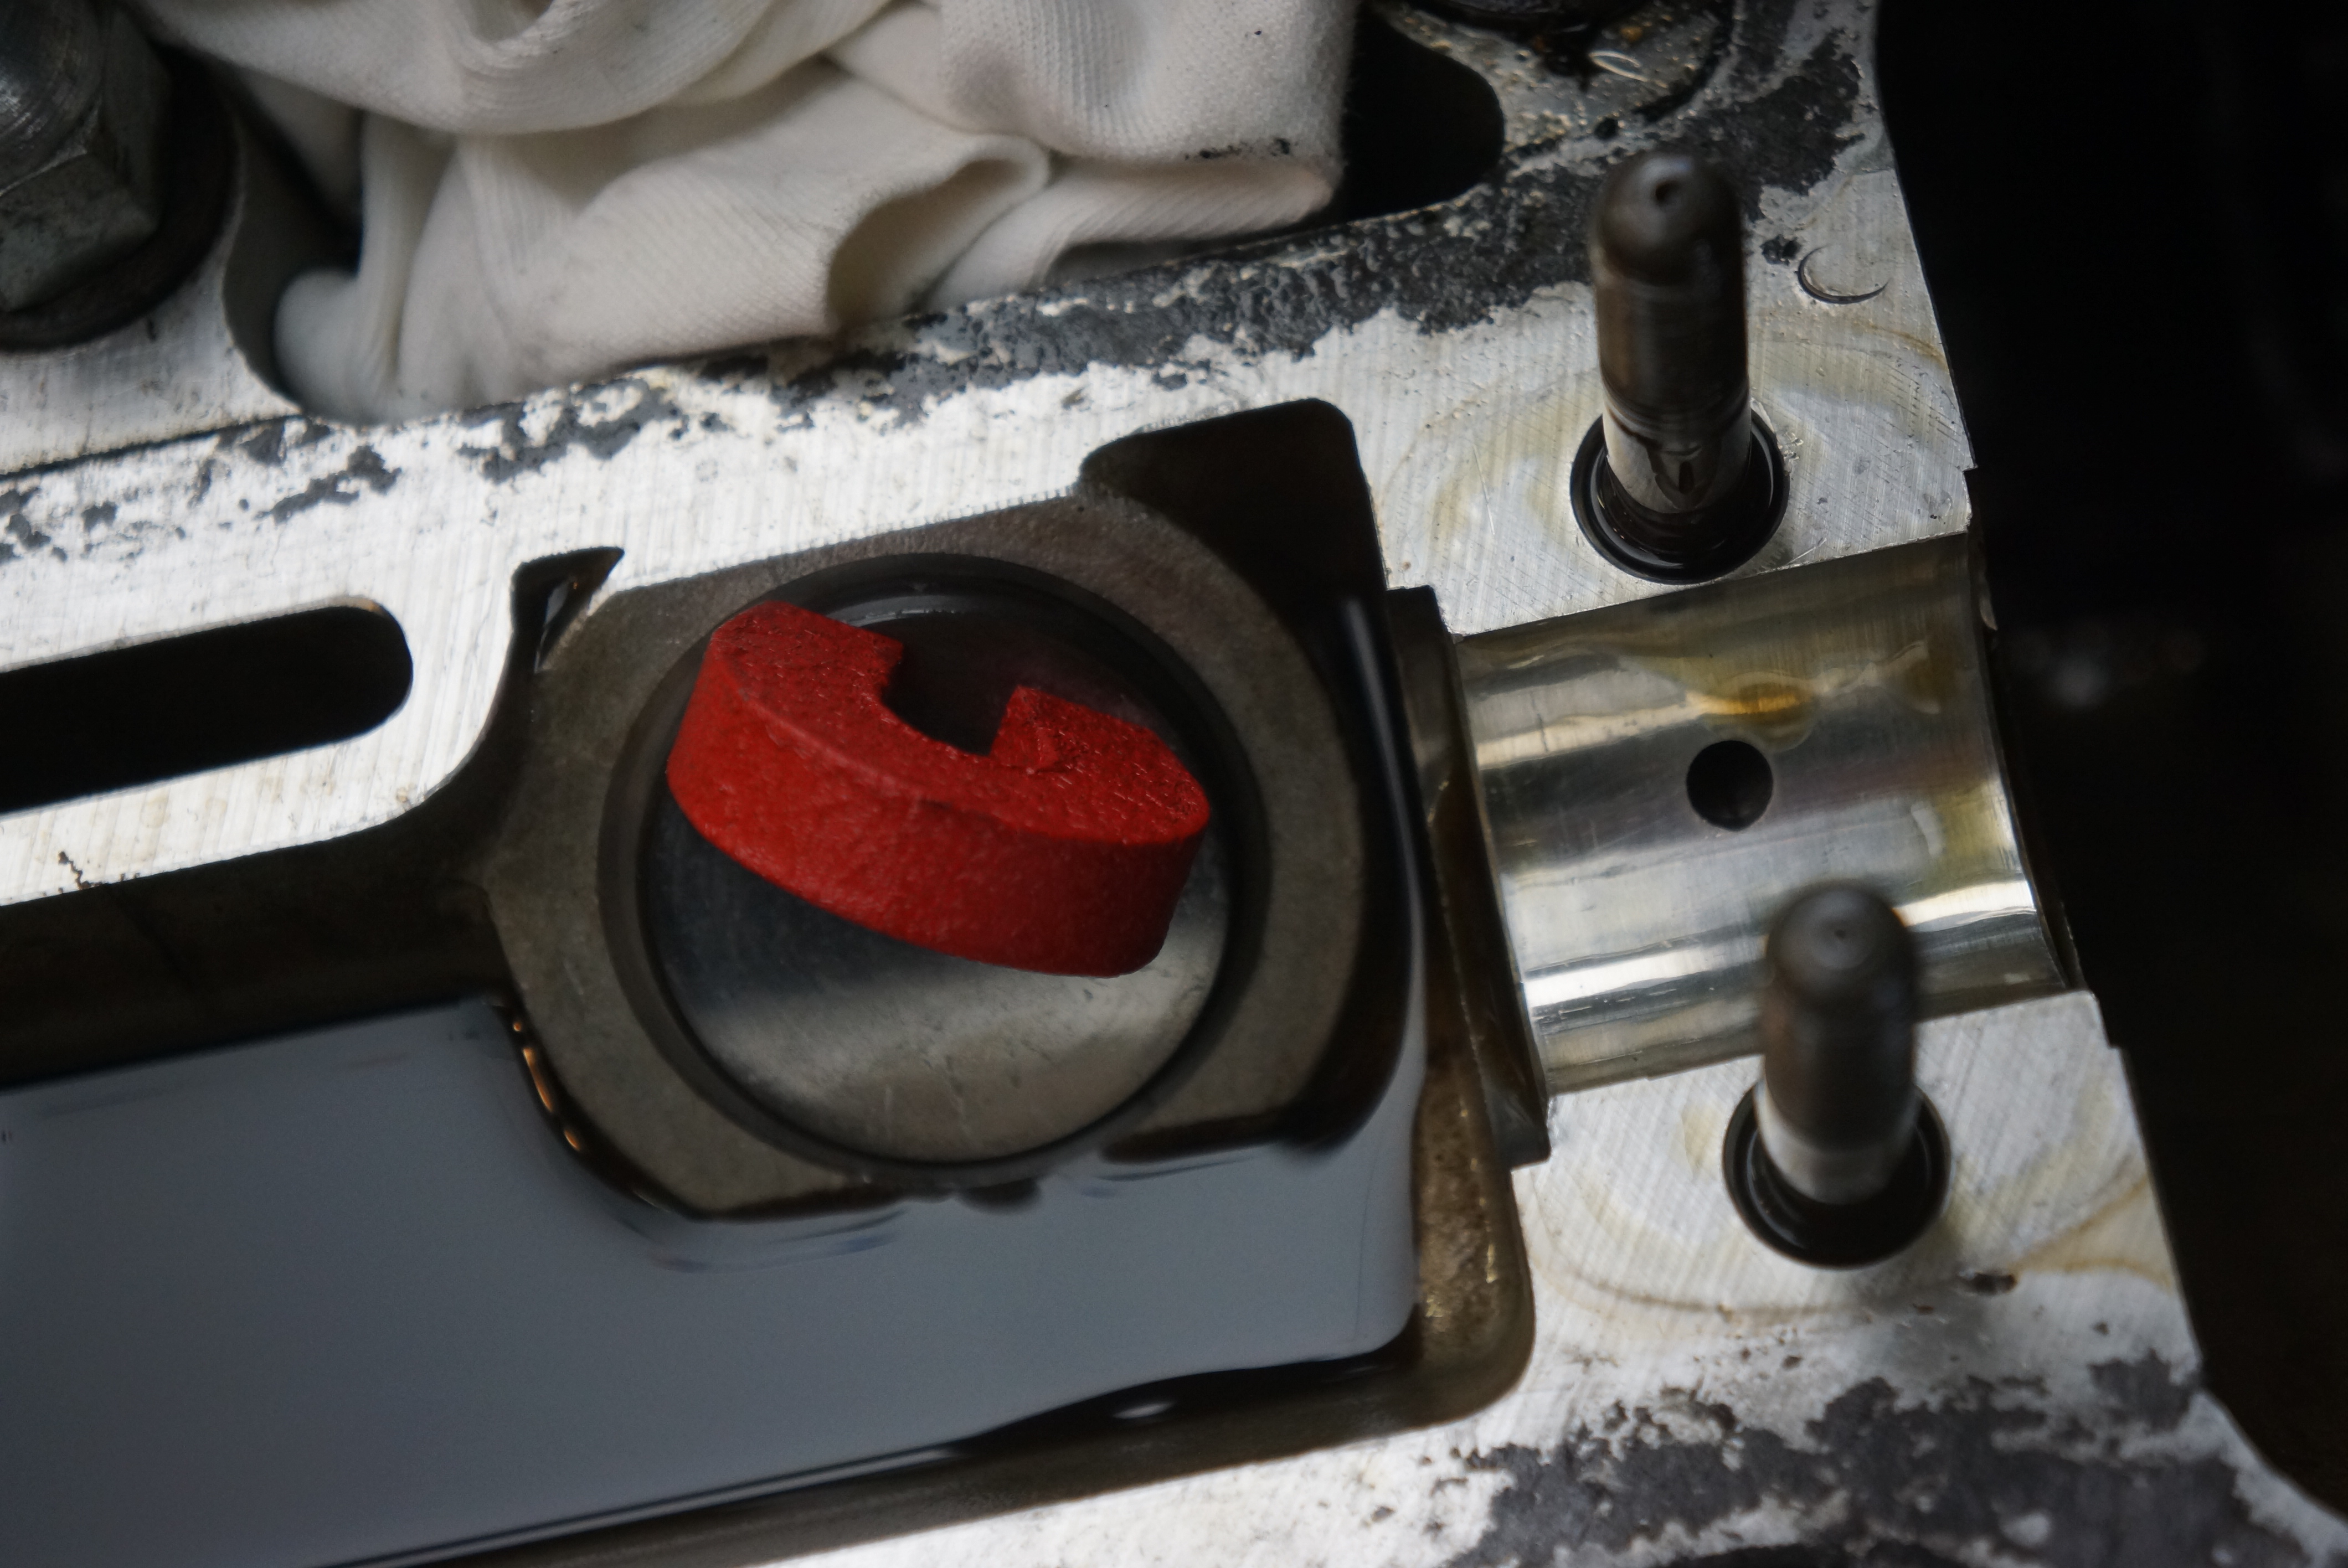
The next trick was getting the buckets out, as they were oil-covered and lacking a way to grab them. I realized that a magnet might do the trick, and it did. The bucket came out, and under it was the shim, which was also removed.
These slippery guys were tricky to remove!
Working on just one cylinder at a time so as not to mix up any of the locations, I measured each shim with a digital metric micrometer. The value was recorded on the same sheet of paper as the clearances. I started on the #1 intake valve, went down the line to the #4 intake valve, then did the same thing on the exhaust side. Once all these measurements were taken, the shims and buckets were back in place on the engine. I gently placed the valve cover on top of the engine, lowered the hood, and took my measurements inside so that the ‘new’ shim sizes could be calculated.
Bucket/follower (top) and shim (left) pose with micrometer
Starrett No. 216 records a shim value of 2.15 mm
I knew that all the out-of-adjustment valves were tight, so I needed greater clearance, so all the new shims needed to be thinner than the current shims. I found an online “Alfa shim calculator” someone built in Excel, and I used it, but I also checked all my numbers two more times. I aimed for the higher end of the spec, figuring that if the valves are tightening up over time, I had best start by providing the maximum clearance while remaining in spec.
Documentation of initial clearances and shim thicknesses
My go-to Alfa supplier, Classic Alfa in the UK, sells shims in increments of 0.125 mm, so it was a fairly easy task to calculate my needed shim sizes. The order was placed, and now I just needed to wait for the shims to show up. But it certainly felt like the hard work was behind me!
With its initial drive event behind me, further work on the Isetta slowed. The notebook I kept to track my progress has very few entries for September 1995. The notes which are there make scant reference to exterior lighting and door adjustments. My time and effort was directed to planning a party.
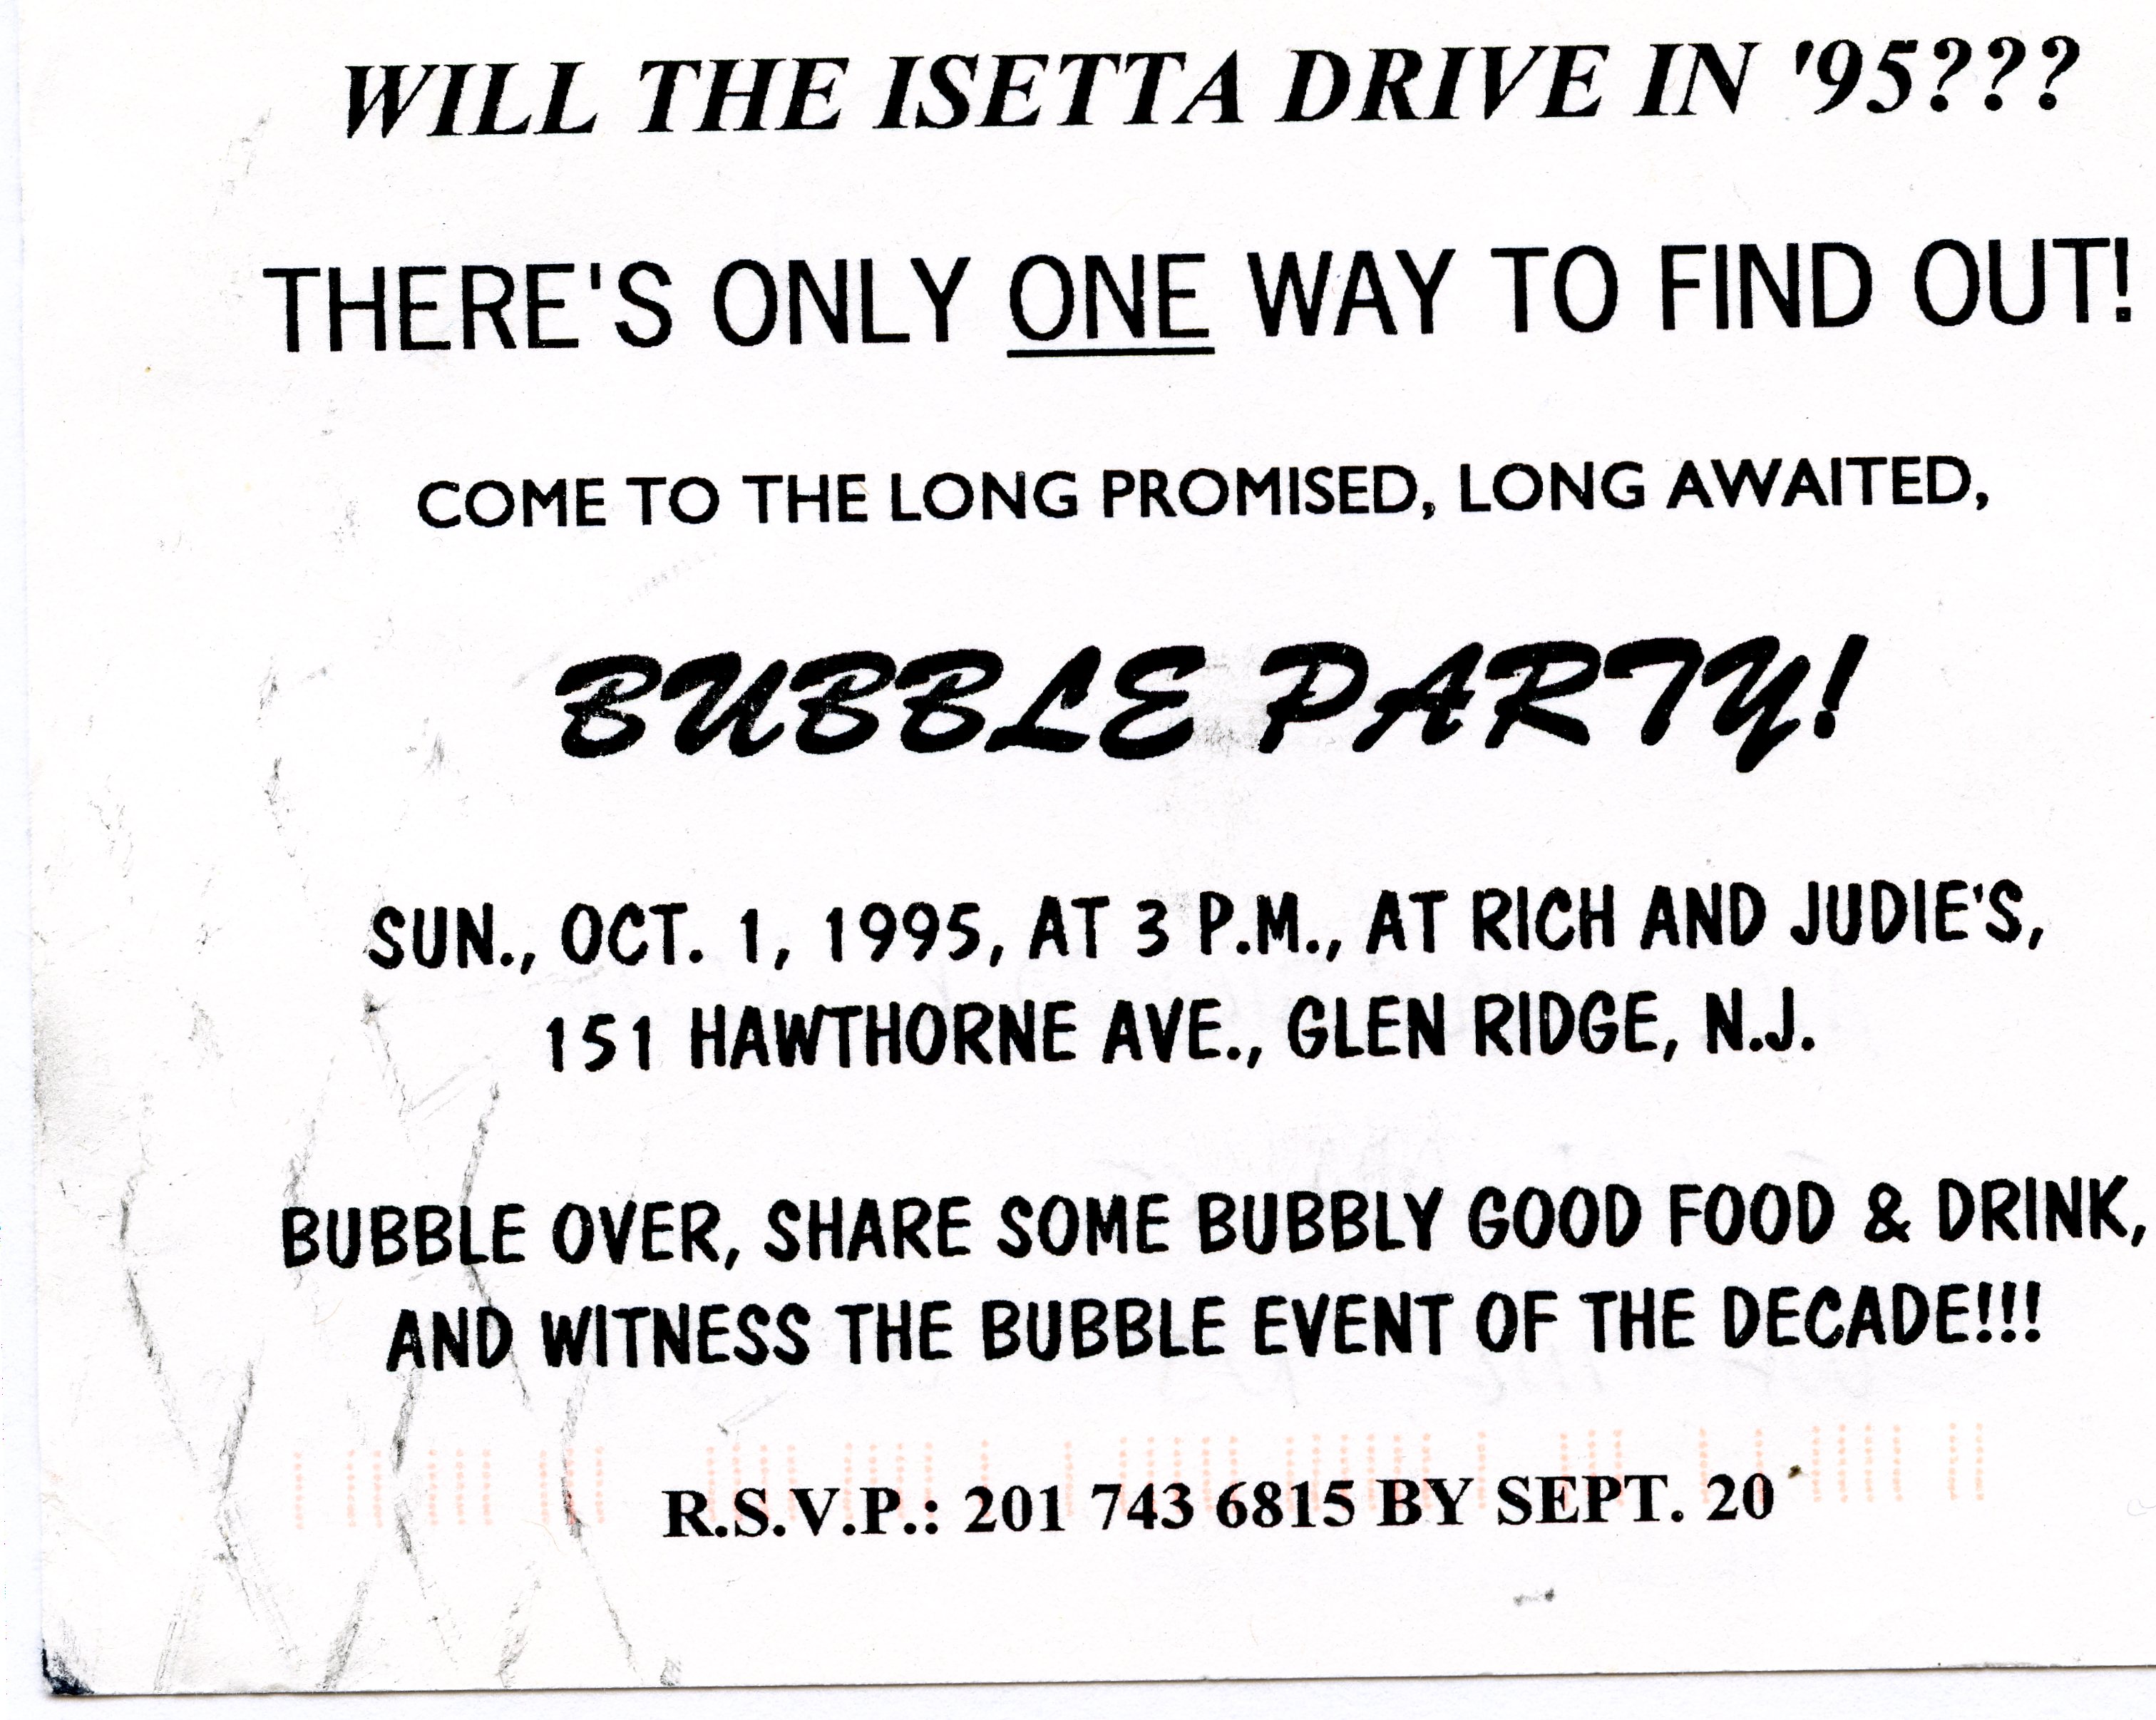
Every milestone of the Isetta’s progress had been marked with a celebration: the first running of the engine, and the body and chassis wedding, to cite two examples. This time, the festivities would be on a much larger scale. The car was as ready as it was going to be for its public unveiling, known as The Bubble Party. The date was set: Sunday, October 1, 1995. We went so far as to petition the town to close our street to vehicular traffic so that the bright red Bubble Machine could be buzzed from one corner to the next without interference. The mayor agreed (I think a small donation helped).
I did take the car out for several more reconnaissance runs, and my ear-to-ear grin gave it away every time: I never imagined that a 13 horsepower car could be so much fun to drive. The only variable not in our control, the weather, was simply ignored. The Isetta was ready, and we would be too.
The time span between October 21, 1978 and September 4, 1995 is quite long. Very long. It is 16 years, 10 months, and 14 days. The former date represents the day I purchased my BMW Isetta. The latter date represents the day I first drove it.
When I bought the car, I did not think that it would take just shy of 17 years to get to this point. But it did. As I promised myself, the Isetta did drive in ’95.
The video of the first drive was recently unearthed after being hidden away in a closet for many years. Along with the videosposted earlier, I had forgotten I had this, and it has been fun to rediscover it. No further words are necessary. Click on the YouTube link below and enjoy the clip taken on what was a beautiful late summer day.
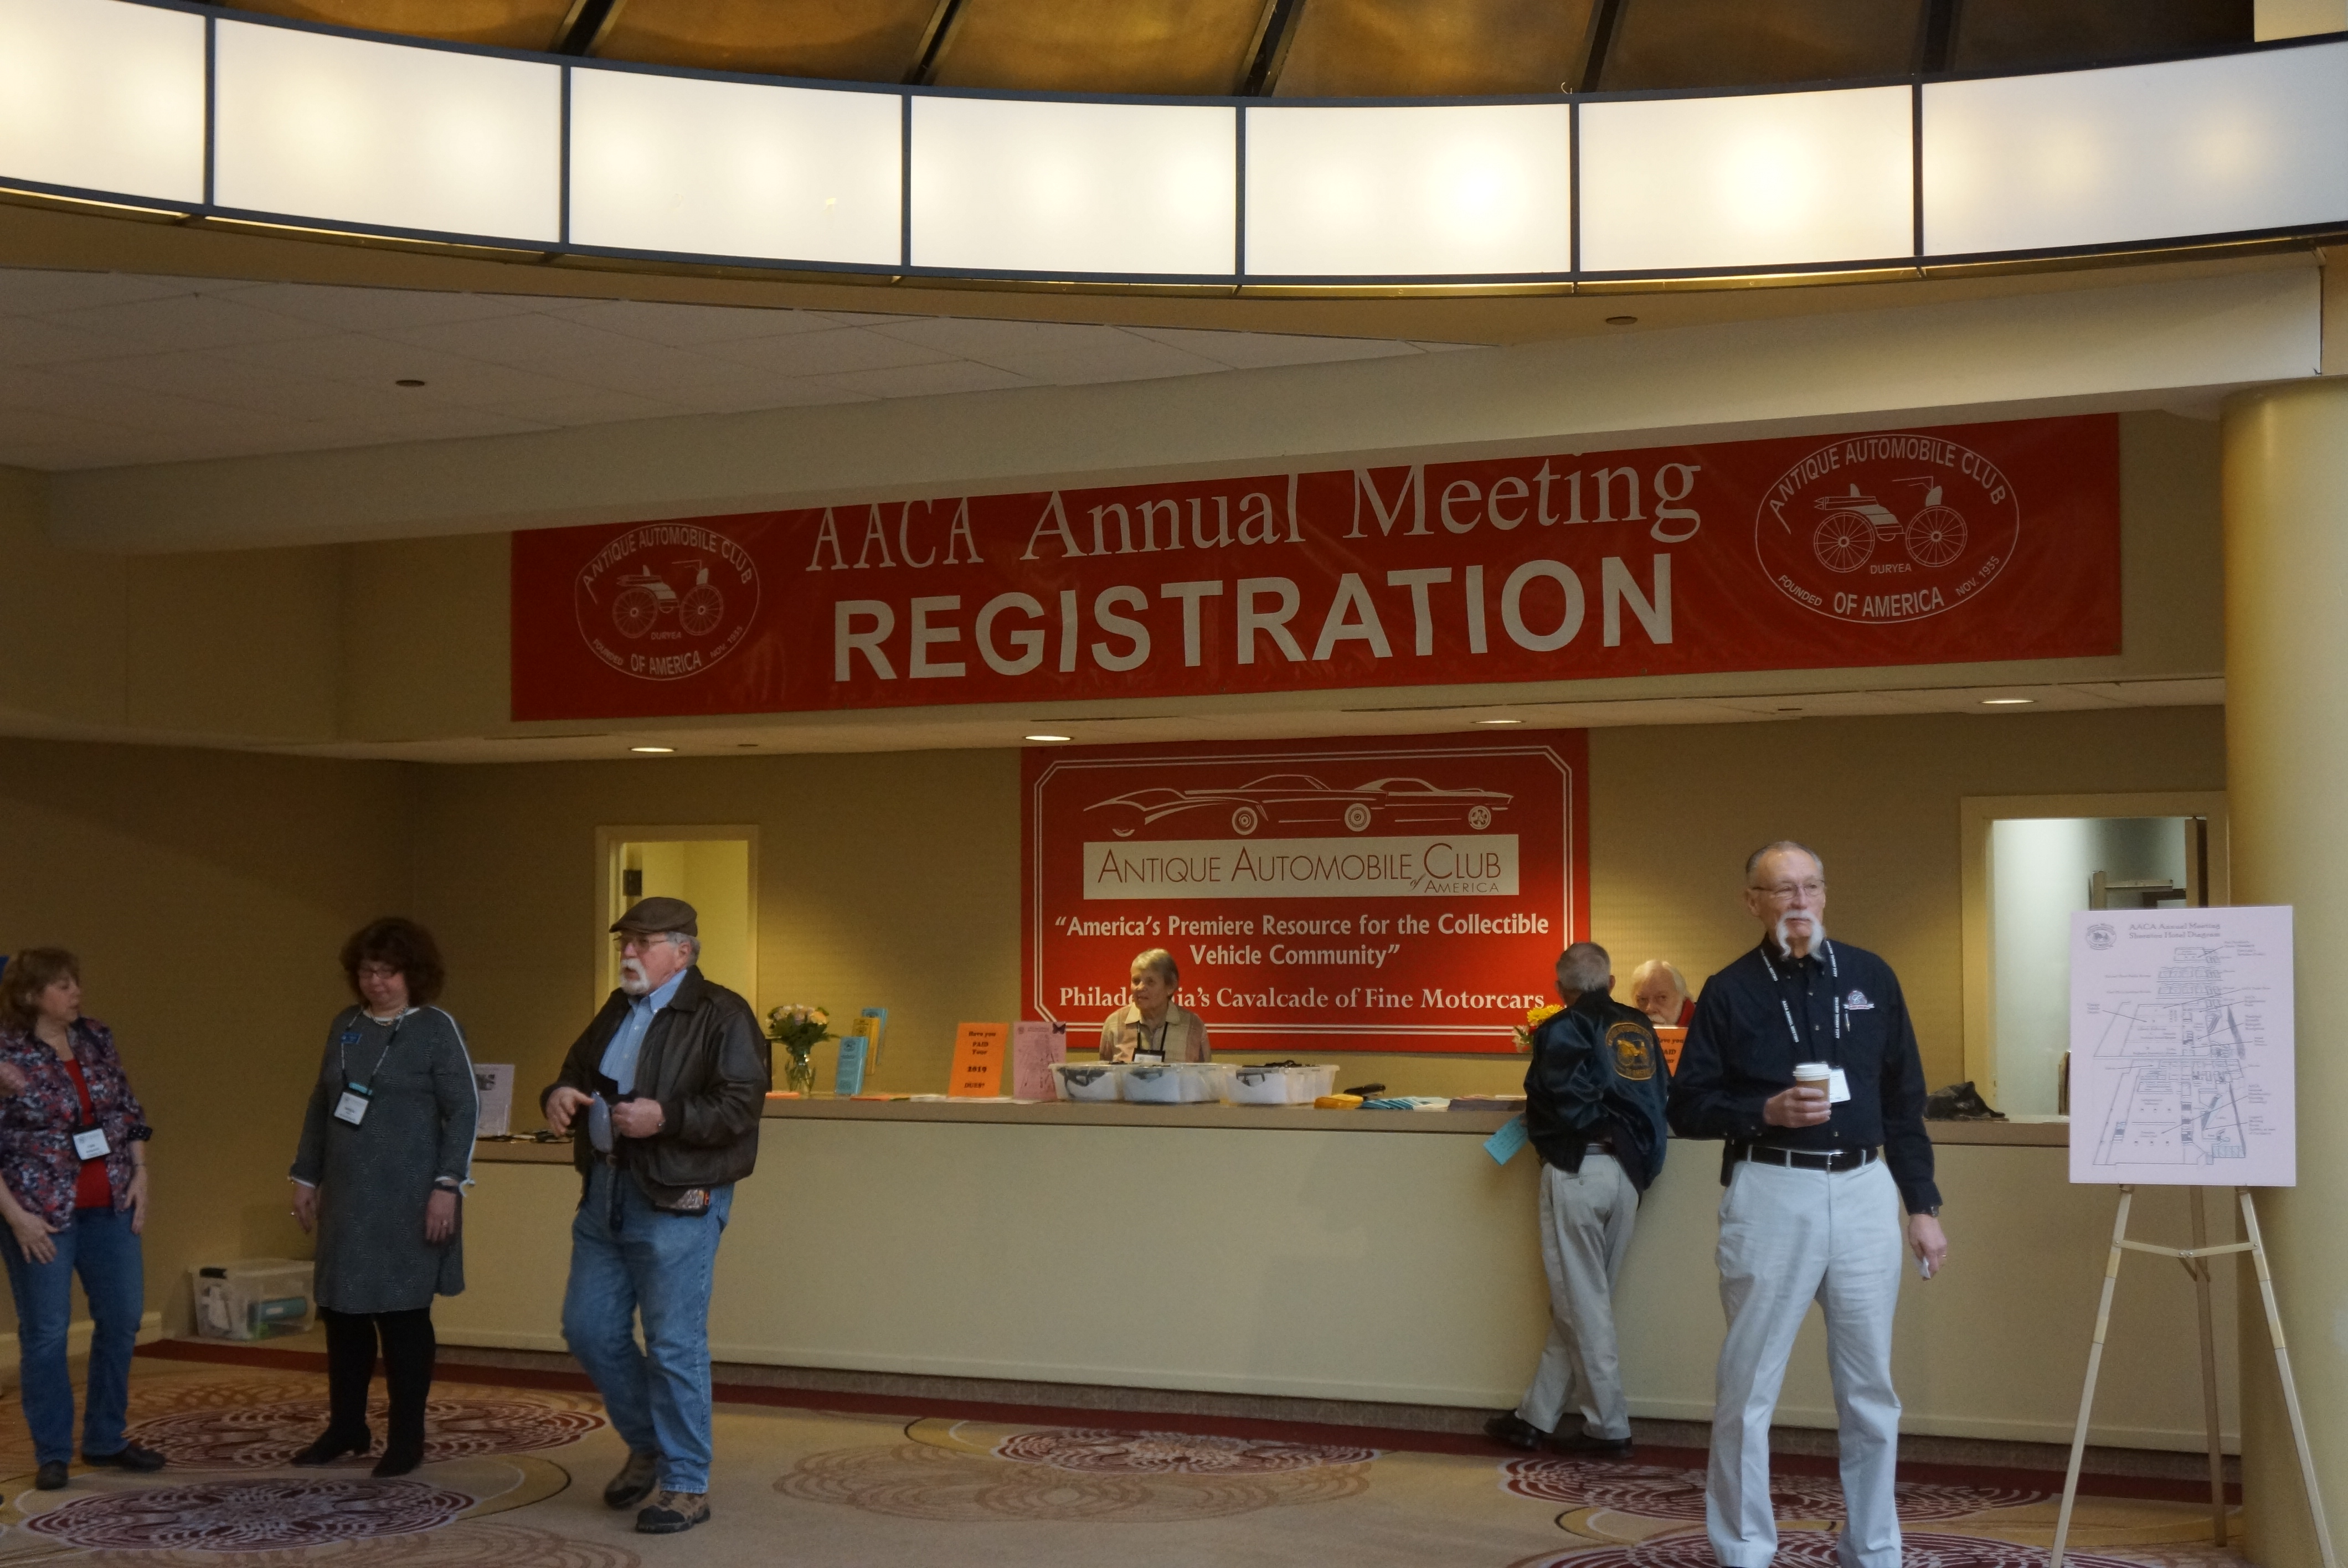
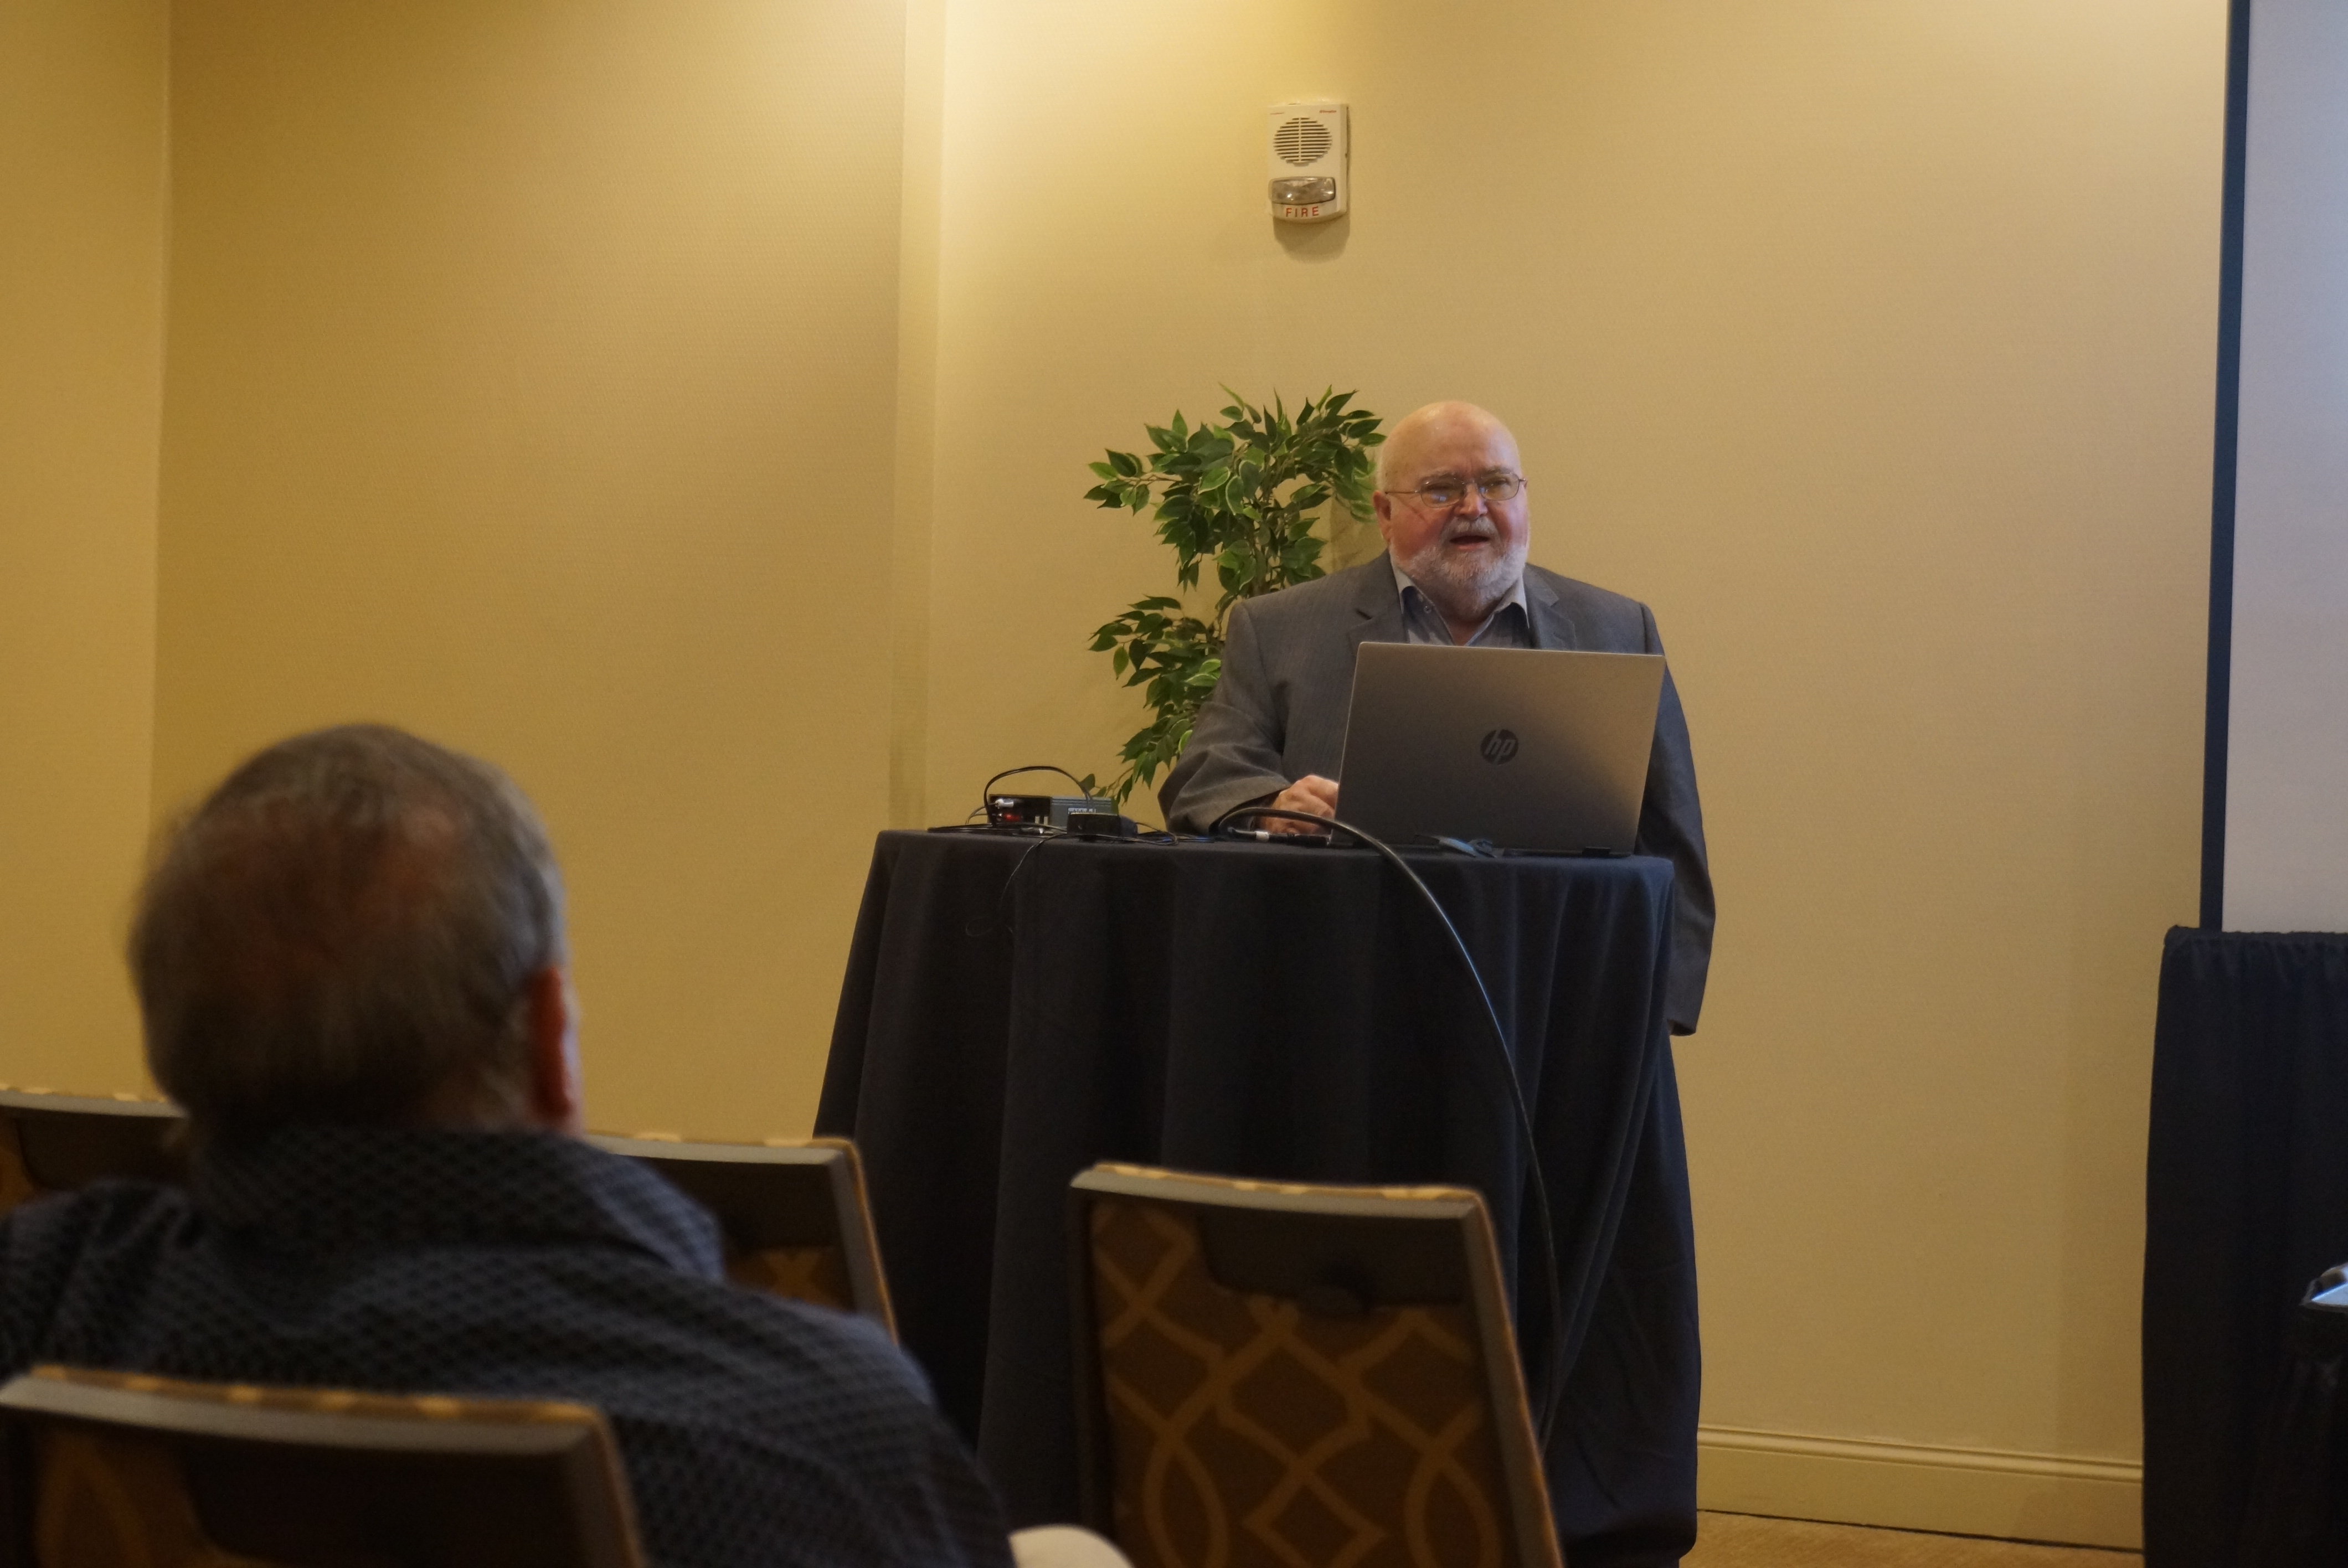
The Antique Automobile Club of America (AACA) held it 83rd annual meeting at the “Philadelphia 201 Hotel” in Center City Philly PA on February 8 & 9, 2019. The AACA has a long history of annual meetings in the City of Brotherly Love – you can read more about that history here. The show was also covered on the blog last year. This year, for the first time, I spent Friday night in the hotel so that I could attend both days. My primary interest was the judging school, and more about that in a bit.
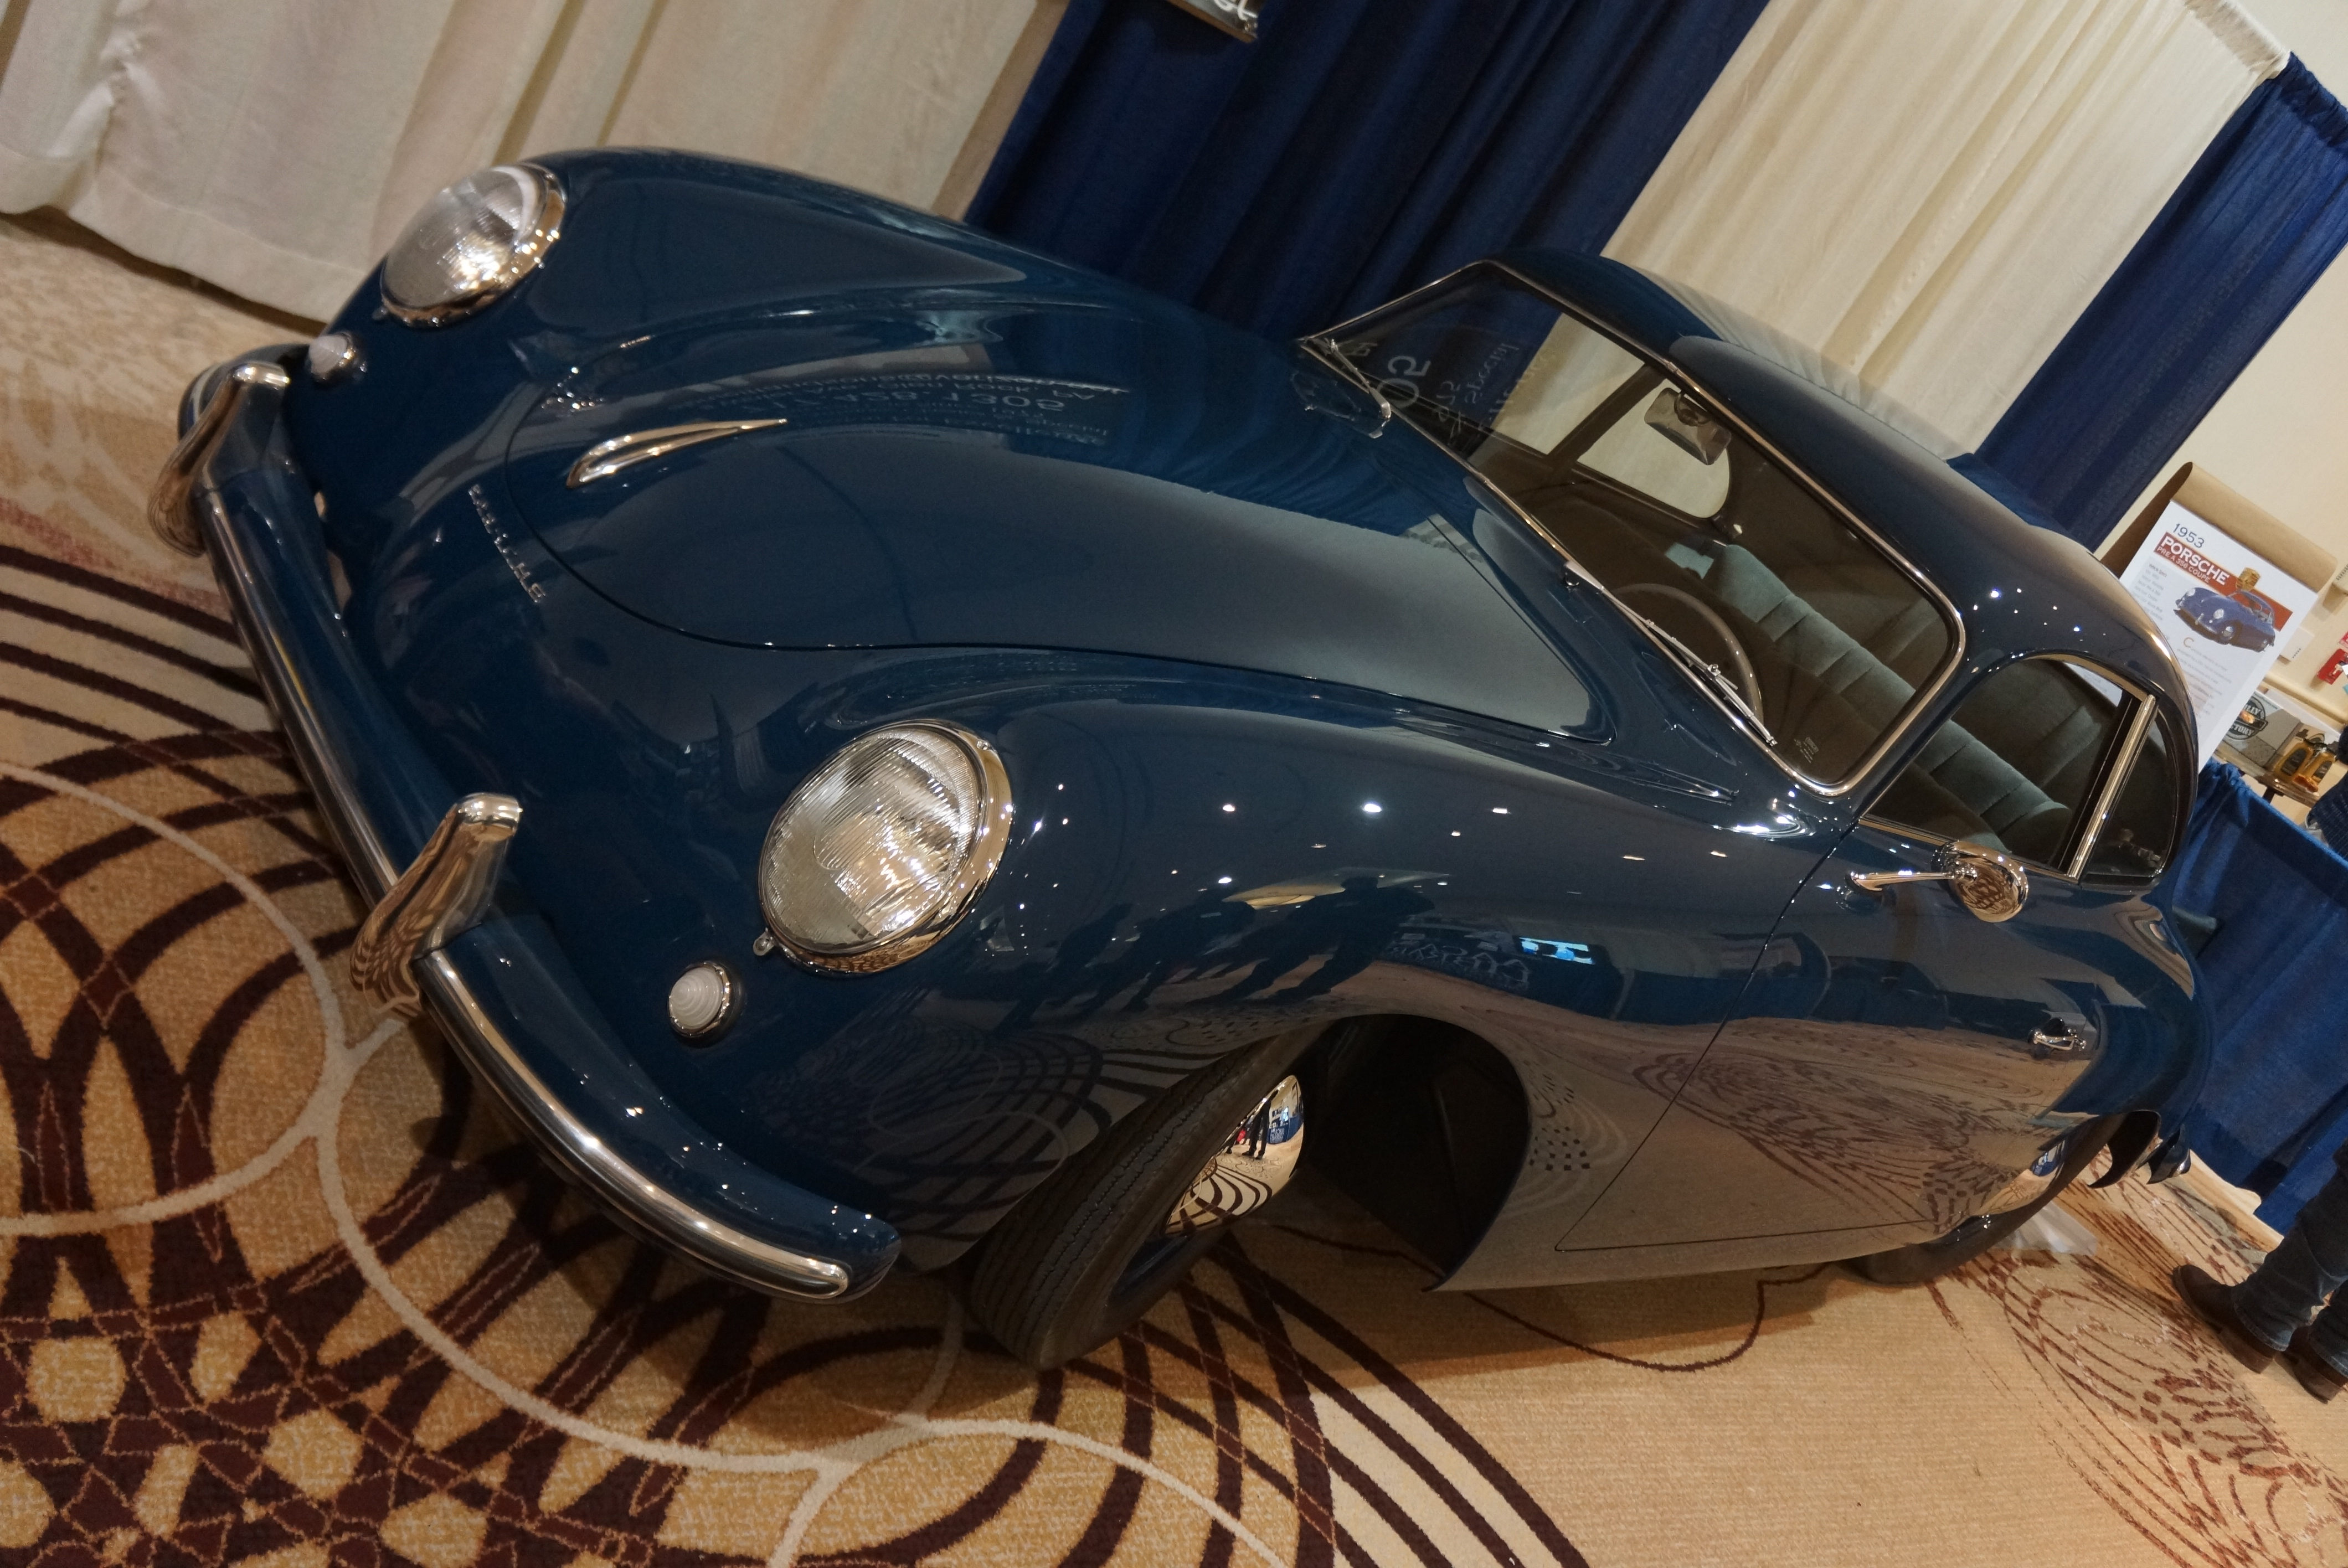
This is not a car show per se. Rather, the principal activities for registrants (you must be an AACA member to attend) are seminars on a variety of topics; judging school; a trade show; a general membership meeting; and the Saturday night awards banquet. The host hotel is nicely set up for this, with the trade show in a large room to accommodate vendors’ booths and displays, and conference rooms of various sizes for the seminars. Everything is within a few minutes’ walk, with no need to venture outdoors into the 32-degree winter weather.
The seminars I attended included “Market Value Trends”, “The History of the Ford Mustang”, “Keeping Tabs on Hobby-Related Legislation”, “The History of the Ford Flathead V8 Engine”, “Planning Your Collector Car Estate”, and “Modern Motor Oils”.
Almost every AACA event offers a judging school. By AACA rules, all judges must attend at least one judging school per calendar year, so there’s good reason for the frequent offerings. My plan is to judge at the NJ Region’s upcoming National in Parsippany in June, so I need to increase my judging credits. I attended the school on Saturday morning, and it’s refreshing to (re)learn that as strict as the judging guidelines are, the Club also recognizes that this is a hobby, and we all are doing this for fun.
The trade show is primarily populated by businesses wishing to promote their wares (restoration shops, books sellers, and appraisal services). Several schools and colleges which now cater to the hobby also had a presence. AACA takes up significant real estate just trying to sell clothing and tchotchkes. The NJ Region set up a booth to promote the June National, and I spent several hours each day in the booth to talk up our event with attendees. I was pleasantly surprised to meet AACA members from as far as Indiana and Florida who expressed interest in attending.
The Annual Meeting is quite different from a meet or a tour: you are not there to ogle beautifully restored cars. However, it is very much like any other AACA event in that it’s about mingling with those who share a passion for the hobby. There was plenty of time to catch up with old friends and become acquainted with new ones. For that reason alone, it’s worth making the trek each February to Philly.
MARKET VALUE TRENDS SEMINAR
Larry Batton of the Auto Appraisal Group presented results from the recently concluded Arizona auctions. Larry’s style is unpretentious, upfront, opinionated, and straightforward. Whether you’re an auction veteran or someone who wonders what the fuss is all about, it’s enlightening to hear some of his behind-the-scenes stories.
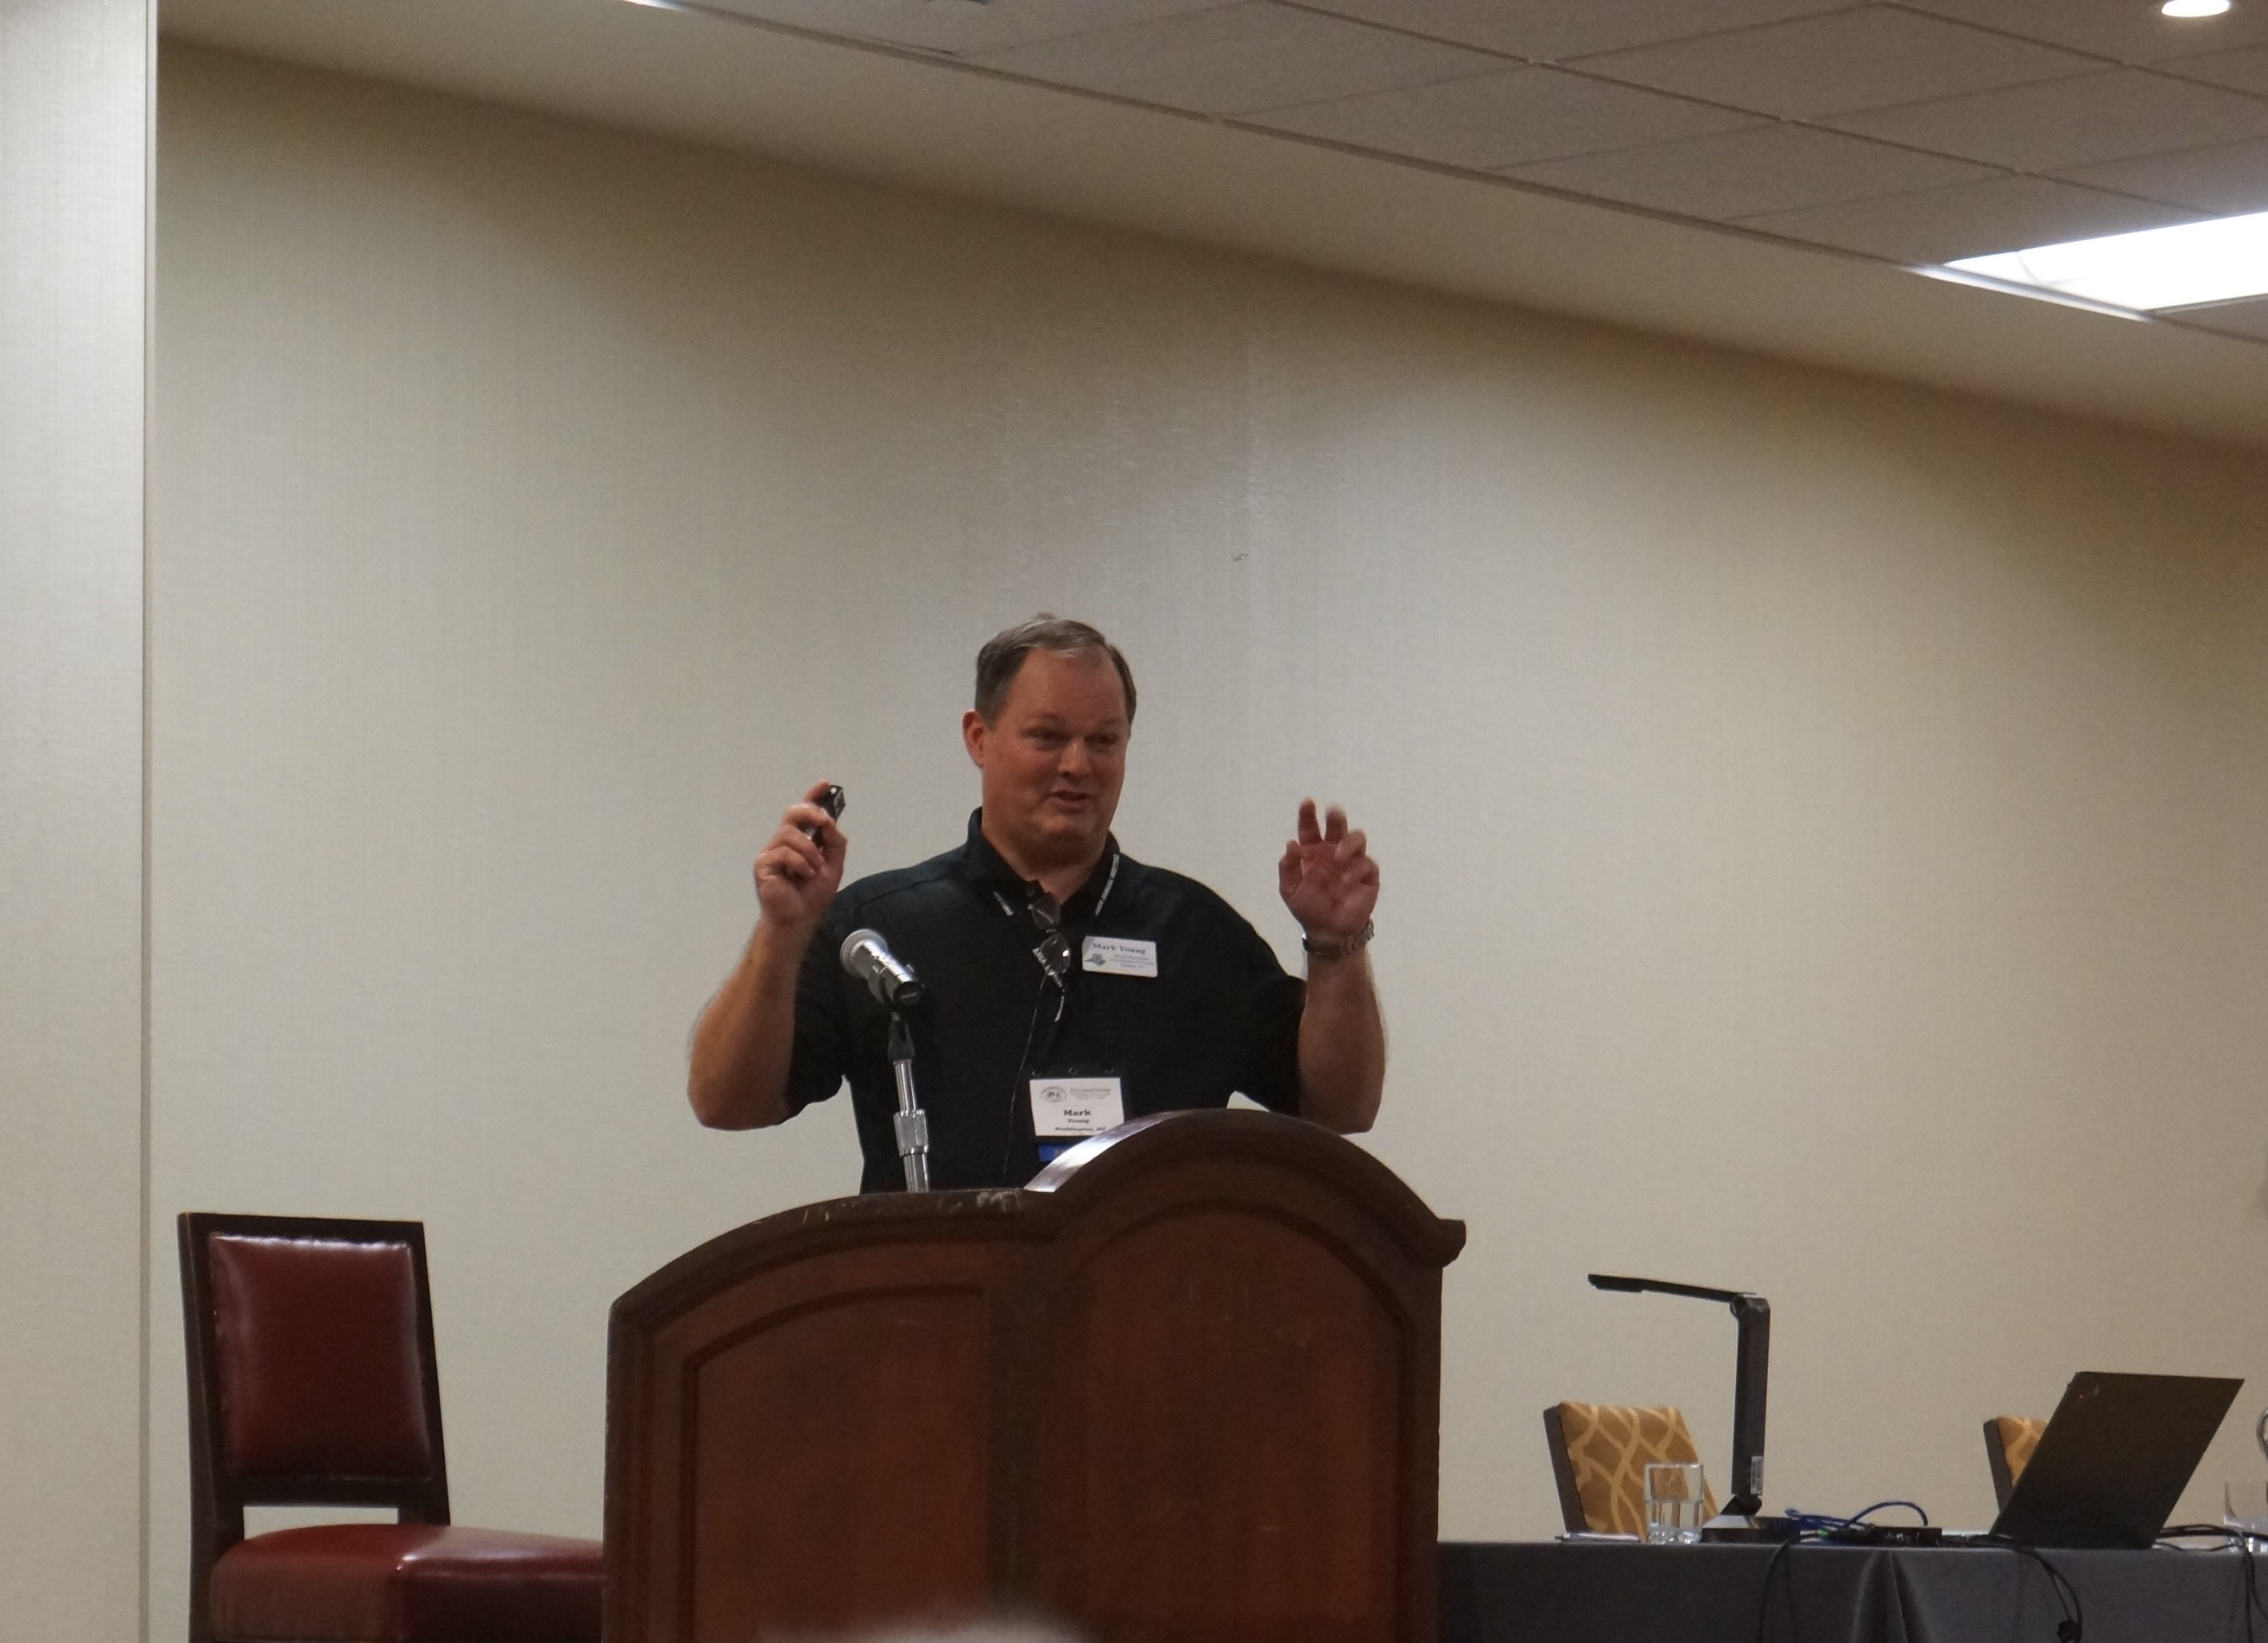
HISTORY OF THE FORD MUSTANG SEMINAR
Mark Young is a 4th generation Ford enthusiast, and that’s putting it mildly. His great-grandfather owned one of the earliest Ford dealerships, a business he started in 1910. I lost count of how many Mustangs are in Mark’s immediate family, but it’s 7 or 8 (plus a few T-Birds). Mark gave a credible and succinct summary of the original pony car’s success and what it has meant for the Blue Oval fans.
HISTORY OF THE FORD FLATHEAD V8 ENGINE SEMINAR
There were many V8 engines in existence before Ford introduced theirs in 1932. But none were as low-priced nor as mass-produced as the “flattie” was; it stayed in production just over 20 years. Dain King, an entertaining man in his own right, provided the interesting back story (for example, Ford engineers scoured junk yards to buy up V8s from other companies, so they could disassemble and see what they could learn from them).
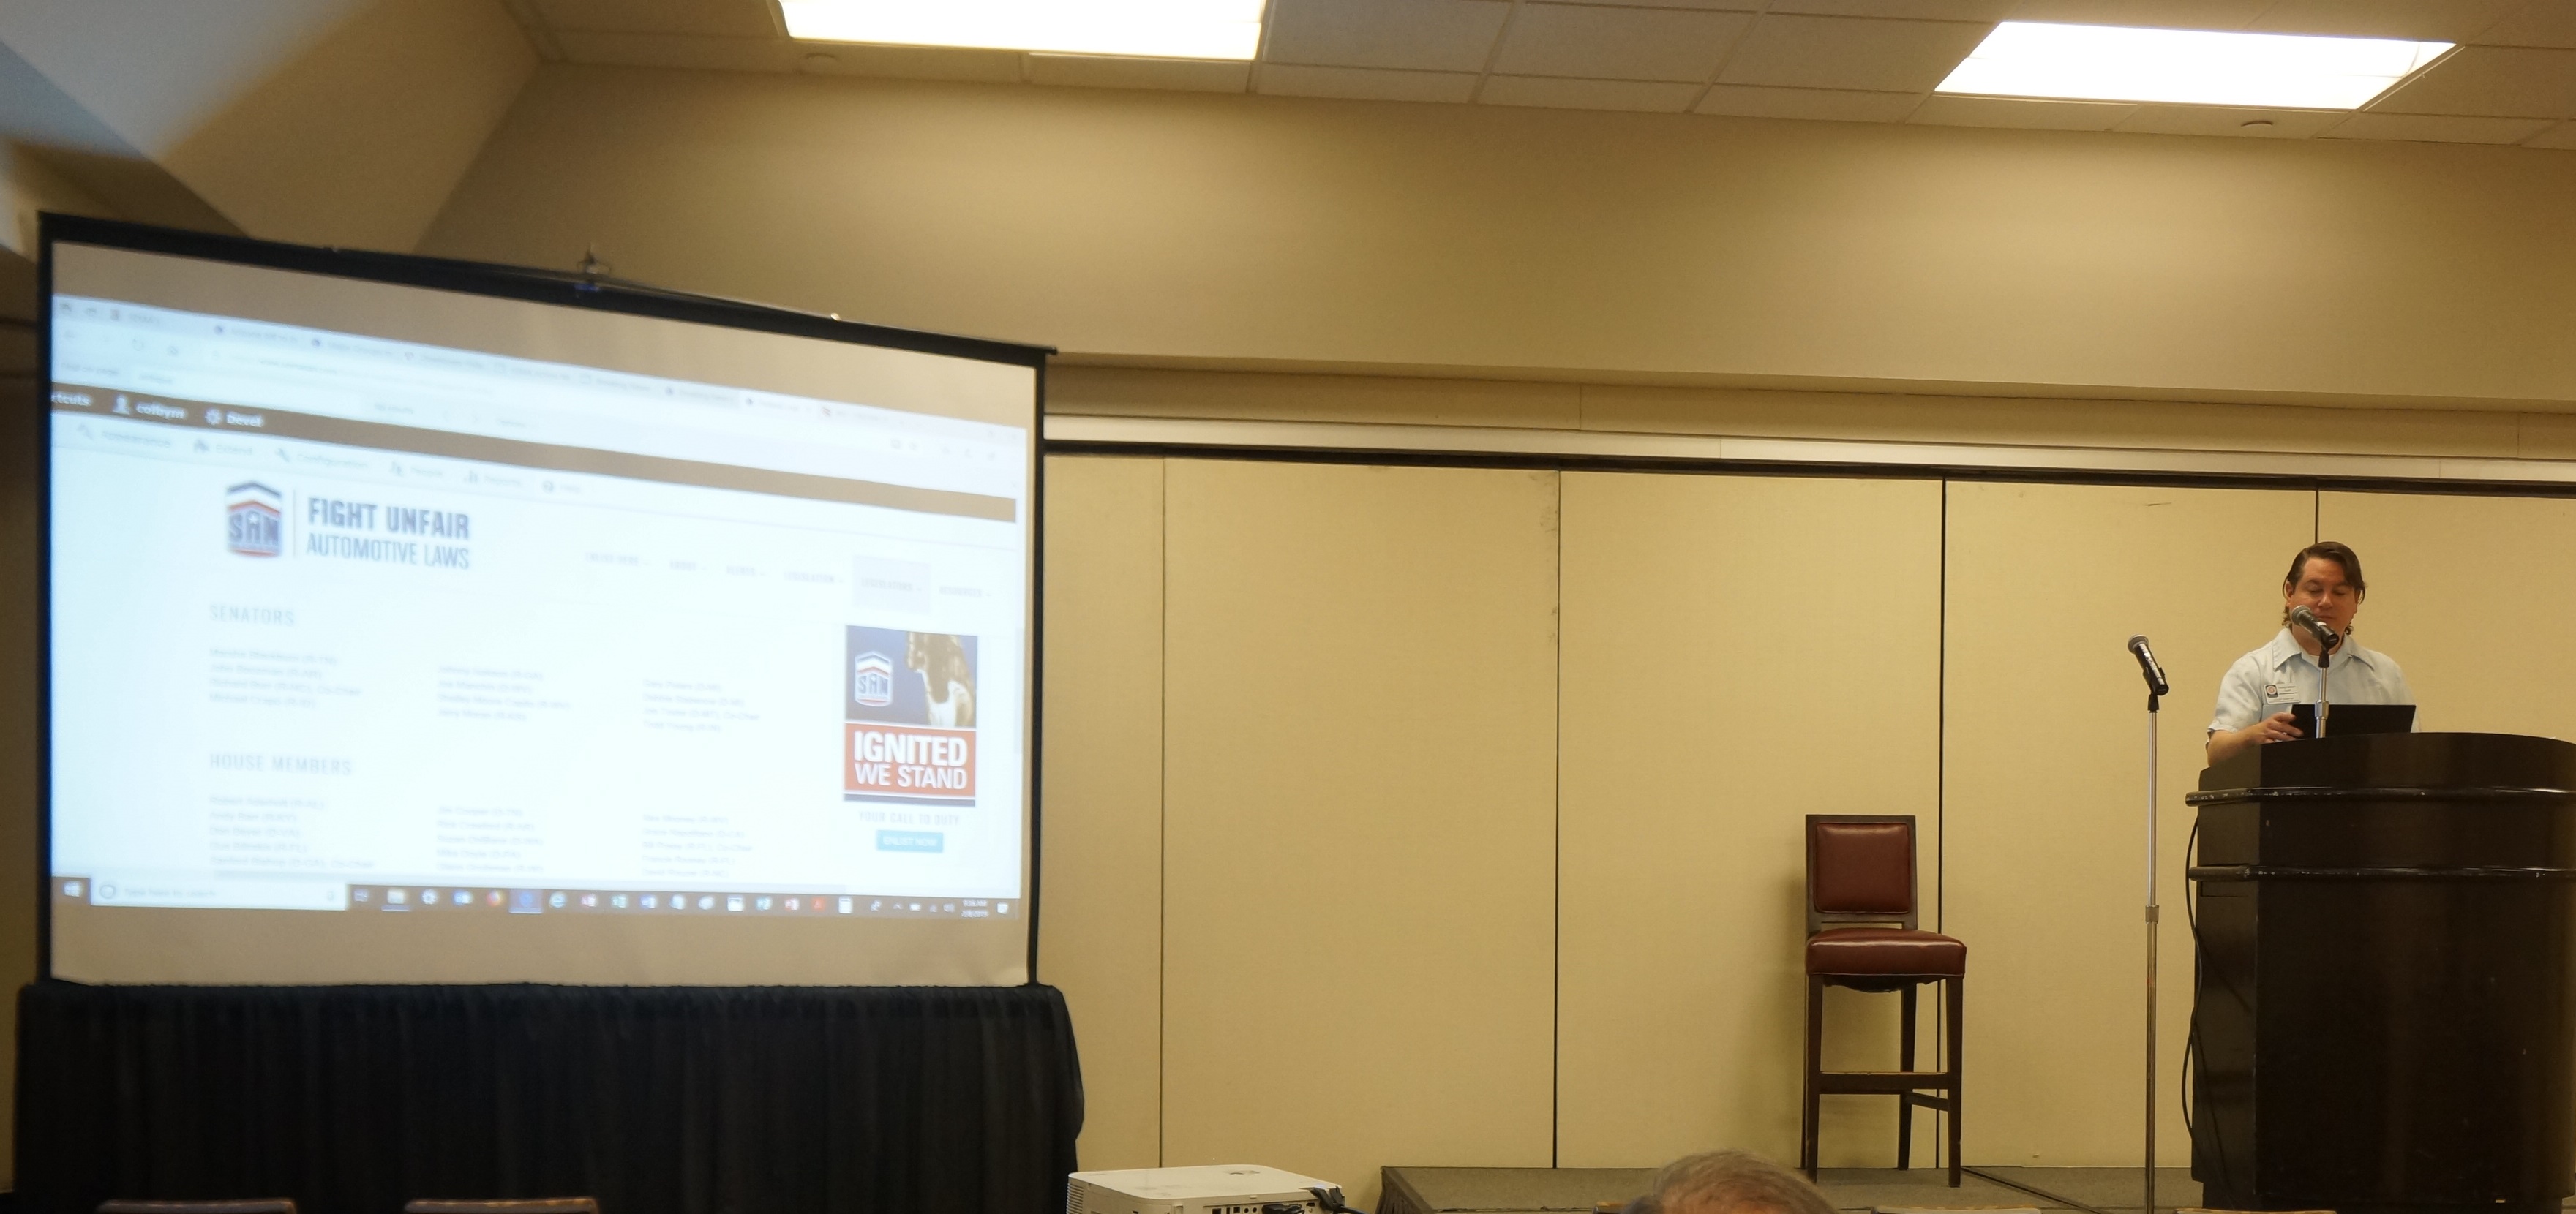
KEEPING TABS ON HOBBY RELATED LEGISLATION SEMINAR
Colby Martin from SEMA (Specialty Equipment Manufacturers Association) made the presentation, which was not a bashing of government regulations. Rather, it was an overview regarding how a regulated industry which seeks fairness and consistency can have a voice. One point of great interest that he showed was a lengthy list of Congresspeople from both parties who have identified themselves as “friends and advocates for the automotive hobby”. It’s good to know that such people exist.
PLANNING YOUR COLLECTOR CAR ESTATE SEMINAR
Father-and-son duo Tony and Mario Monopoli provided a series of common-sense suggestions to help ensure that upon your demise, your heirs either have your cash, or know how to turn your “stuff” into cash. Tony confessed that for the past few years, he’s been getting rid of his stuff on eBay so that he has the cash while he’s still around. If you’re keeping what you have for now, Tony suggested making lists (what you own, what it’s worth, and where it’s located) and making sure your descendants have copies of the lists.
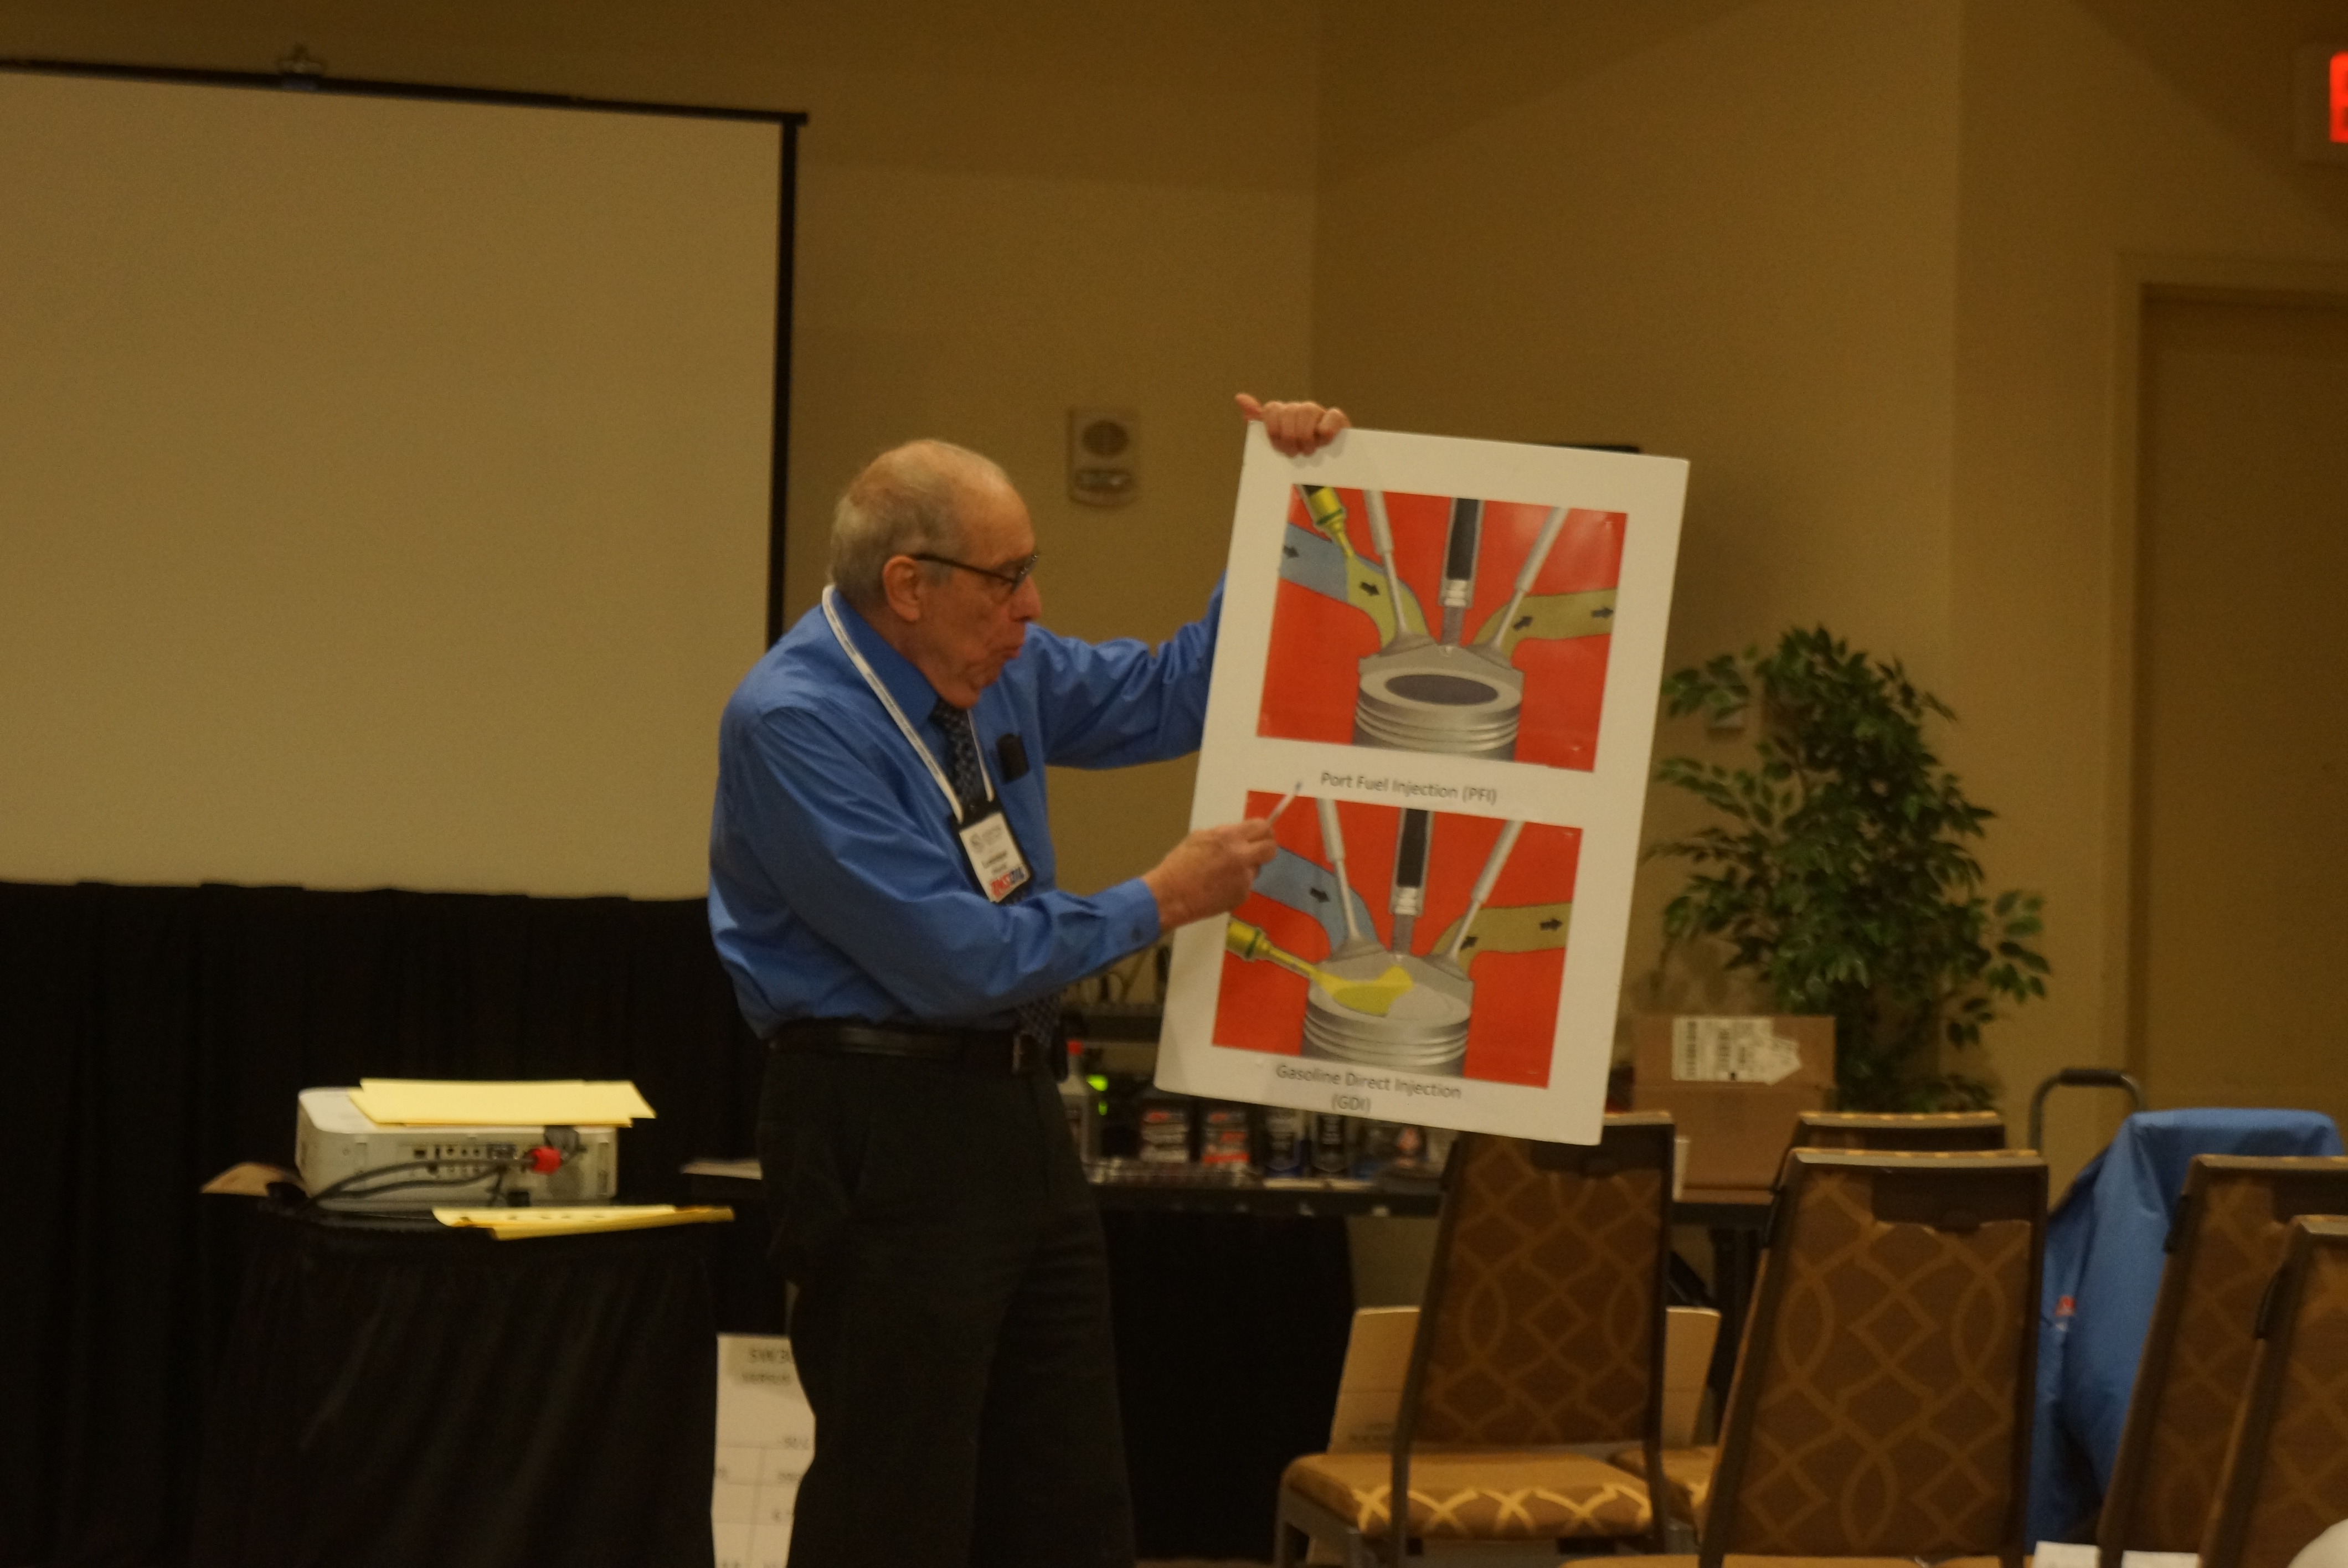
MODERN MOTOR OILS SEMINAR
Part chemistry class, part history class, and part sales pitch, Larry Giancola, who unabashedly works for AmsOil, provided more information than you need about base oils, index modifiers, and viscosity, as well as phosphorus, calcium, and zinc (for a moment, I thought I was in nutrition class). While touting the benefits of the oil he sells, Larry also kept it real. One revelation was the discussion around Direct Injection (DI) engines and the havoc they are causing. He pointed out that the vehicle manufacturers have specifically requested that the engine oil manufacturers produce an engine oil (SN+) to address this, and they have.
AACA JUDGING SCHOOL
Dain King and Stan Kulikowski did a wonderful job explaining the intricacies of AACA’s judging rules and points system. All class cars start at 400 points, with points deducted for faults. Cars are judged first on authenticity, and only then on condition. To provide a simple example: if a 1940 Ford is on the show field with radial tires (non-authentic), that car would lose maximum point value for 4 inauthentic tires. If a different 1940 Ford had bias-ply tires correct for that year, but only one of the 4 was half worn while the other 3 appeared new, it would lose nothing for authenticity, but lose condition points for only that one worn tire. As stated earlier, they stressed that this is a hobby, and the judge’s job is not to “destroy” someone’s work with a few stokes of a pen. All in all, it was a very enlightening session.
It had been some wedding! The body and chassis were reunited. Now the party was over. The guests had departed. It was time to get back to work and make the reunion more permanent. The upcoming week was a vacation week for me so that I could fully apply myself. It felt as though I were days away from actually driving the creature.
First item on the to-do list: install new sound-deadening material to the interior. The commercially-available products seen in every old car magazine were one choice (Dynamat is one well-known brand). However, they are pricey, even for a car as small as an Isetta. Another issue was my desire to adhere as closely as possible to the original treatment, which resembled tar paper. (The new-fangled stuff is thick and shiny and more appropriate for a drafty ‘50s British roadster or a noisy ‘60s muscle car.)
When conveying my indecision to my neighbor, he gave me a great suggestion: a visit to Home Depot would likely yield a roll of black roofing material which could be purchased for a reasonable number. For $9.97, I bought a roll which could have completed multiple Isettas! The measuring and the cutting began.
“30 LB FELT”, a deal at $9.97 (plus tax of course)
Note bolts thru body to chassis
New insulation glued in place
The wiring harnesses were next. The Isetta has two: a front main harness, and a rear harness. I had earlier disassembled, cleaned, and re-sheathed them, and they were ready to be put back into place. This was a clear case of my earlier photography coming to the rescue, as it was the photos taken during disassembly which portrayed the exact locations and connections for the wiring.
The electrical system of the vehicle is as simple as it gets: front and rear exterior lights, dashboard warning lights, and the starting/charging system. No power seats, no climate control. The test-firing of the engine way back in March of that year meant that I had the battery, Dynastart, and voltage regulator connections down, so with the body resting on top of the chassis, I only needed to bring those wires to their permanent spots.
Top of dash pod
and underside
The ignition switch was a trouble spot. I had an original one, but no key for it. There was a key code on the outside of the cylinder, but efforts to find someone who could create a working key for it were futile. One gent at the local auto parts store was very patient with me as I sought solutions to a car for which he had no listings. We tried several aftermarket ignition switches, but the first few were physically too large to fit within the minuscule dash pod. Finally, he found a switch that fit. He got to know me, and came to be of great assistance on several other small universal parts I needed.
The seat as found
The seat had been sent out to a local upholstery shop. Here, I purposely deviated from original, as American-market Isettas used a patterned vinyl upholstery, and I did not want to sit on vinyl. Instead, I chose a beige corduroy with off-white piping. The beige seat came close to matching the beige fabric sunroof, and since I always like red & beige on Ferraris, I thought “why not?”
Back from the upholstery shop
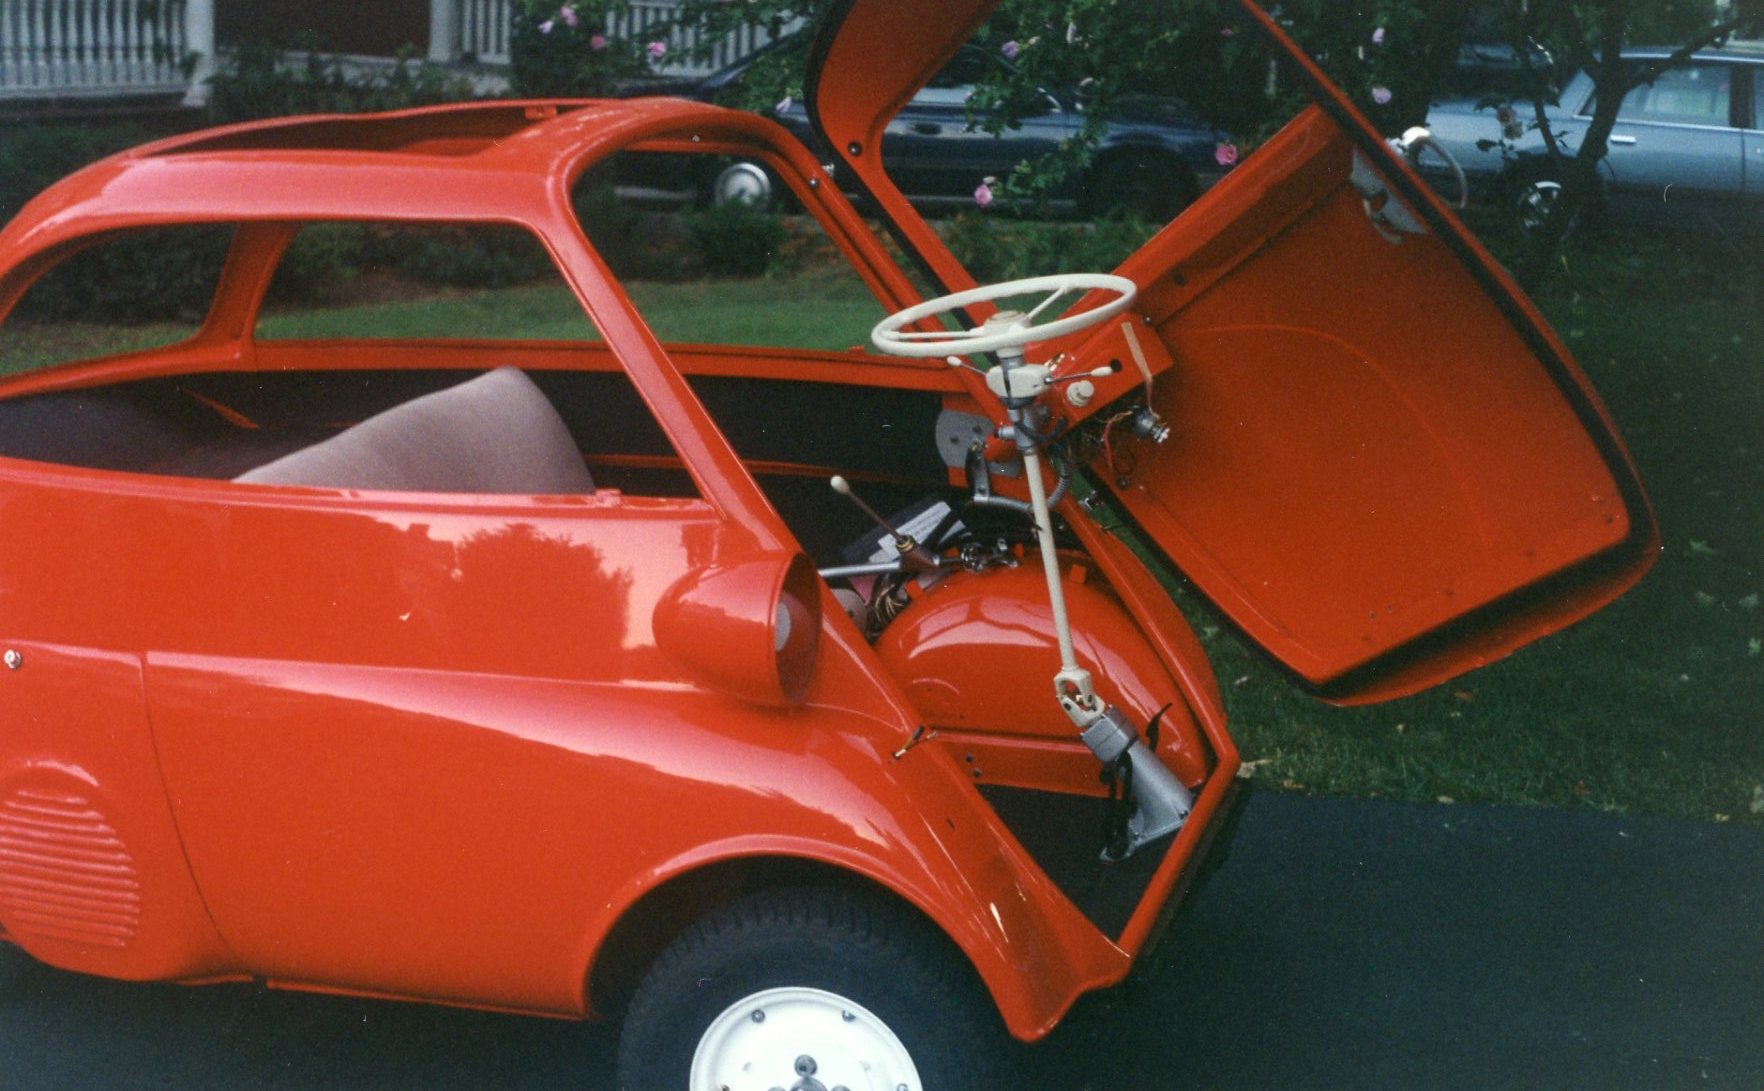
The steering wheel, column, dashboard, and pedals are a major subassembly unto themselves, and these were bolted into place, with pedals connected to the undercar linkages. To the left of the steering wheel, the shifter was joined to the rear-mounted transmission. Once I readjusted the clutch, I was able to shift into all four forward gears and reverse gear.
Ready for the seat (towels protect inner fender paint)
All the work recounted here took two weeks, bringing me to Labor Day weekend. That Sunday night, September 3, 1995, I discovered that the car’s battery was flat from sitting. I put it on trickle charge overnight. The next day was Labor Day. In the morning, I would attempt to start the Isetta, put it into gear, and be behind the wheel when it would move under its own power for the first time under my 17 years of ownership.
During the restoration of the Isetta, a frequent question presented to me was “what motivates you to keep going?” Of course, I wanted to see the project reach a successful conclusion, but setbacks, and there were a few, can be demotivating. There were times I questioned my own sanity, as in, “why am I spending so much time, money and effort to restore a 13-horsepower bubble car from the 1950s that most people have never heard of?” With everyday life (job, family, house) swirling around me, I was occasionally tempted to quit the whole deal.
One of my mantras during this 5+ year stretch was “celebrate your successes”. Reaching certain milestones not only feels great, but the achievement can be shared with others, which then inspires you to keep moving forward.
In August of 1995, I was ready for such a celebration: the Isetta body shell, freshly painted and just back from “The Shop”, was about to be reunited with the mechanically-restored chassis. In a traditional automobile assembly plant, the moment of “marrying” the up-until-then separate body and chassis is called the marriage point. So, in honor of that event’s facsimile, we decided to host a wedding. Before, um, consummating this union, since the shiny and clean chassis was about to be covered up again, a final set of photographs was taken to document its return to as-new glory.
The wedding was scheduled for Sunday, August 20, 1995, and since a wedding must have guests, a small ensemble was invited. (Memory doesn’t recall whether any of the invitees were tipped off that there was work to be done before food and beverages would be served.) The chassis was staged in the driveway just beyond the garage doors, with the body patiently hanging out in the garage on four jack stands.
Five intrepid groomspeople (Chris Beyer, John Maggio, Dennis & Ann Marie Nash, and Don Dahringer) vaulted the body back into the daylight. Spotters were assigned to eyeball the body’s descent so that nothing was injured. It took a few moments to clear all the obstacles, but the (re)union was a success.
A video camera (thanks, John) was rolling to capture the event. You can view a 12-minute excerpt at this YouTube clip here:
Whew! My nervous excitement is palatable to me as I watch myself nervously pace back and forth and around the car. In all seriousness, having a group of friends around me helped alleviate my worries. Once I knew the body shell was resting on the chassis rails, we popped the champagne, ate some BBQ, and of course, shared dessert in the form of a wedding cake:
The end of the push to make “The Isetta Drive in ‘95” was close, really, truly close. The steering, pedals, wiring harness, ignition, and seat all needed to be installed and connected. The motivation was the knowledge that I was perhaps a few short weeks away from driving my Isetta for the first time since buying it as a disassembled heap in 1978.
It almost looks ready to drive. Almost.
(Special thanks to my Creative Team pals Cody, Eslam, and Greg for their video-editing assistance. You guys are the DUDES.)
Jody Fitzpatrick, proprietor of “The Shop” in Maplewood NJ, had my Isetta in his possession for one day shy of five weeks. His work was completed, done, finished. I breathed a huge sigh of relief if only for his ability to accurately predict his work timeline, originally estimated at “3 to 4 weeks”. This was close enough. There wouldn’t be any restoration shop horror stories in my future.
Chris Beyer, work colleague, neighbor, and friend, had accompanied me when I dropped off the Isetta body. When I told him that it was ready for pick-up, he was ready and willing to join me again.
The date was Friday July 28, 1995. Nothing in my notes or my memory explains how Chris and I both happened to be off from work that day; but we were. It was a sweltering humid day, hotter than the previous days had been during what was already an oppressive summer. Cranking the A/C in my Volvo 850 wagon did little help; nothing was going to cool me enough to dissipate my nervous excitement over seeing the painted shell.
Jody’s 2nd and final statement
At our arrival, Jody strolled out to greet us, looking and acting nonchalant. “How come HE’S so cool?” I asked no one. Perhaps because he does this every day, and, it’s not his car, and, he just wants to get paid, replied the voice in my head. The body shell, of course, looked perfect, almost too much so. I was afraid to touch it, but with Jody and Chris’s help, we got the same 2x4s bolted back to its underside, and then to the trailer floor.
The red 850, ready to tow home the red Isetta (note dolly and plywood in lower right of photo)
From ugly duckling to gorgeous swan (obviously, beauty is in the eye of the beholder)
Chris and I pose in parking lot of The Shop
Jody got his check, I got my receipt and my obligatory photos, and we were on our way. I must have glanced in the rear view mirror about every 12 seconds to make sure the body was still there. At a red light on the way home, several male teens yelled out “hey, it’s the Urkel-mobile!” Oh My God, I thought, am I going to be hearing this for the duration of my ownership of this thing? (The short answer to that question is “yes”.)
Back home after a 5-week vacation
Soon to be reunited
Leaving the 2x4s in place for now, we carried the body into the garage, and back onto my makeshift dolly. I posed it next to the completed chassis, fully aware that in a few days, five years of mechanical work would be covered forever (or at least until the car is re-restored in 2095).
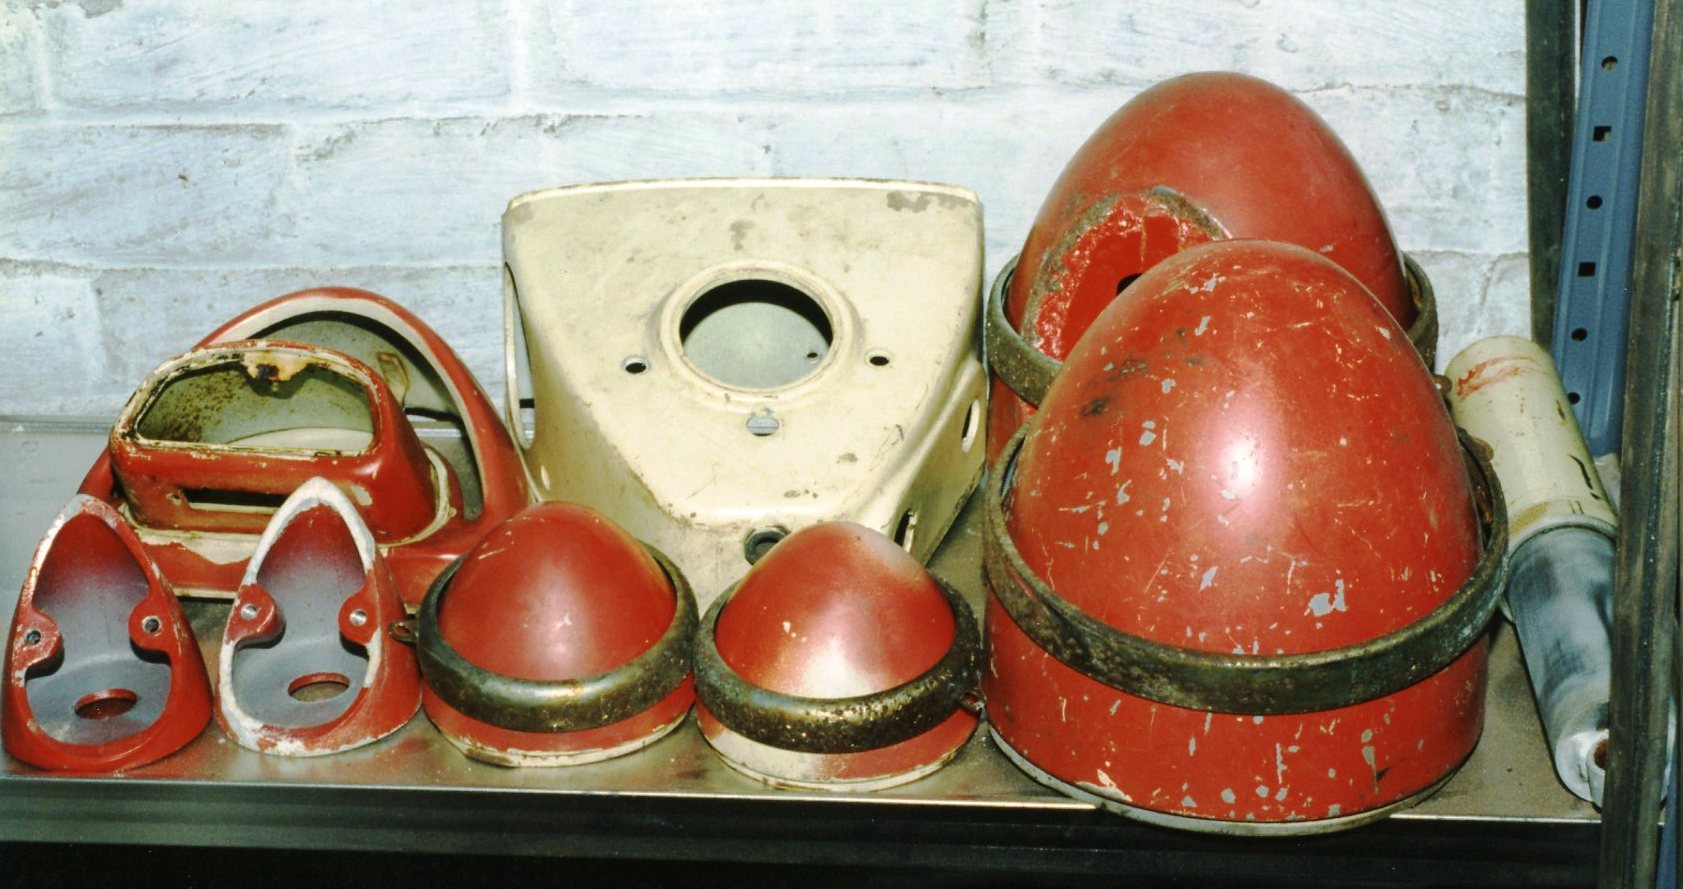
Light buckets and other externals at the ready
What work was remaining before reuniting the body and chassis? The body’s hand-painted underside now had primer overspray on it, so that got yet another coat of gloss red. The headlight and tail light buckets were bolted on. The fuel tank, which had earlier been restored by coating it with Bill Hirsch’s GasTank Sealer, was secured in place. The 2x4s were finally removed, and the body was placed onto 4 jack stands.
Gas tank bolted into place (note fuel tap in upper left)
In an auto assembly plant, the moment when the car’s body, on one conveyor, is lowered onto a complete chassis, arriving on another conveyor, is called “the marriage point”. The Isetta’s 17-year courtship was coming to an end. It was time to host a wedding party and consummate this marriage.
Jody Fitzpatrick, proprietor of “The Shop” in Maplewood NJ, was my choice to oversee the body restoration of the Isetta for many reasons: he was personally recommended, the business was nearby my residence, his pricing was fair, we had a mutual understanding of what “done” looked like, and his estimated timeframe was reasonable. Another reason is that Jody assured me that I could visit and observe the progress whenever I desired (sort of like conjugal visits for the incarcerated).
Having read more than one “restoration shop horror story” (the car gets pushed to the back, 6 months pass with no progress, the shop demands more upfront money, they lose your car keys, or worst, they close the business and lock the doors with your car inside), having visitation rights was refreshing.
So visit I did.
Three times during that hot July of 1995, I stopped in to have a peek and to snap a few snaps. Jody was always very accommodating and genuinely happy to see me, and gave me free rein to walk around my car and chat up the crew doing the actual labor.
During the first visit, employees were using homemade scrapers to remove the paint. They had decided against chemical dipping or media blasting, fearful of inflicting further damage. They also hammered out any dents and other rough spots, in preparation for some minor welding and an eventual skim coat of putty in spots. (From my own research, I had come to learn that any talk of body repair that doesn’t involve some small use of plastic filler is fantasy.)
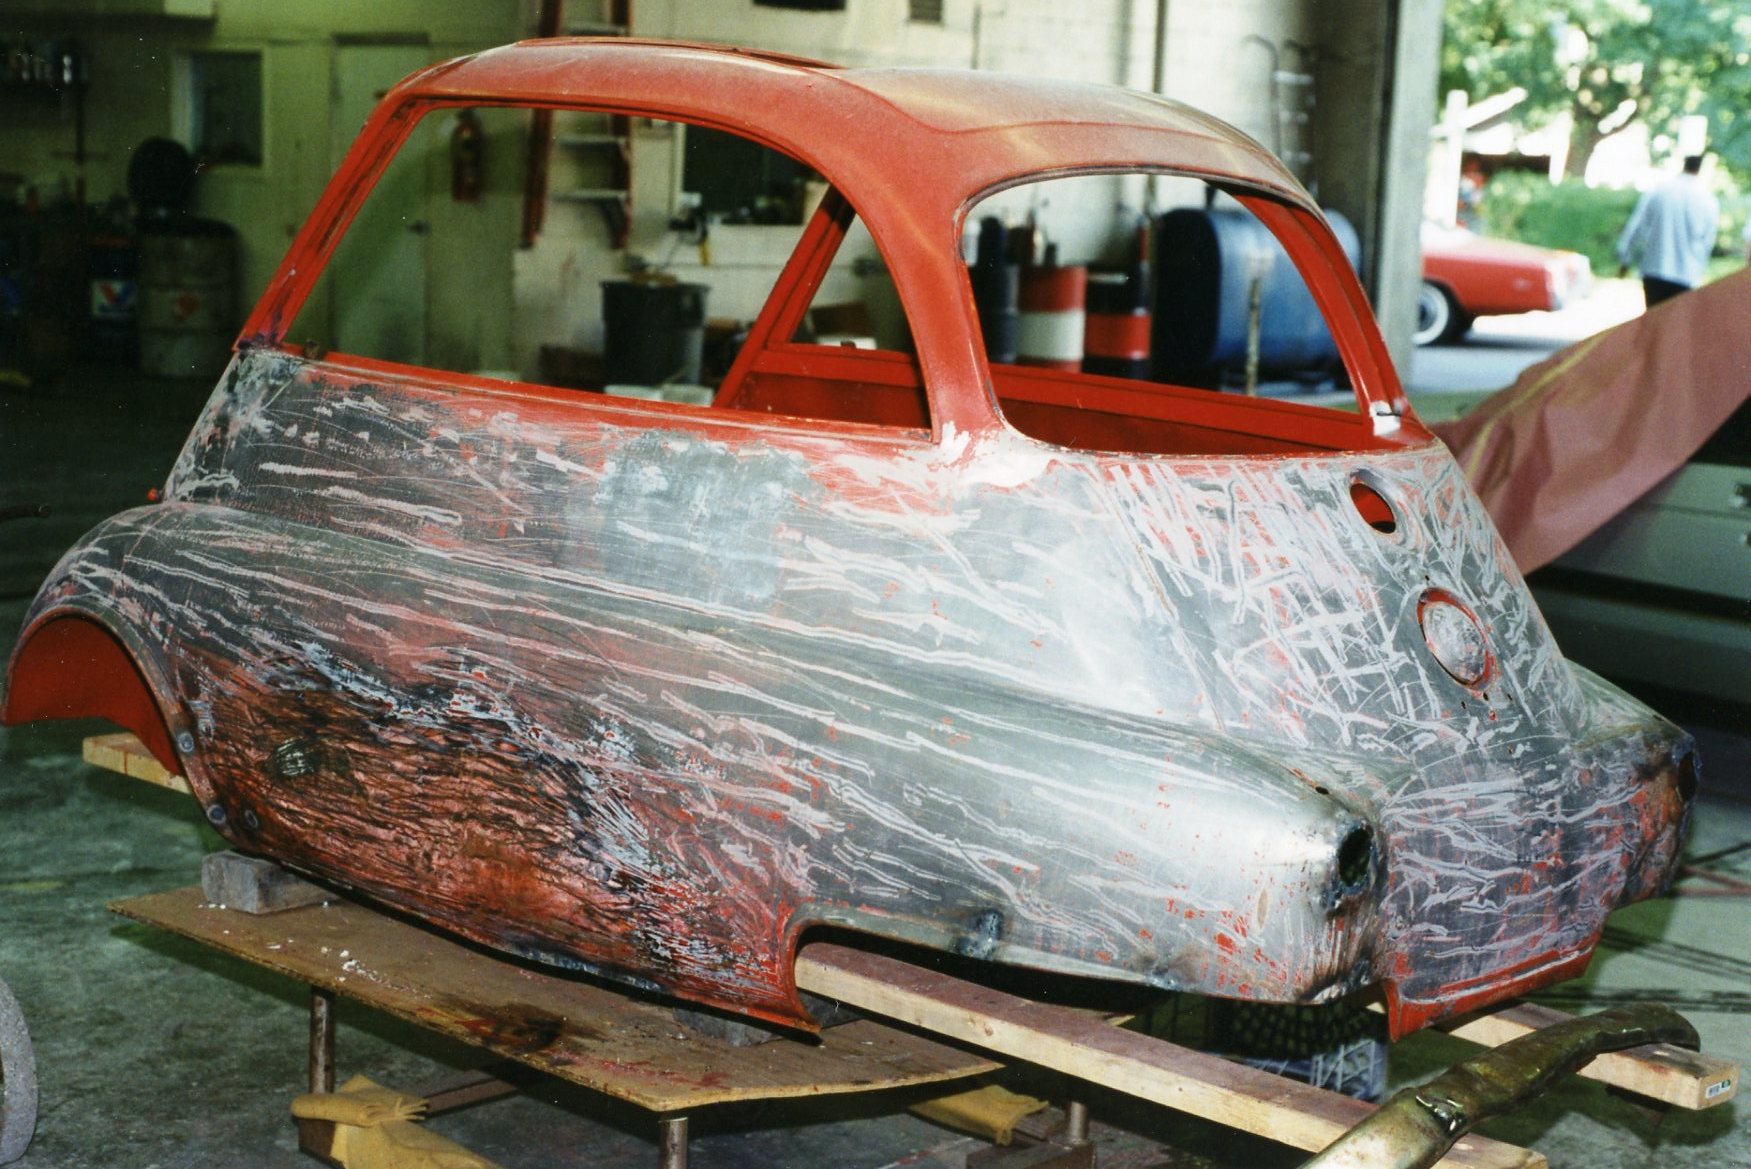
THE SHELL IN THE PROCESS OF PAINT BEING REMOVED:
During this visit, Jody and I also finalized the choice of paint color. There was no known “official 1957 BMW Isetta paint code chart” we could refer to, so we did the next best thing. Sampling the unfaded paint we found under the BMW roundel on the door, we matched that to the closest shade among the modern paint code charts in Jody’s possession. We both agreed that the 1995 Ford Mustang shade of “Performance Red” was it. Jody stressed another advantage: should the car need touch-up or repair in the future, the correct paint would be readily available.
Just a week later, I saw the body with all the original paint gone, and the metal work beginning. I had given Jody a recommendation from John Jensen’s Isetta Restoration book for a method to reinforce the rearmost body panel at the tail lights and rear bumper. This section of the shell was not directly attached to the chassis, and was a known weak spot. Jody stated he would use the printed suggestion to add some additional metal in places.
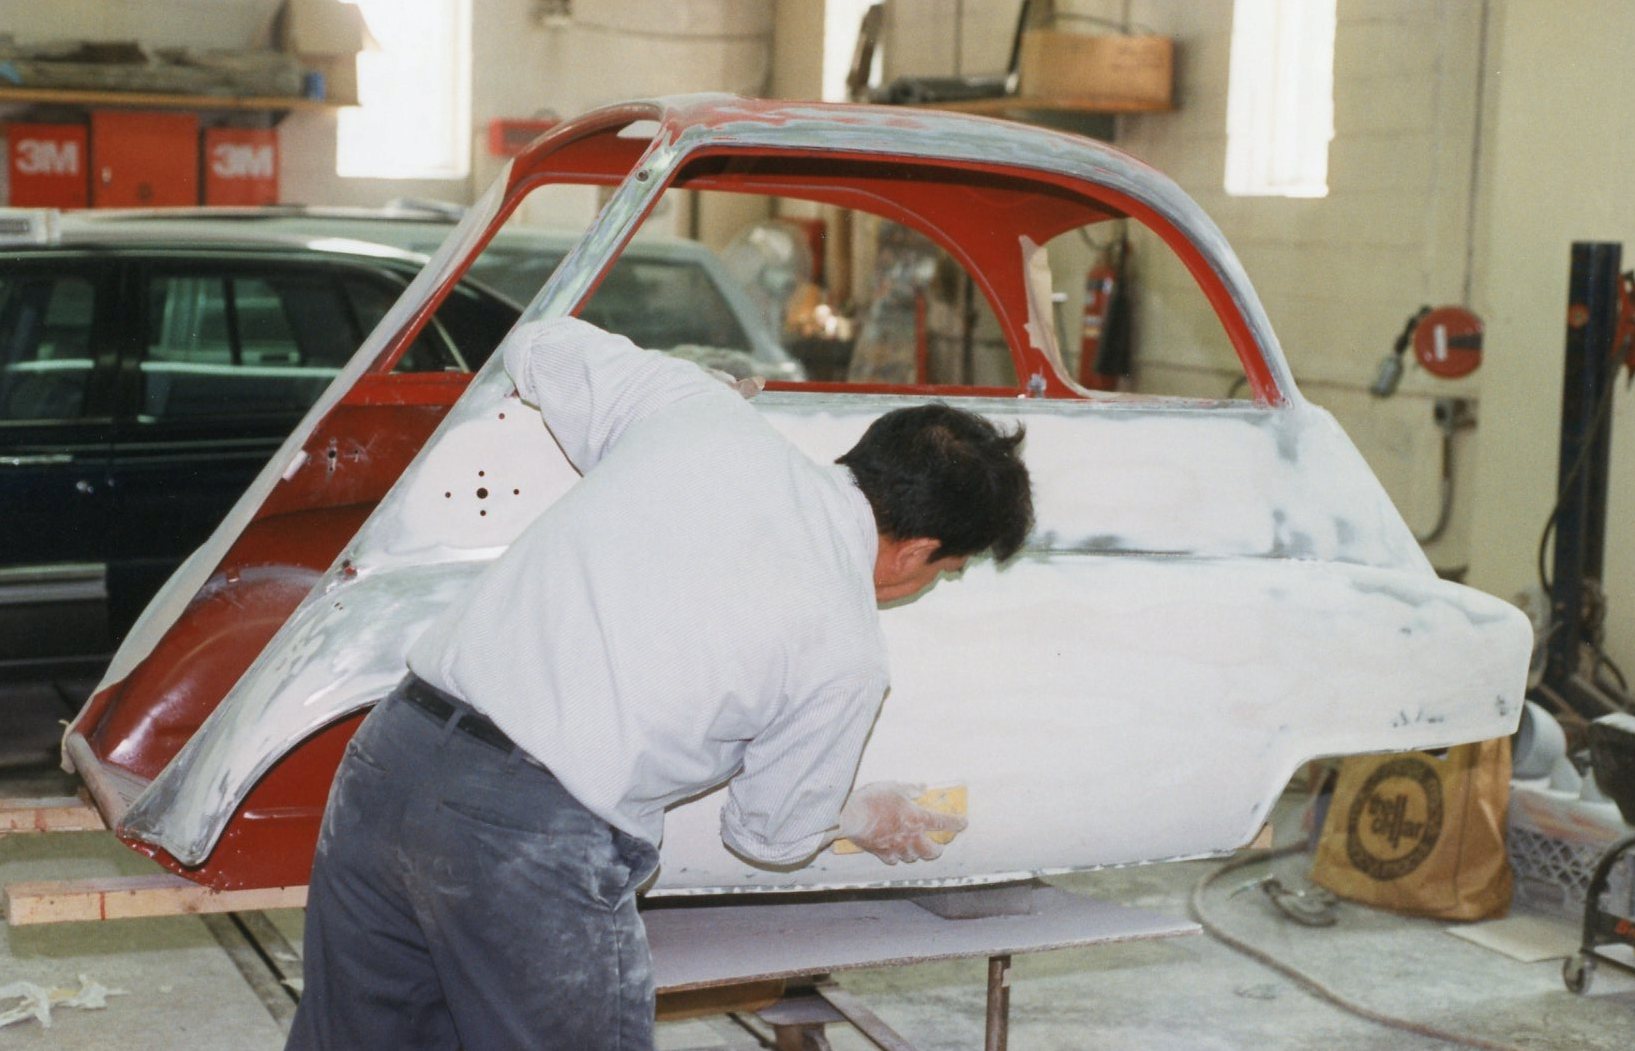
HAND-SANDING THE FILLER AND THE GUIDE COAT:
During this 2nd visit, I pointed out a number of drilled holes which needed to be filled. These included where the dealer-installed mud flaps and luggage rack had been, neither of which were to be reinstalled. (I would later discover one which I missed, requiring the purchase of a somewhat pricey accessory in order to cover it!) Jody’s suggestion of grinding down the visible factory welds at the body panel joints was rejected by me, as I had every desire to keep to an original look.
Like a proud papa, I posed alongside the work-in-progress:
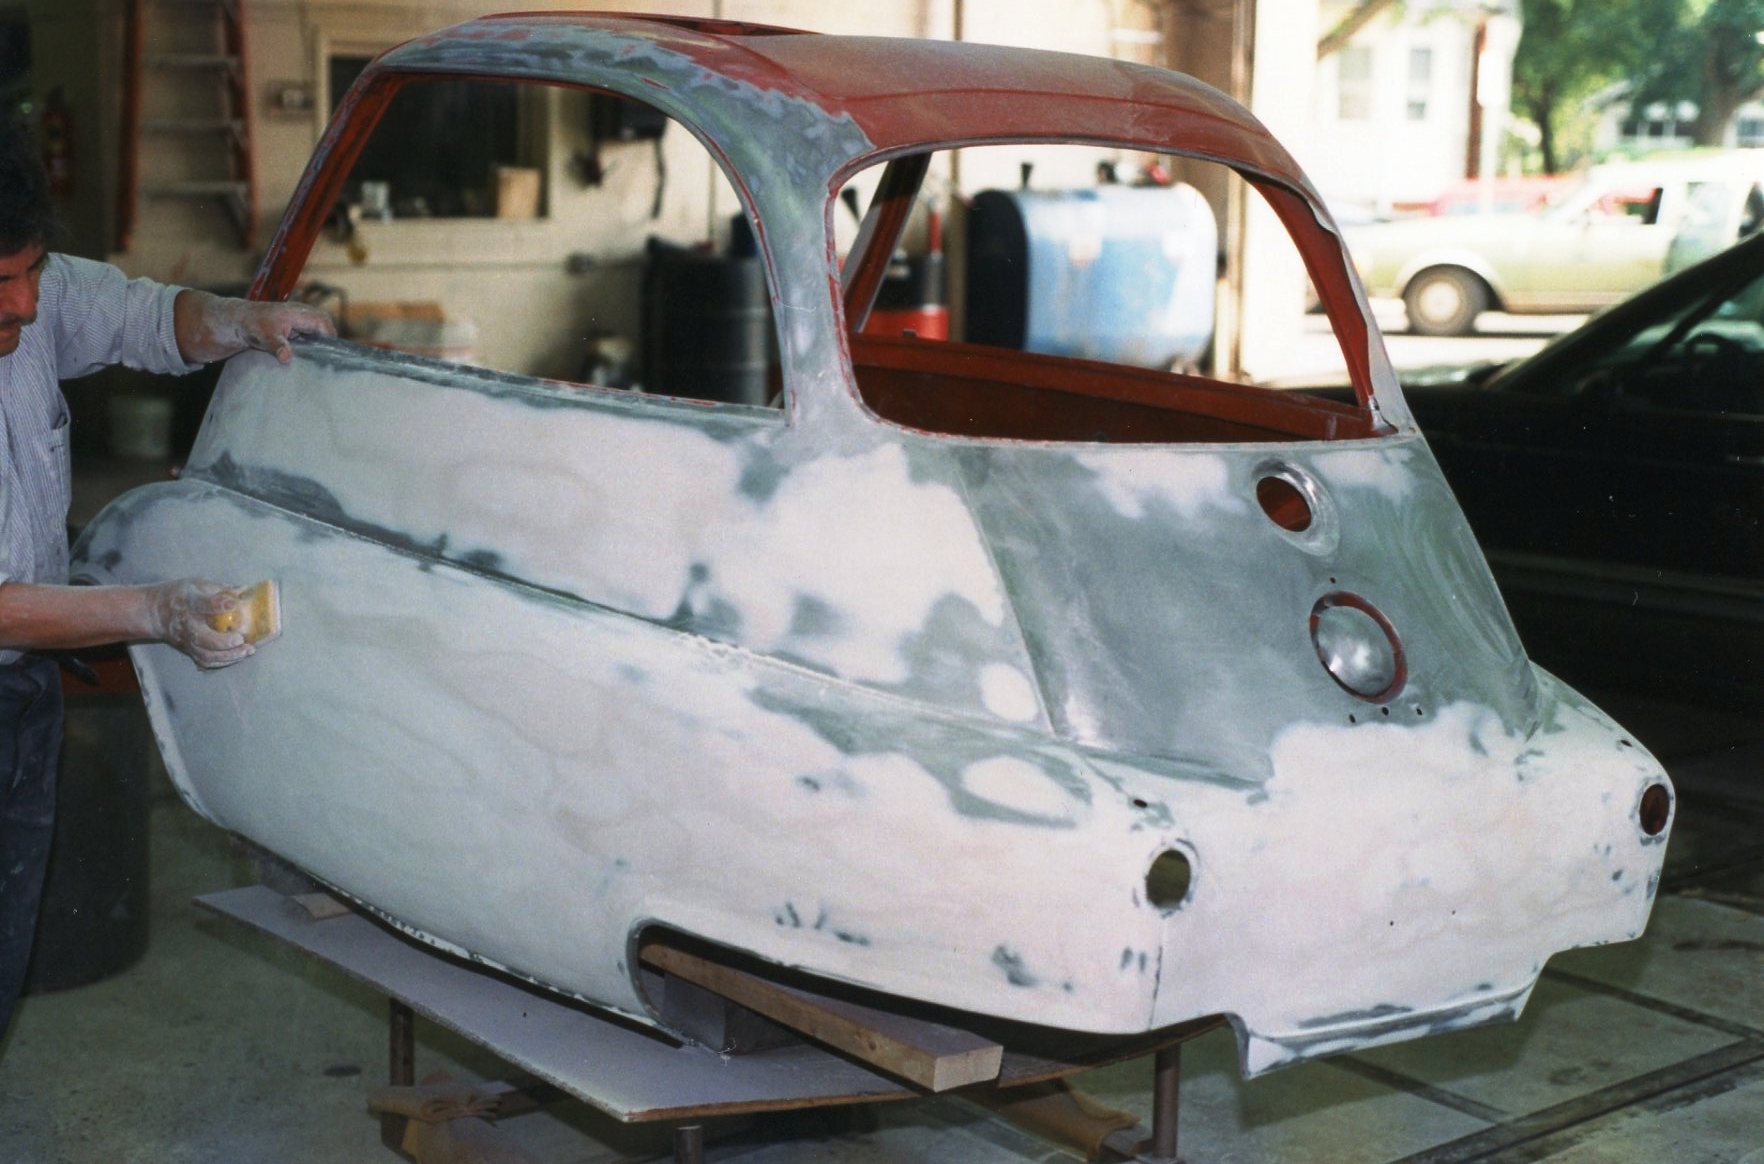
The third visit found the body in full primer. With the metal work done and its flanks as smooth as new, it was not difficult to visualize a freshly painted body shell. Jody had the door and all the other exterior pieces at The Shop, but he also generously offered to hang and align the door for me, something that was not part of our initial negotiation. I brought the freshly-plated door hinges with me so that he could do just that.
THE BODY IN FULL PRIMER, JUST PRIOR TO COLOR COAT:
Perhaps the most exciting aspect was that the work was closely adhering to the originally estimated timeframe. Jody said that it might take a week longer than he hoped, but everything looked to be on track for a final pick-up by the end of July. And there were no “pricing surprises” either. Jody had gotten a $2,000 down payment upon drop-off, and he said that all I owed him at completion was the $2,000 balance plus NJ state sales tax.
A few days later I got the call. “It’s ready whenever you are.” That Saturday, I hooked up the trailer to the car and grabbed my checkbook. We were on our way.
Happy New Year! The most recent posting of the Isetta Saga was Chapter 13, way back in May 2018 (it was a busy summer and fall). It’s time to resume the Saga, with intentions to post subsequent chapters more consistently through the winter months.
Chapter 13 ended on a high note: I had found a somewhat local body repair place in Maplewood NJ, “The Shop”, run by Jody Fitzpatrick, who agreed to take on the job. Jody and I had a verbal agreement that for $4,000 in materials and labor, he would perform all needed metal repair work, plus prime and paint the exterior and interior using a single stage paint. (He offered to clear coat it, but I declined, wanting to keep to the factory appearance.)
Notably, for that price he would NOT paint the underside, and his interior work would be limited to paint only. He would perform no metal prep to the interior (and it really didn’t need it), nor would he cut and buff the interior paint.
He suggested that my prep of the shell should include removing all glass, sunroof, and trim; removing the existing “tar paper” soundproofing; priming the interior panels; and painting the underside with whatever top coat color I chose.
Jody estimated that this body and paint work would take about three to four weeks. If I got the shell to him in June, I’d have it back sometime in July, giving me all of August and September to complete the reassembly of the car. In the grand scheme of things, I envisioned an “Isetta Party” for some time in the autumn. There was a lot to do, but it seemed within reach.
Stripping the body of its mechanical and trim pieces was straightforward. I had had practice with the two other body shells which got similar treatment through the years. Out came all the glass, followed by the bumpers, headlight and tail light buckets, and steering wheel & column. Then the wiring harness was removed as a complete assembly, taking care to tag as many of the terminal connections as possible.
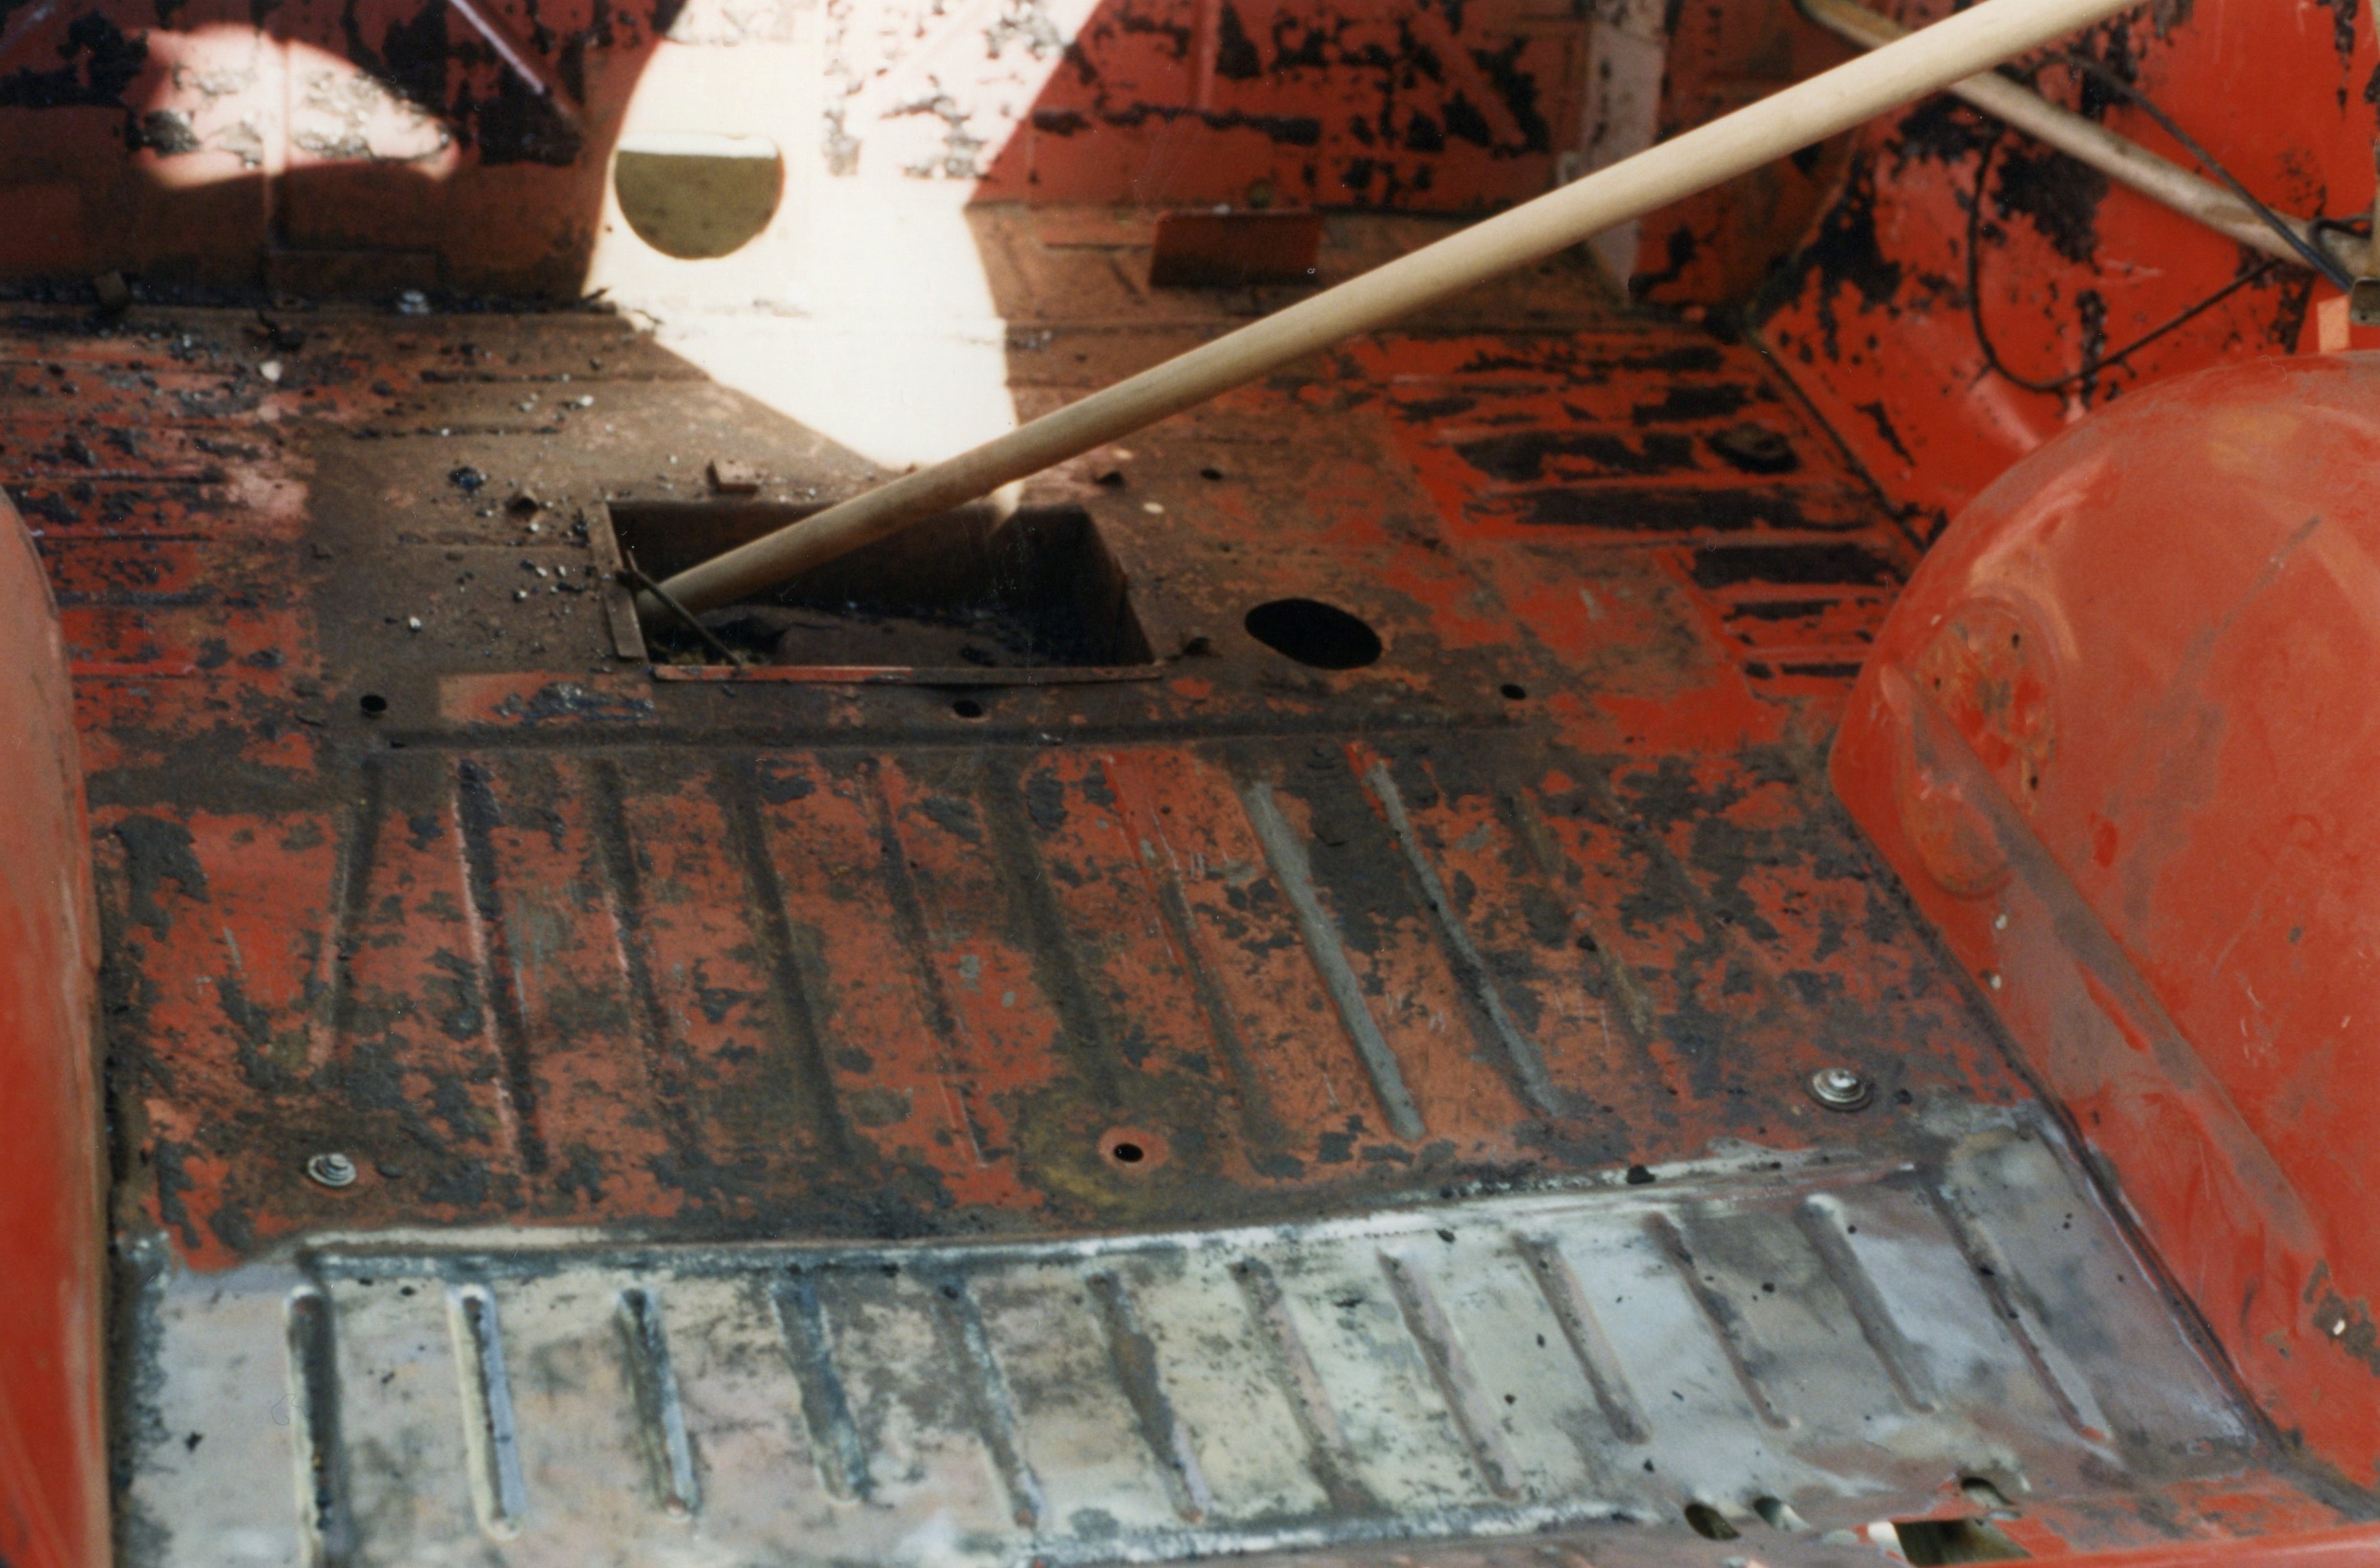
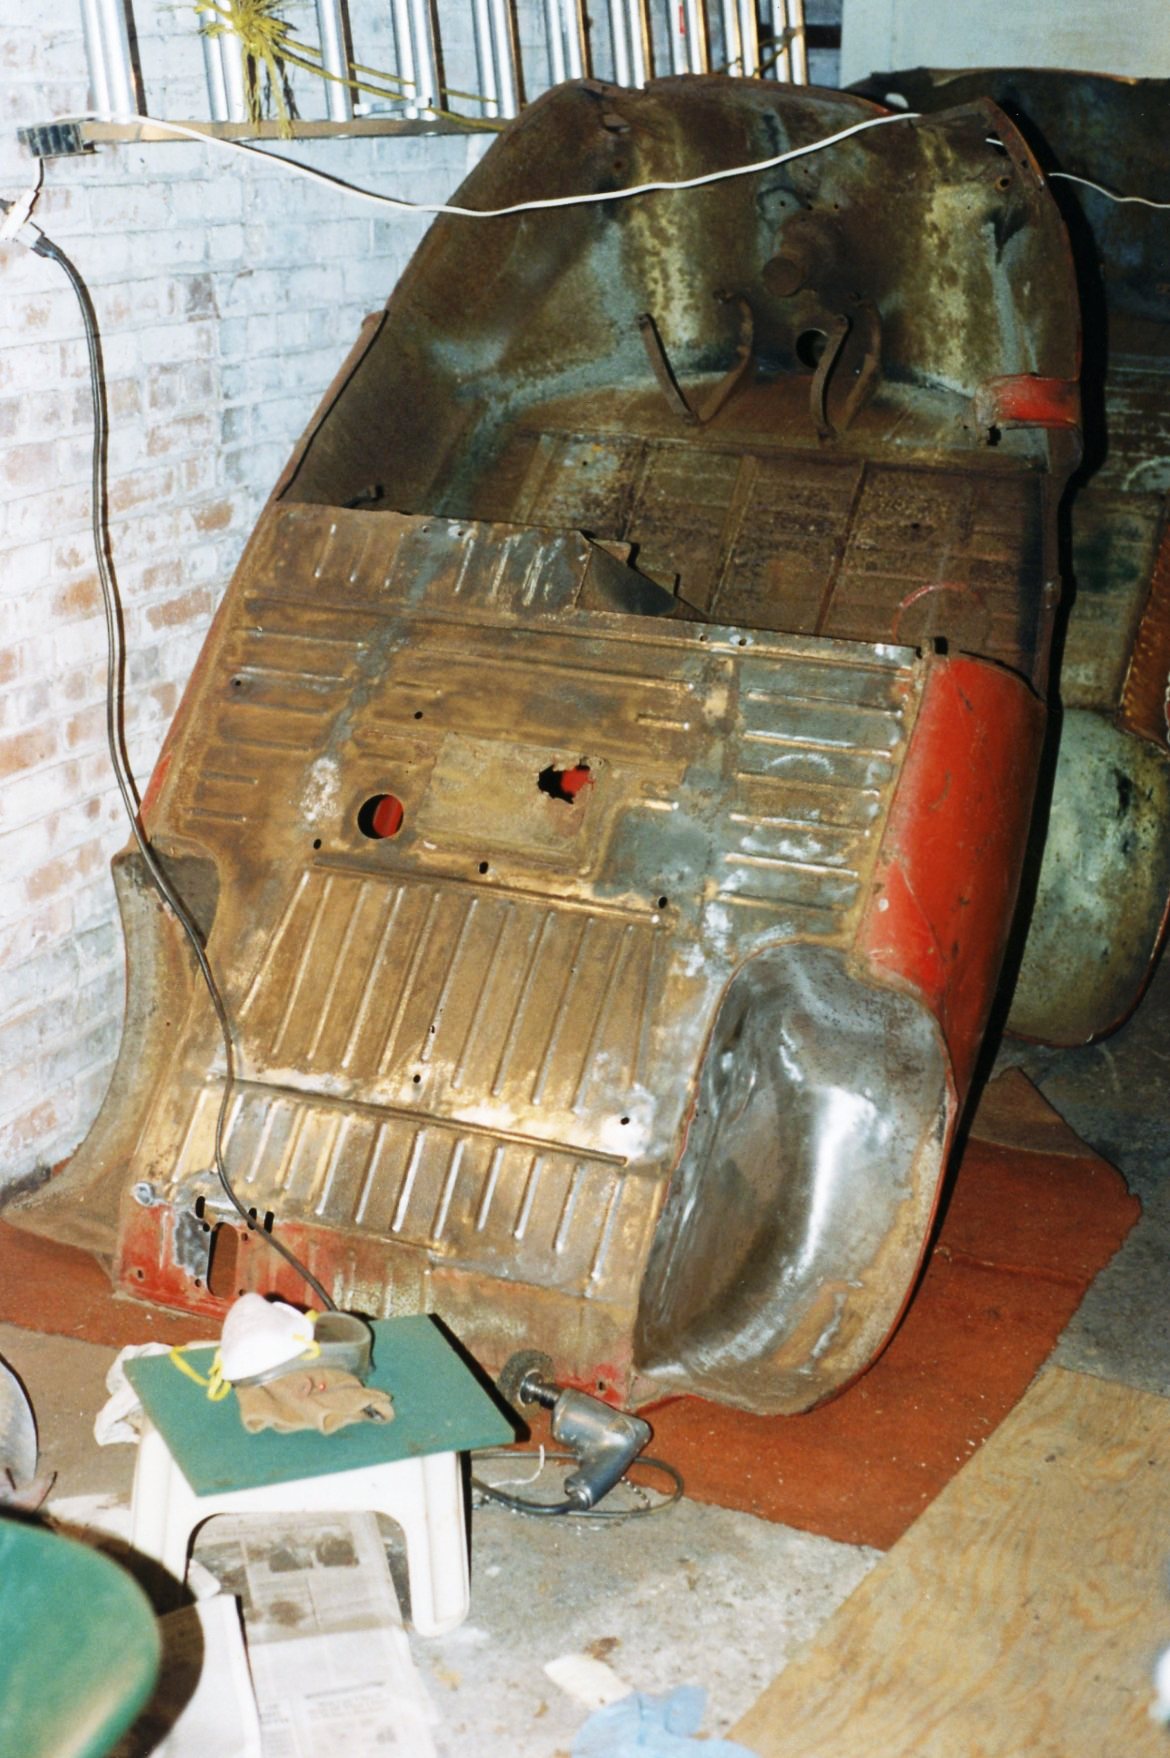
The interior was tackled next. The heavy black tar paper lining the inside of the shell was certainly original. The 38-year-old glue gave me a fight, and I fought back using a heat gun, a putty knife, and lots of grunt work. The final bits were broken loose using a wire brush chucked into my trusty Black & Decker electric drill. Given the age of the car, I went so far as to remove the paint from the floor and wheel wells, so that fresh paint could be applied to bare metal.
Floor in process of being stripped; broomstick holds door open.
The only rust-through in the entire body was a hole in the battery box (as the lowest part of the interior, any water which leaked in was going to settle there.) Since this wasn’t an appearance concern, and I’m no body man, the fix was a thick piece of sheet metal stock, bent to shape, glued and riveted into place from the inside. This was done as opposed to covering the hole from the outside in order to provide support for the battery.
Sheet metal repairs done while you wait
Once the inside was stripped down to bare metal, the body was tipped up onto its door opening (door removed of course), which provided full access to the underside. I’m not sure how the factory finished off the bottom of the body (if they did at all), but I faced a floorpan completely covered with old paint and surface rust. Like the interior, the underside was brought down to bare metal with wire brushes mounted in an electric drill; tedious work, to state the obvious.
James Nanry, having assisted with body tilts, poses with his accomplishments
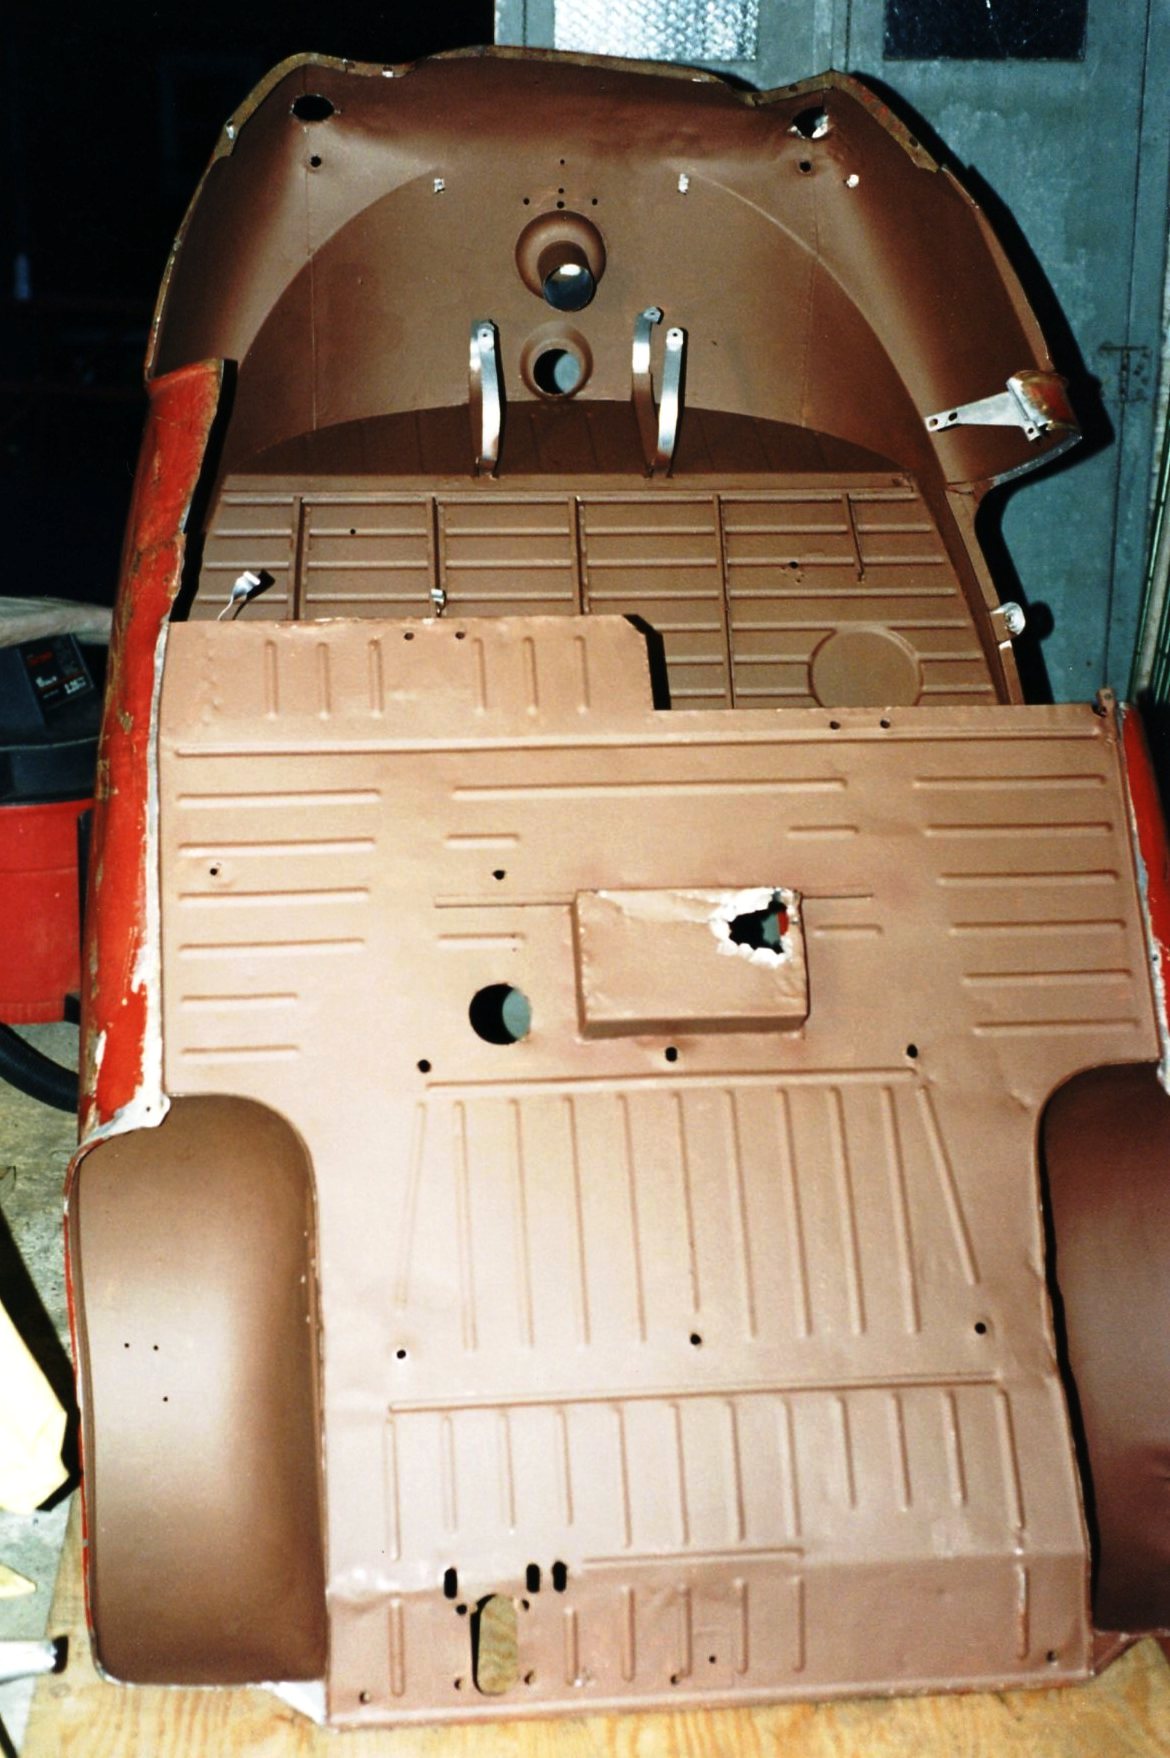
I decided on a multi-coat approach to provide maximum protection for the sheetmetal. Certainly the car was not going to be driven in inclement weather, but there would still be times when it would be outside in damp and humid conditions.
Midway through the messy job of stripping the underside
First coat: Bill Hirsch zinc paint prep/converter, to neutralize any remaining rust, and to help convert the surface to accept the paint:
Extraneous parts were delivered along with the body
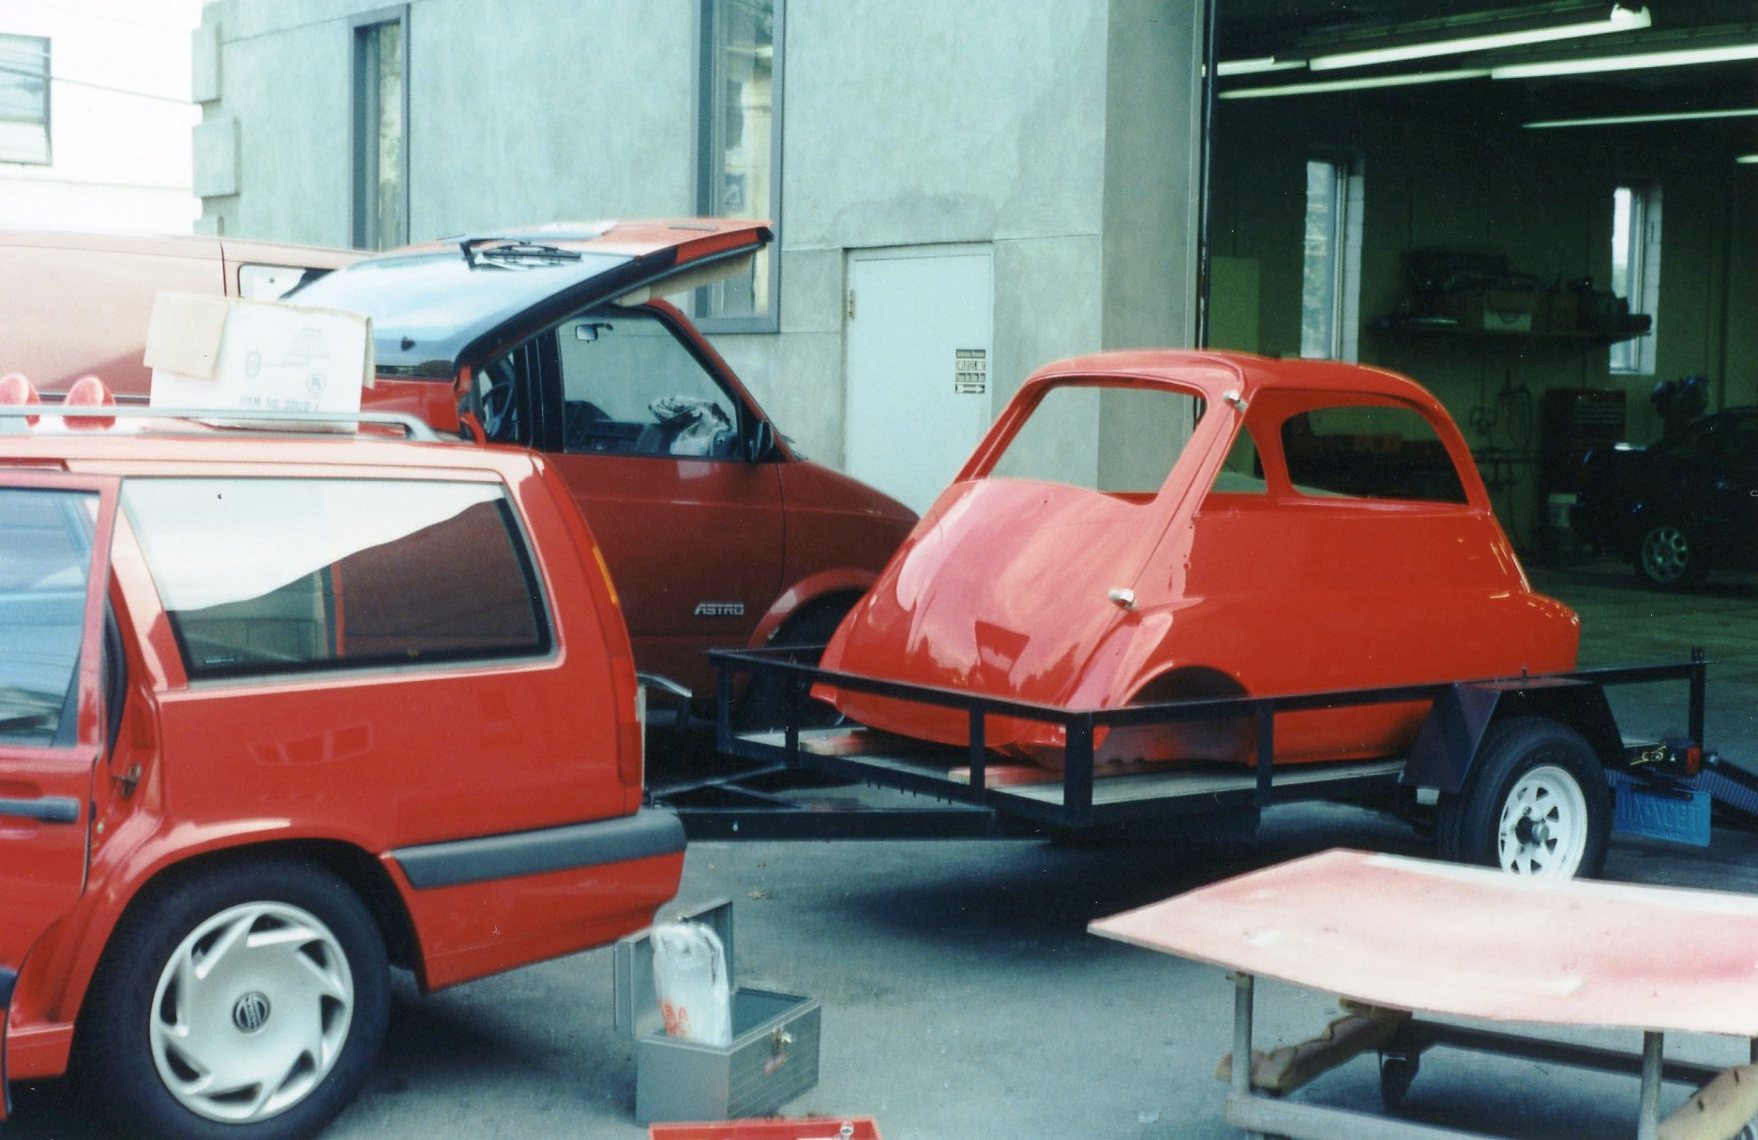
The body (along with the door, headlight buckets, engine cover, and instrument panel, all to be painted the same red) was ready to head to “The Shop”. I bought two 2x4s, glued strips of carpet to them, and bolted them to the underside of the shell using existing mounting holes. I then bolted the 2x4s to the wooden floor of my trailer. It was secure. Photos document my dear departed friend Chris Beyer who so graciously and generously accompanied me that day.
Chris shows off red paint
and 2x4s bolted to body
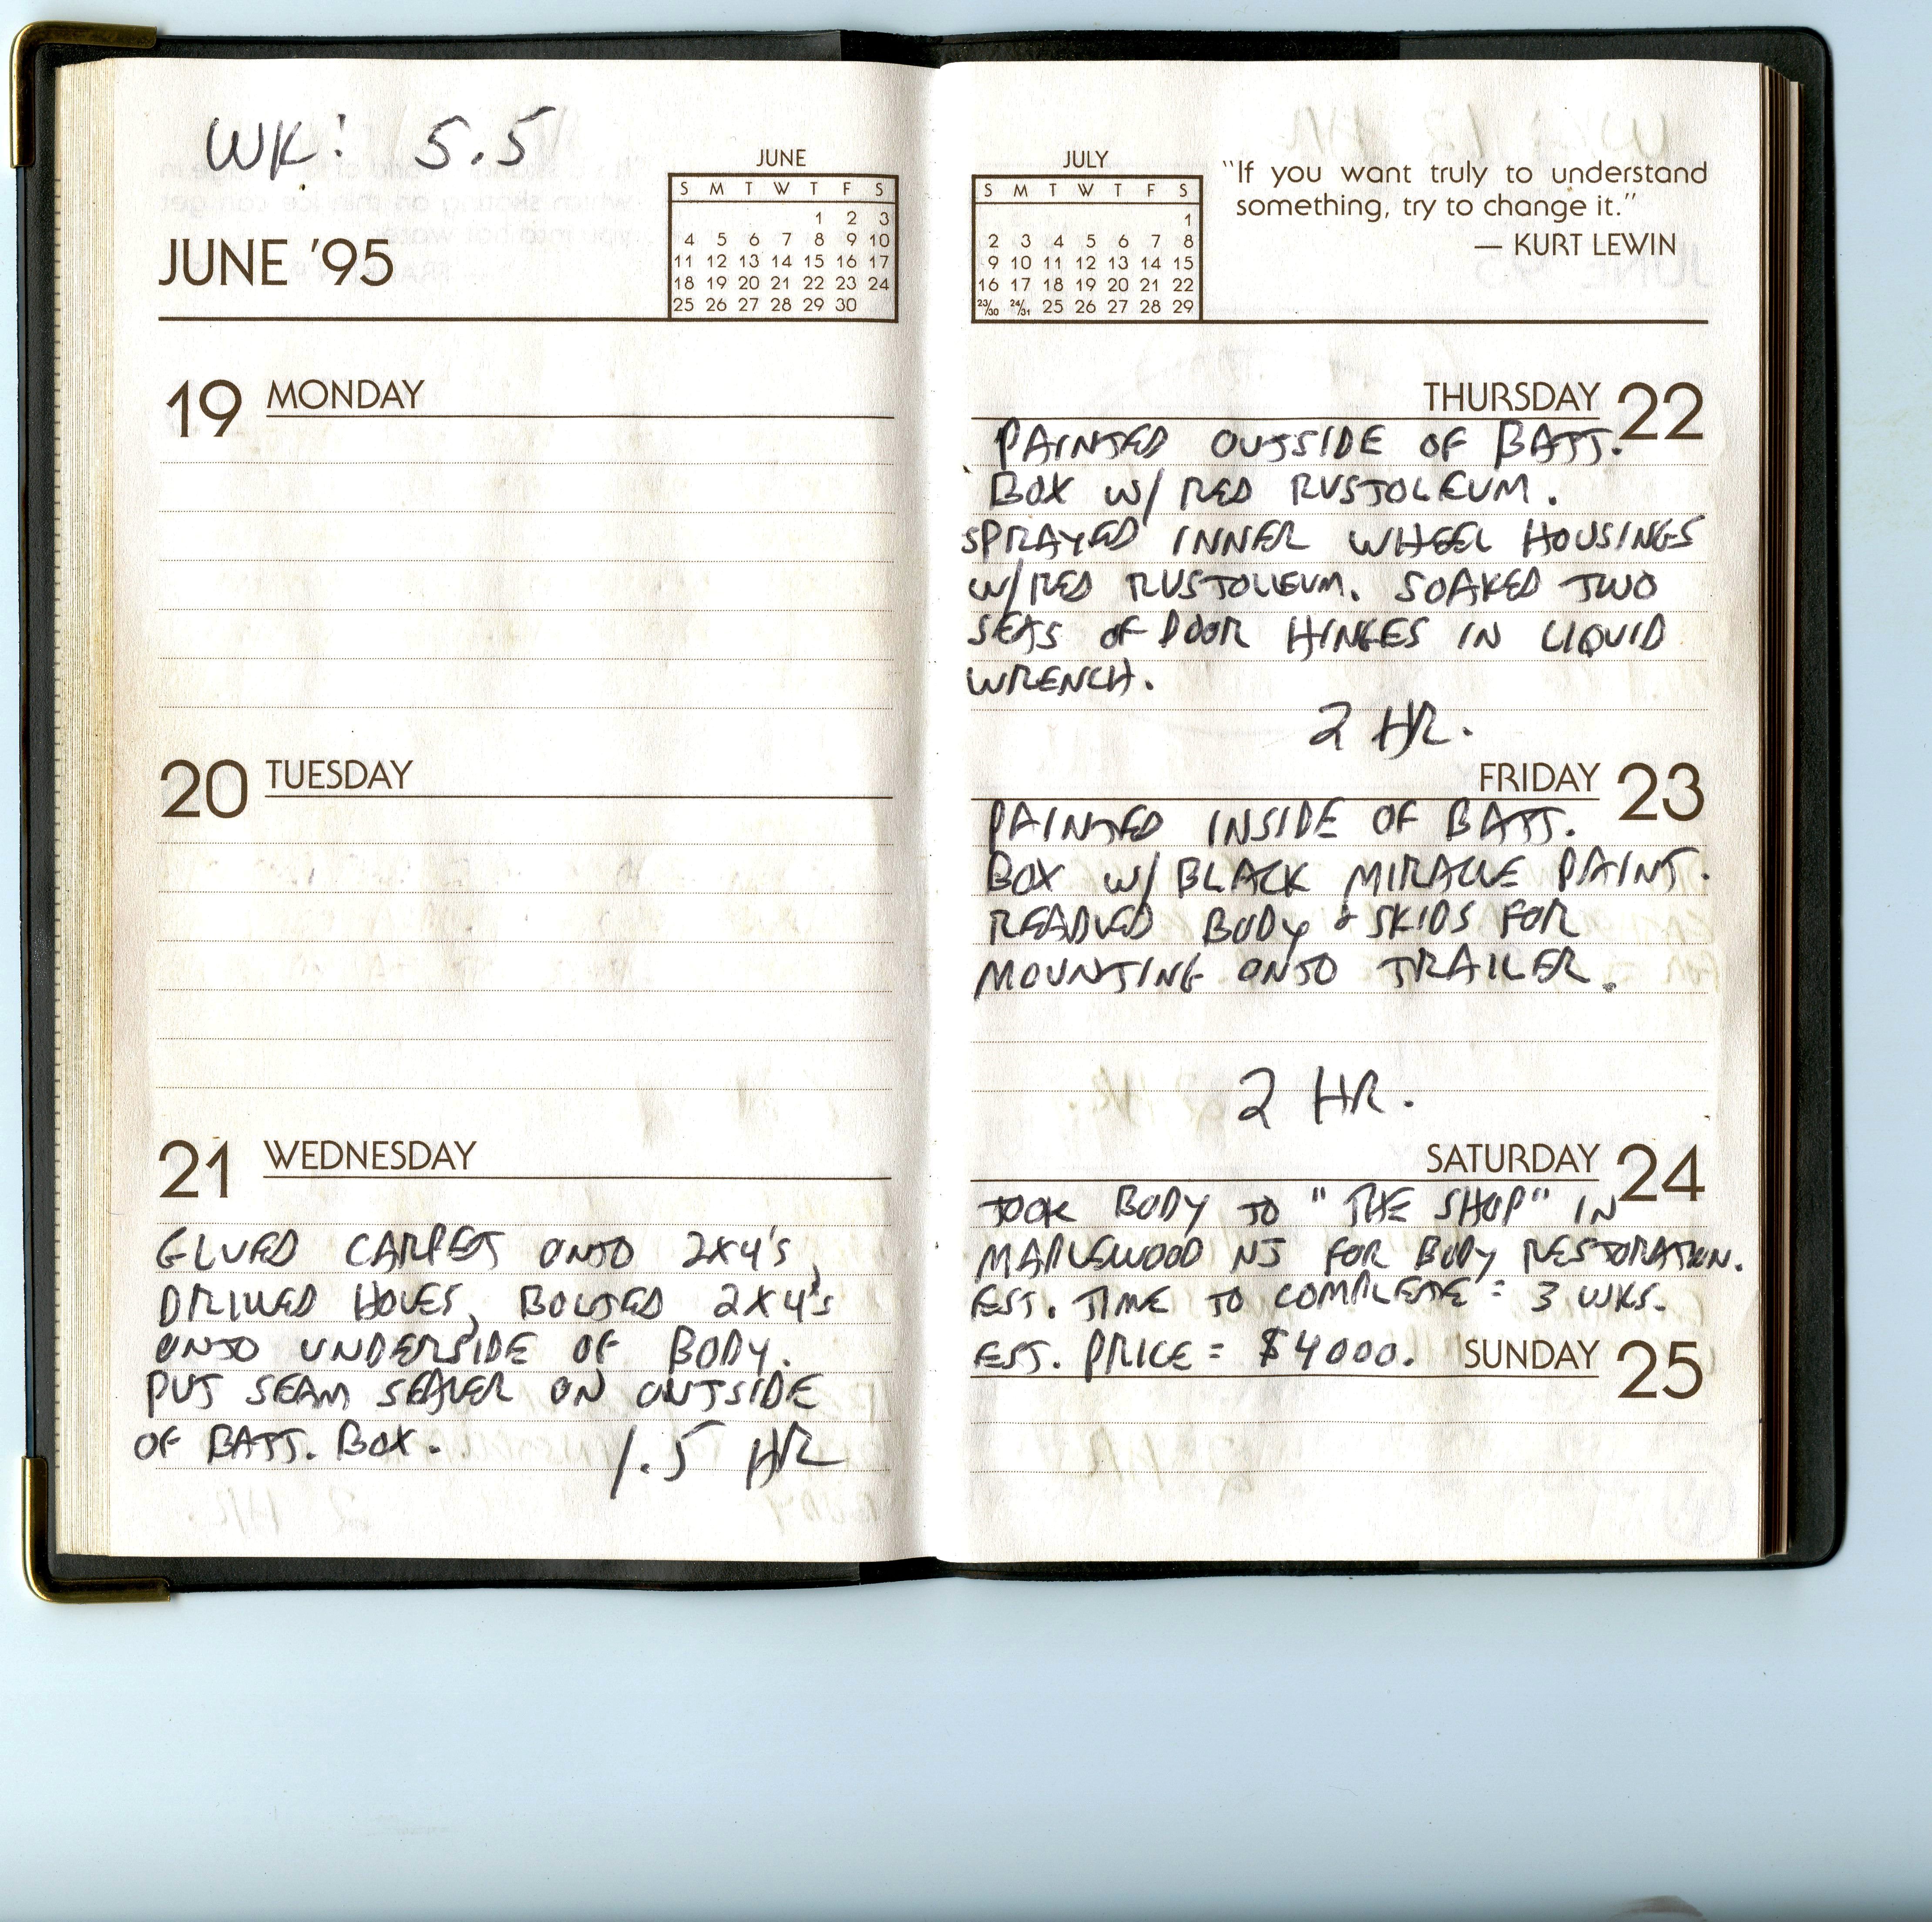
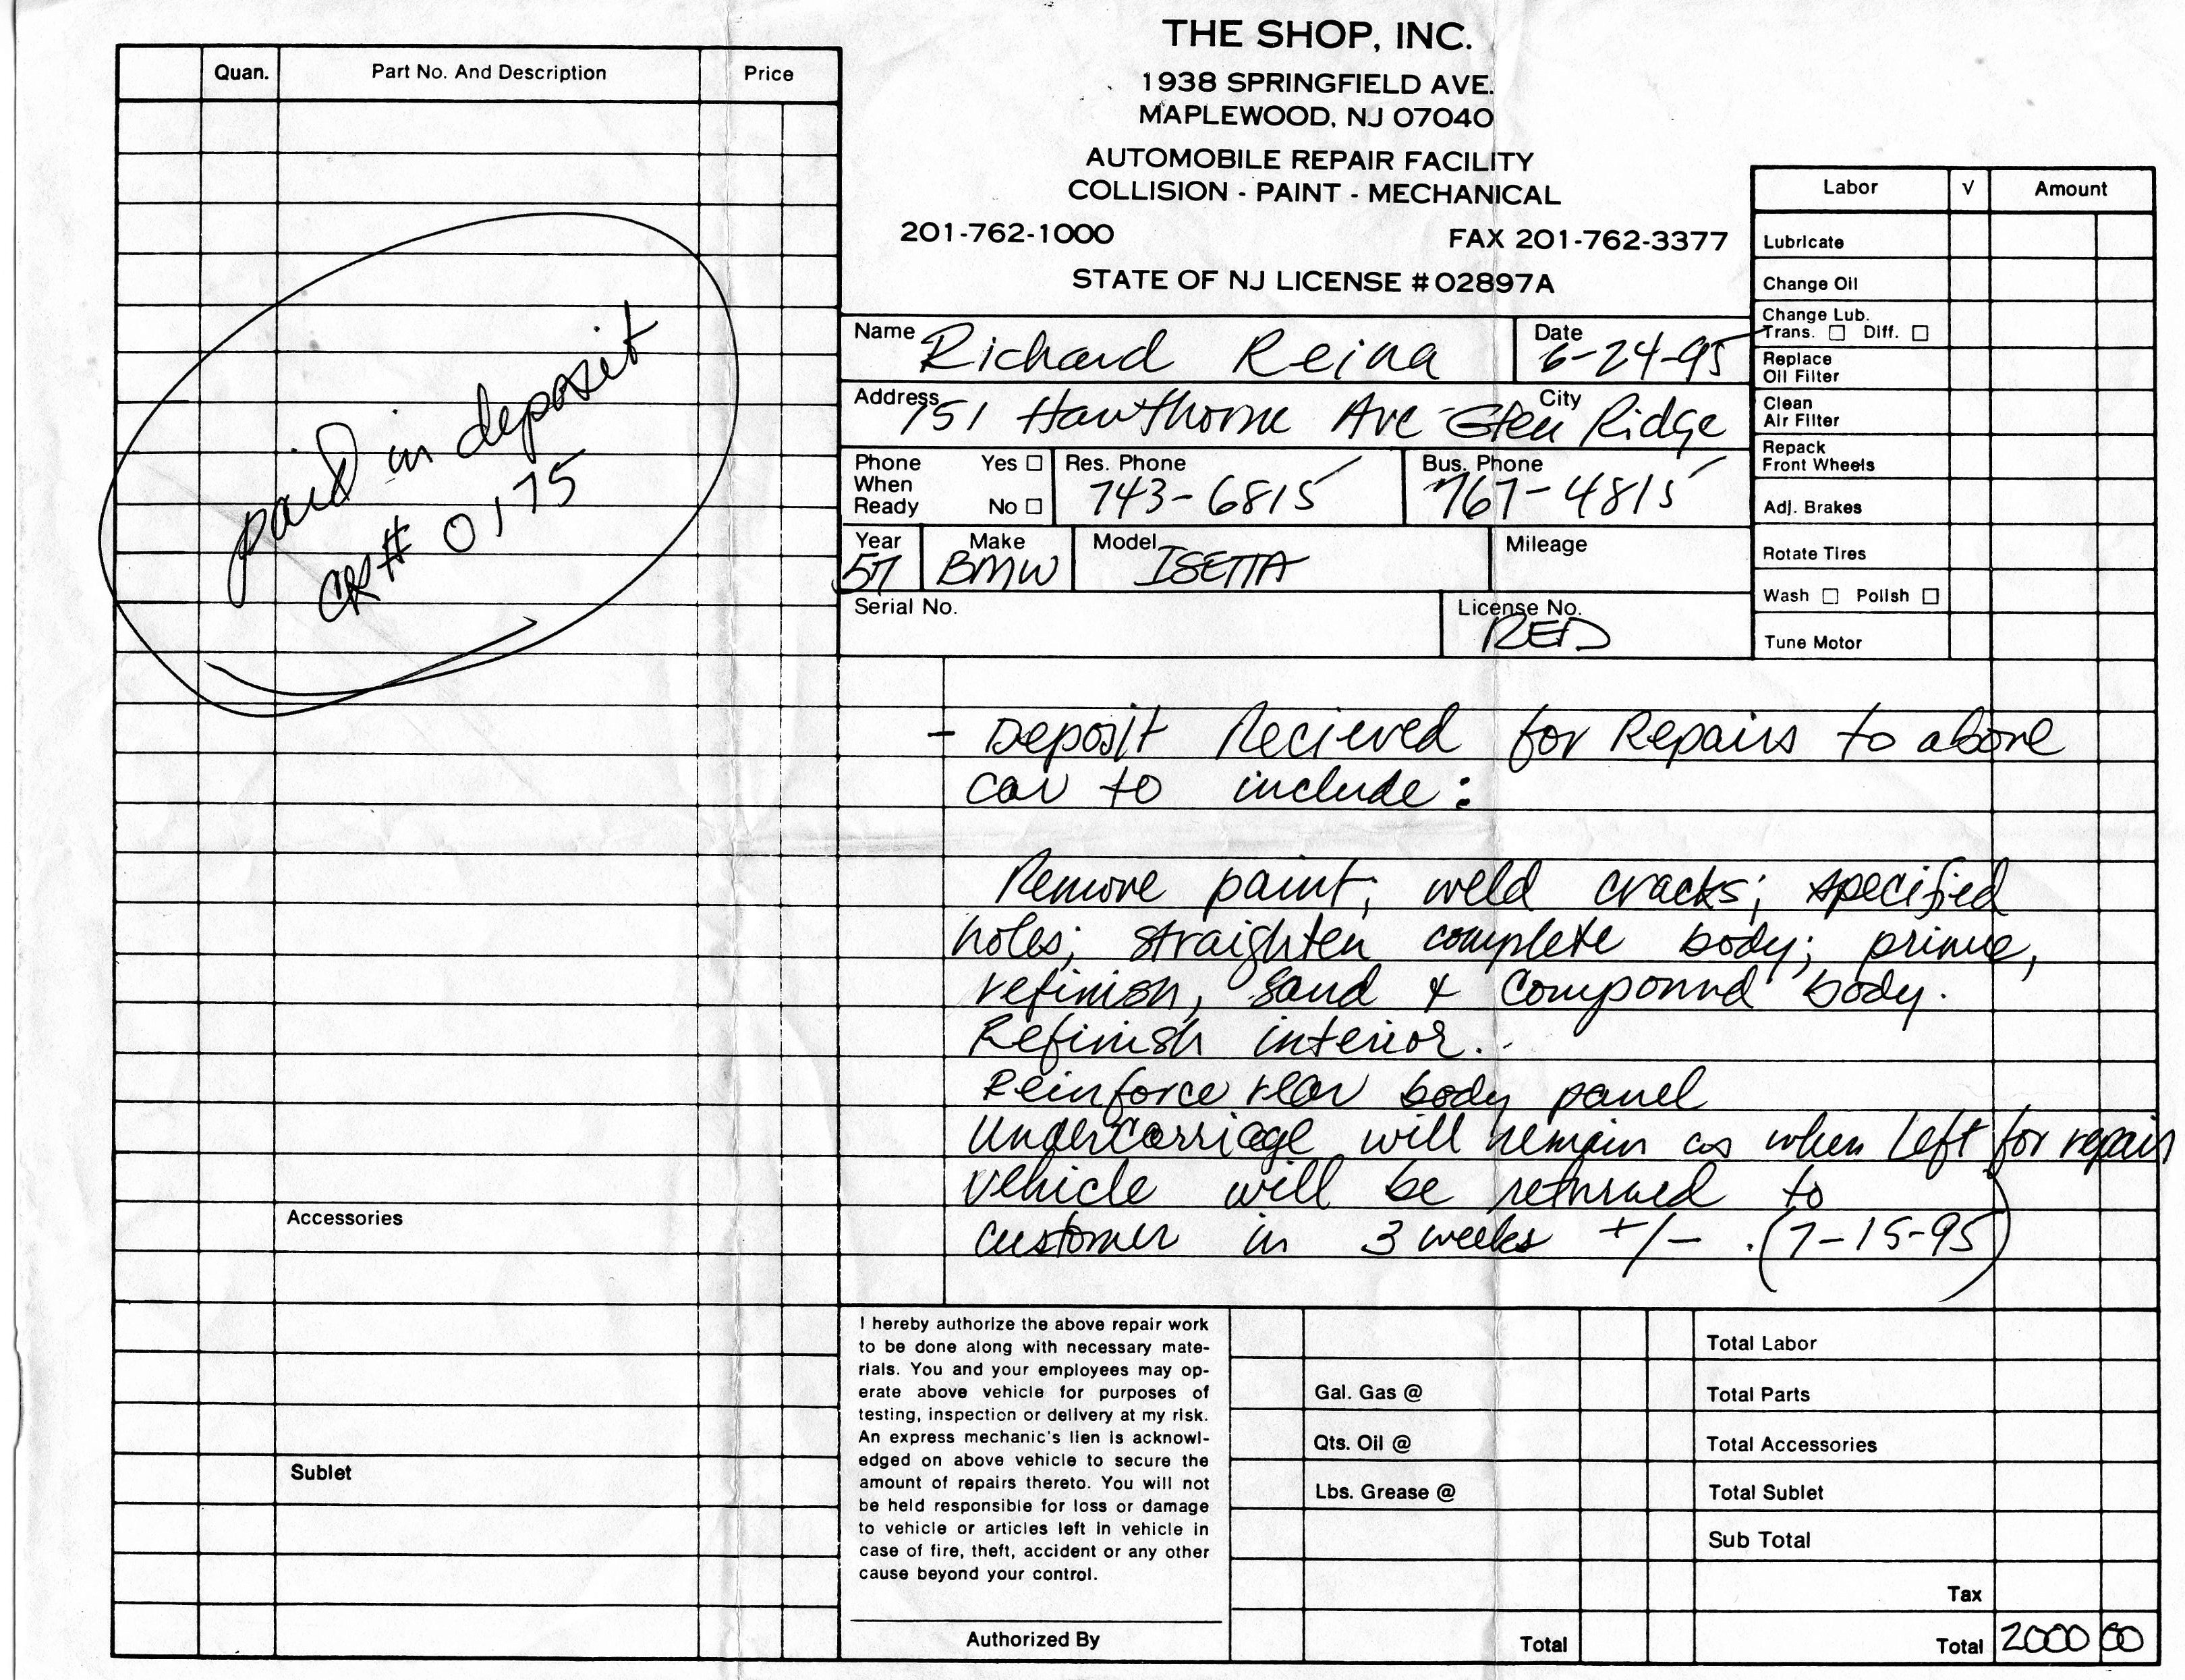
My Isetta log book contains this entry for Saturday, June 24, 1995:
Took body to “The Shop” in Maplewood NJ for body restoration. Est. time to complete = 3 wks. Est. price = $4000.
Deposit of $2000 paid at dropoff; balance due at completion
Now it was up to Jody. I think I went home and had a stiff drink.